Part 4: JWT Authentication, Decorators and Blacklisting Tokens

Photo by Alex Pudov on Unsplash
Tutorial Sections
- Project Overview
- Part 1: Project Setup and Environment Configuration
- Part 2: Database Models, Migrations and JWT Setup
- Part 3: API Configuration and User Registration
- Part 4: JWT Authentication, Decorators and Blacklisting Tokens
- Part 5: RESTful Resources and Advanced Request Parsing
- Part 6: Pagination, HATEOAS and Parameterized Testing
Table of Contents
Github Links for Part 4
Project Structure
The chart below shows the folder structure for this section of the tutorial. In this post, we will work on all files marked as NEW CODE. Files that contain code from previous sections but will not be modified in this post are marked as NO CHANGES.
. (project root folder) |- src | |- flask_api_tutorial | |- api | | |- auth | | | |- __init__.py | | | |- business.py | | | |- decorators.py | | | |- dto.py | | | |- endpoints.py | | | | | |- widgets | | | |- __init__.py | | | | | |- __init__.py | | |- exceptions.py | | | |- models | | |- __init__.py | | |- token_blacklist.py | | |- user.py | | | |- util | | |- __init__.py | | |- datetime_util.py | | |- result.py | | | |- __init__.py | |- config.py | |- tests | |- __init__.py | |- conftest.py | |- test_auth_login.py | |- test_auth_logout.py | |- test_auth_register.py | |- test_auth_user.py | |- test_config.py | |- test_user.py | |- util.py | |- .env |- .gitignore |- .pre-commit-config.yaml |- pyproject.toml |- pytest.ini |- README.md |- run.py |- setup.py |- tox.iniKEY:FOLDERNEW CODENO CHANGESEMPTY FILE
api.auth_login Endpoint
That last section ended up being a lot longer than I anticipated, but I don’t think the rest of the auth_ns endpoints will require the same amount of explanation since there’s no need to repeat the same information. Right off the bat, we do not need to create a RequestParser or API model since the api.auth_login endpoint can use the auth_reqparser to validate request data.
Why is this the case? The data required to register a new user or authenticate an existing user is the same: email address and password. With that out of the way, we can move on to defining the business logic needed to authenticate an existing user.
process_login_request Function
When a user sends a login request and their credentials are successfully validated, the server must return an HTTP response that includes an access token. As we saw when we implemented the registration process, any response that includes sensitive information (e.g., an access token) must satisfy all OAuth 2.0 requirements, which we thoroughly documented and implemented in Part 3. The implementation for the response to a successful login request will be nearly identical.
In observance of DRY, I decided to refactor the code that constructs the HTTP response out of the process_registration_request function (extracted to new method _create_auth_successful_response), in order to avoid repeating nearly the same code in process_login_request. I’ve provided the entire code for the updated version of src/flask_api_tutorial/api/auth/business.py below:
| |
With that taken care of, let’s take a look at the process_login_request function:
| |
The first thing we do in this function is call User.find_by_email with the email address provided by the user. If no user exists with this email address, the current request is aborted with a response including 401 HTTPStatus.UNAUTHORIZED.
If a user matching the provided email address was found in the database, we call check_password on the user instance, which verifies that the password provided by the user matches the password_hash value stored in the database. If the password does not match, the current request is aborted with a response including 401 HTTPStatus.UNAUTHORIZED.
If the password is verified, then the response is almost exactly the same as a successful response to a registration request — we create an access token for the user and include the token in the response. Also, we adhere to the requirements from RFC6749 which were fully explained earlier. The only difference is the status code (200 HTTPStatus.OK instead of 201 HTTPStatus.CREATED) and the message (“successfully logged in” instead of “successfully registered”).
LoginUser Resource
The API resource that processes login requests will be very similar to the RegisterUser resource. First, update the import statements in src/flask_api_tutorial/api/auth/endpoints.py to include the process_login_request function that we just created (Line 9):
| |
Next, add the content below and save the file:
| |
There are two minor differences in the implementation of the LoginUser resource and the RegisterUser resource:
Line 32: The
@auth_ns.routedecorator binds this resource to the/api/v1/auth/loginURL route.Line 37: The HTTP status codes for successfully registering a new user and successfully authenticating an existing user are 201
HTTPStatus.CREATEDand 200HTTPStatus.OK, respectively.
We can verify that the new route was correctly registered by running flask routes:
flask-api-tutorial $ flask routes
Endpoint             Methods  Rule
-------------------  -------  --------------------------
api.auth_login       POST     /api/v1/auth/login
api.auth_register    POST     /api/v1/auth/register
api.doc              GET      /api/v1/ui
api.root             GET      /api/v1/
api.specs            GET      /api/v1/swagger.json
restplus_doc.static  GET      /swaggerui/<path:filename>
static               GET      /static/<path:filename>
The Swagger UI should also be updated to include the new API endpoint:
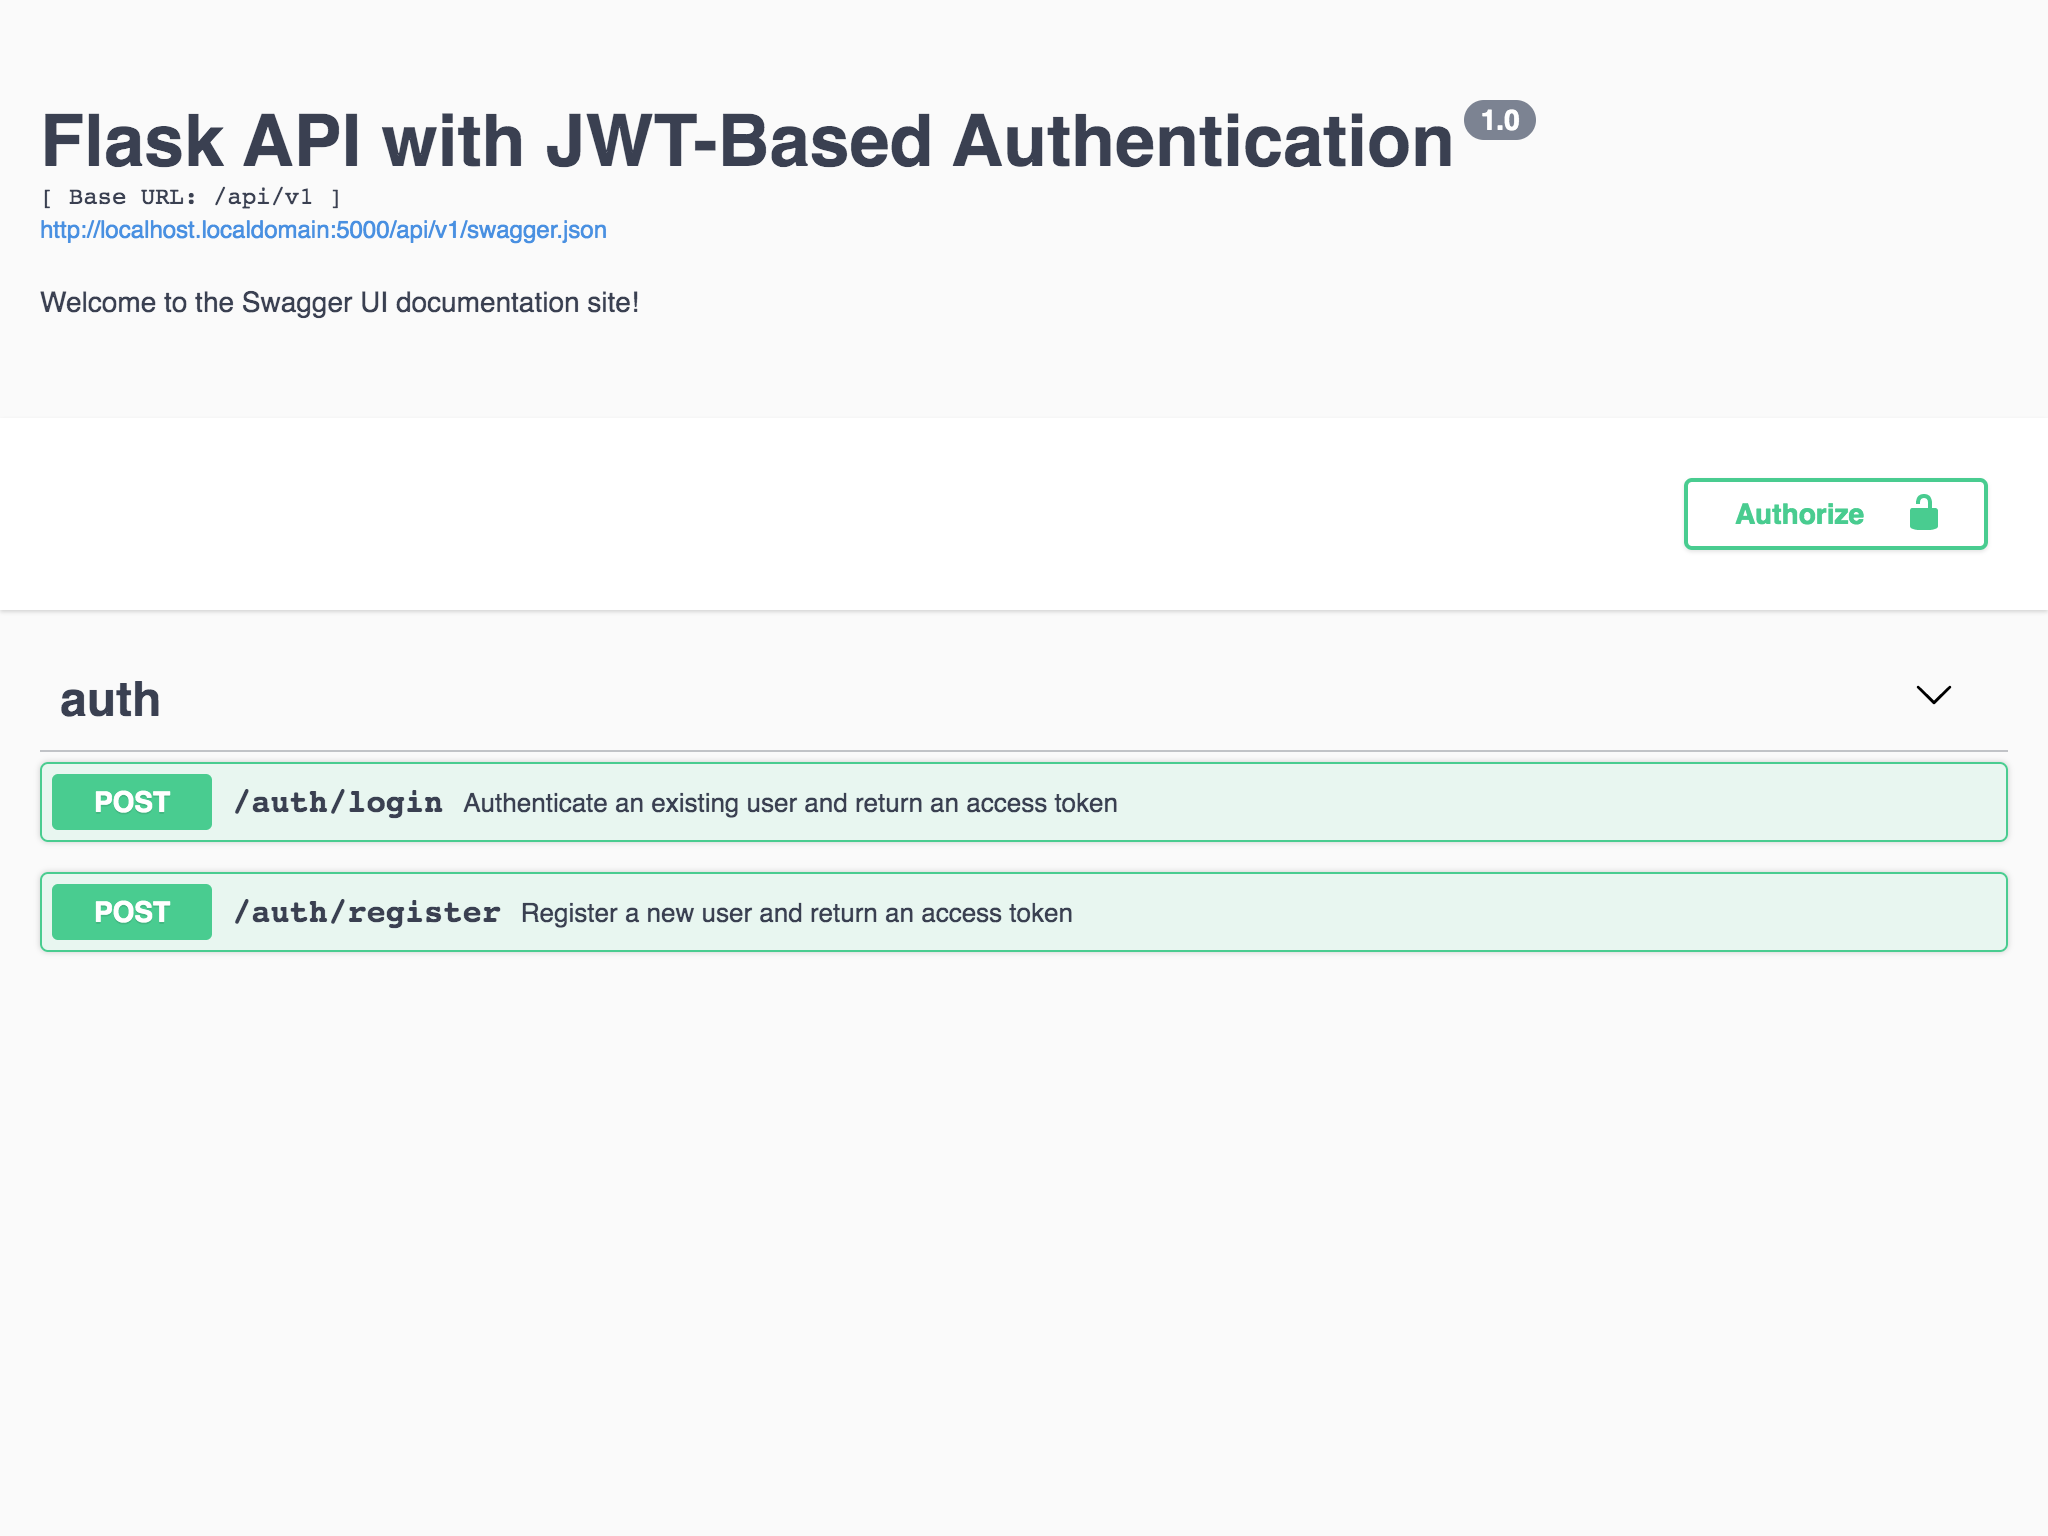
Figure 1 - Swagger UI with /auth/login endpoint
Finally, let’s create unit tests to verify the login process is working correctly.
Unit Tests: test_auth_login.py
First, we need to create a function that sends a post request to the new endpoint we just created. Since this function will be used by nearly all of our test cases, we place it in the tests/util.py file:
| |
Hopefully this looks familiar to you since it is nearly the same as the register_user function. Next, create a new file named test_auth_login.py in the tests folder, add the content below and save the file:
| |
Everything in this file should be simple to understand since it is so similar to the test set we just created. Run tox and make sure no failures occur.
Accessing Protected Resources
The two remaining API routes in the auth_ns namespace and all endpoints in the widget_ns namespace are protected resources, so called because any request sent by a client must include an access_token in JWT format in the request header’s Authorization field.
In Part 3, we discussed the required format for the server’s response to an authorization request (according to RFC6749 and RFC6750). The specification documents also define the required format for the server’s response to a request for a protected resource.
The server must validate the access_token, and if the token is valid/not expired and the user has the necessary access rights for the protected resource (e.g., administrator privileges), the request is considered successful. In this case, the format and content of the server’s response will depend on the resource and the HTTP method type requested by the client.
However, if the token is invalid/expired or there is some other issue preventing the request from succeeding, the server’s response will be the same regardless of the resource:
If a client sends a request for a protected resource without an
access_token, the server must reject the request and must not provide any explanation for why the request was rejected in the response header’sWWW-Authenticatefield. The status code of the response must be 401 (HTTPStatus.UNAUTHORIZED)If the protected resource request does not include authentication credentials or does not contain an access token that enables access to the protected resource, the resource server MUST include the HTTP "WWW-Authenticate" response header field ... If the request lacks any authentication information (e.g., the client was unaware that authentication is necessary or attempted using an unsupported authentication method), the resource server SHOULD NOT include an error code or other error information.
For example:
HTTP/1.1 401 Unauthorized
WWW-Authenticate: Bearer realm="example"
RFC6750 also states that
WWW-Authenticate: Bearer"MUST be followed by one or more auth-param values" and goes on to suggest that "a realm attribute MAY be included to indicate the scope of protection". Section 3.2.1 of RFC2167 (HTTP Authentication: Basic and Digest Access Authentication) defines the realm attribute:realm
A string to be displayed to users so they know which username and password to use. This string should contain at least the name of the host performing the authentication and might additionally indicate the collection of users who might have access. An example might be "registered_users@gotham.news.com".
If a request is received without an access token in the request header, the realm attribute in the WWW-Authenticate field of the response header will communicate the access level necessary for the requested resource — either
registered_users@mydomain.comoradmin_users@mydomain.com.If the token is invalid/expired, the server must reject the request and provide an
errorand/orerror_descriptionin the response header’sWWW-Authenticatefield explaining why the token is invalid. The status code of the response must be 401 (HTTPStatus.UNAUTHORIZED)If the protected resource request included an access token and failed authentication, the resource server SHOULD include the "error" attribute to provide the client with the reason why the access request was declined ... In addition, the resource server MAY include the "error_description" attribute to provide developers a human-readable explanation that is not meant to be displayed to end-users.
For example, ... in response to a protected resource request with an authentication attempt using an expired access token:
HTTP/1.1 401 Unauthorized
WWW-Authenticate: Bearer realm="example", error="invalid_token", error_description="The access token expired"
If a client sends a request for a protected resource and the token is valid/not expired, but it has been blacklisted, the server must reject the request and provide a message prompting the client to log in again. The status code of the response must be 401 (
HTTPStatus.UNAUTHORIZED)If a client sends a request to a protected resource that requires administrator privileges, and the token is valid/not expired but the user does not have administrator privileges, the server's response will be nearly the same as the response when the token is invalid/expired. The only difference is that the error code must be
insufficient_scope, and the status code of the response must be 403 (HTTPStatus.FORBIDDEN)insufficient_scope
The request requires higher privileges than provided by the access token. The resource server SHOULD respond with the HTTP 403 (Forbidden) status code and MAY include the "scope" attribute with the scope necessary to access the protected resource.
@token_required and @admin_token_required Decorators
We can implement the responses required when a request for a protected resource must be rejected with a pair of function decorators. It is important to understand how these decorators are designed and how this design is driven by the need to obey the specifications from RFC6750.
Create a new file named decorators.py in src/flask_api_tutorial/api/auth and add the content below:
| |
Line 6: The
ApiUnauthorizedandApiForbiddenclasses which are imported here have not been created yet, we will cover these next.Lines 10, 23: This module exposes two decorators,
@token_requiredand@admin_token_required. If access to a method/function needs to be restricted to users who have a validaccess_token, simply decorate it with@token_required. If access needs to be restricted solely to users who have a validaccess_tokenAND administrator privileges, decorate the method with@admin_token_requiredinstead.Lines 15, 28: The first thing both decorators do is call the
_check_access_tokenfunction. This function returns atoken_payloadobject if anaccess_tokenwas sent in the request header AND the token was successfully decoded. If noaccess_tokenwas sent or the token is invalid/expired, the current request is aborted.Line 39: Within the
_check_access_tokenfunction,requestis the globalflask.requestobject (imported in Line 4) which allows us to access the headers from the current request, among other things. For more info, check out the Flask docs.Lines 40-41: If no token is found in the header’s
Authorizationfield, the current request is aborted to prevent access to the requested resource.Line 42: If the request header does contain an
access_token, we attempt to verify and decode it. Remember, if the token is invalid/expired, then the value ofresult.failurewill beTrueandresult.errorwill contain a string value that explains why the validation failed.Lines 43-49: If the token is invalid/expired, we abort the current request. We will explain how the
ApiUnauthorizedclass is used shortly, but you probably noticed that we are providing values for more attributes in this instance than we did when we aborted the request in Line 41. What is the difference?In Line 41, we aborted the current request because the header’s
Authorizationfield did not contain anaccess_token. Per the specification, the server’s response should not contain an error code or other error information when this is the case.However, in Line 44, the client did send a token in the request header, but it was invalid/expired. In this case, the server’s response should include information explaining the reason why the request was denied. This information is contained in
result.error, and will be included in the server’s response since we are providing it to theApiUnauthorized__init__function.Line 50: If the
access_tokenwas successfully validated and decoded, then the JWT payload (which is stored inresult.value) is returned to the decorator function.Lines 29-30: Back in the
admin_token_requireddecorator, after successfully decoding the token payload, the first thing we do is check the value oftoken_payload["admin"], which tells us if the user has administrator privileges. If this value isFalse, then the request is rejected by callingApiForbidden.Lines 16-17, 31-32: Both decorators pass the contents of
token_payloadto the decorated function in the same way — by iterating over the dictionary items and (for each item) creating a new attribute on the decorated function (attribute name = dict item key, attribute value = dict item value). This allows the decorated function to access the user’spublic_id, theaccess_tokenstring value, etc.If that explanation was confusing, it should make more sense after we apply the decorator to a function and step through the code, which will happen very shortly.
Lines 20, 35: After the token has been decoded and passed to the wrapped function, the wrapped function is executed and returned to the code that originally called it.
ApiUnauthorized and ApiForbidden Exceptions
Next, let’s take a look at the custom HTTP exceptions that are used in our decorator functions. Create a new file named exceptions.py in src/flask_api_tutorial/api and add the content below:
| |
There are a few things to point out regarding the code above:
Line 2: The
werkzeug.exceptionsmodule contains Python exceptions that you can raise from application code to trigger standard non-200 responses. Bothwerkzeug.exceptions.Unauthorizedandwerkzeug.exceptions.Forbiddenare subclasses ofwerkzeug.exceptions.HTTPExceptionwith the value ofcodedefned as401and403, respectively.Both functions inherit the
get_headersmethod from theHTTPExceptionbase class, which returns a hard-coded value of[('Content-Type', 'text/html')]. We know that any response for a protected resource that is not successful MUST include the HTTPWWW-Authenticateresponse header field, per RFC6750.We can add the
WWW-Authenticatefield to the response header by subclassing thewerkzeugUnauthorizedandForbiddenclasses and overwriting theget_headersmethod.Lines 4-5: These are hard-coded values that are used for the value of the
realmattribute. If the resource that was requested requires administrator privileges, the value will be"admin_users@mydomain.com", if the resource only requires a valid token, the value will be"registered_users@mydomain.com".The values provided in this project are completely generic examples that should be customized to reflect your domain before deploying this API in the real-world.
Lines 8-36: Refer back to the
decorators.pyfile to see how we are raising theApiUnauthorizedexception. When the token fails validation, the reason for the failure is provided to both thedescriptionanderror_descriptionparameters, and these are used to construct the value of theWWW-Authenticateheader field.Line 39-53: The
ApiForbiddenimplementation is much simpler since the value of theWWW-Authenticateheader field does not change and can therefore be hardcoded to the value you see here.
Let’s see how we can apply the @token_required decorator to the remaining API endpoints since both rely upon the access_token being sent with the HTTP request.
api.auth_user Endpoint
The purpose of this endpoint is to verify that the access_token issued to the logged-in user is currently valid, and if so, to return a representation of the current user containing the email, public_id, admin and registered_on attributes from the User model class.
The way we implement this endpoint will demonstrate a few new concepts:
- How to create an API model and use it to serialize a database object to JSON, in order to send the database object in a HTTP response.
- How to use the
@token_requireddecorator - How to send requests from Swagger UI and httpie that include the
access_tokenin the request header.
user_model API Model
The first thing we need to do is create an API model for the User class. In src/flask_api_tutorial/api/auth/dto.py, update the import statements to include the Model class from flask_restx and the String and Boolean classes from the flask_restx.fields module (Lines 2-3):
| |
Next, add the content below and save the file:
| |
"User" is the name of the API Model, and this value will be used to identify the JSON object in the Swagger UI page. Please read the Flask-RESTx documentation for detailed examples of creating API models. Basically, an API model is a dictionary where the keys are the names of attributes on the object that we need to serialize, and the values are a class from the fields module that formats the value of the attibute on the object to ensure that it can be safely included in the HTTP response.
Any other attributes of the object are considered private and will not be included in the JSON. If the name of the attribute on the object is different than the name that you wish to use in the JSON, specify the name of the attribute on the object using the attribute parameter, which is what we are doing for registered_on in the code above (Line 22).
You may have noticed that the User class has attributes named registered_on and registered_on_str, a datetime and str value, respectively. registered_on_str is the datetime value formatted as a concise, easy-to-read string. We want to use the string version in our JSON, but would rather use registered_on as the name, rather than registered_on_str. Specifying attribute="registered_on_str" in the fields.String constructor achieves this.
The last attribute in the User API model is named token_expires_in, but the User db model does not contain an attribute that matches this in any way. So why would we define an API model with a value that doesn’t exist on the object being modeled?
Objects in Python are quite permissive due to the language’s dynamic nature. For example, you are free to create new attributes of your choosing on any object, and we will modify the User object to include an attribute named token_expires_in before we marshal the object to JSON and send it to the client. The value for this attribute will be a formatted string representing the timedelta until the token expires, which is available from the payload of the user’s access token after validating that the token is valid.
The Flask-RESTx docs contain a full list of the classes available in the `fields' module as well as instructions for creating a custom formatter.
get_logged_in_user Function
Our next task is to create the business logic for the api.auth_user endpoint. The first thing we need to do is verify that the access token included in the request is valid. Sounds like a job for the @token_required decorator!
Open src/flask_api_tutorial/api/auth/business.py and update the import statements to include the @token_required decorator and a few helper functions from the datetime_util module (Line 8 and Lines 10-13).
| |
Then, add the decorated function:
| |
Thanks to the @token_required decorator, if the request header does not contain an access token or the access token was sent but is invalid/expired, the get_logged_in_user function is never actually executed (unless a valid token is found, the current request is aborted before calling the wrapped function). So what’s the deal with Line 56 above? It isn’t very obvious, so let’s break it down line-by-line. First, look at the code for @token_required:
| |
After successfully decoding the token in Line 15, the function iterates over the items in token_payload. Each item’s name and value are then used to call setattr on decorated (remember, decorated is the wrapped function, in this case get_logged_in_user).
The code below shows the value of all local variables while iterating over the dictionary items within token_payload:
# f = <function get_logged_in_user at 0x1080a1ef0>
@wraps(f)
def decorated(*args, **kwargs):
    # decorated = <function get_logged_in_user at 0x1080a1f80>
    token_payload = _check_access_token(admin_only=False)
    # token_payload = {'public_id': '77e8570c-5432-4a5a-9a5d-71915604a0db', 'admin': False, 'token': 'eyJ0eXAiOiJKV1QiLCJhbGciOiJIUzI1NiJ9.eyJleHAiOjE...HNlfQ.wNvDzYMiY70wWm4xmt698G1WYgPPup6OH1NrcsfaXy0', 'expires_at': 1565075425}
    # len(token_payload) = 4
    for name, val in token_payload.items():
    # name = 'public_id'
    # val = '77e8570c-5432-4a5a-9a5d-71915604a0db'
        setattr(decorated, name, val)
        # decorated.public_id = '77e8570c-5432-4a5a-9a5d-71915604a0db'
    for name, val in token_payload.items():
    # name = 'admin'
    # val = False
        setattr(decorated, name, val)
        # decorated.admin = False
    for name, val in token_payload.items():
    # name = 'token'
    # val = 'eyJ0eXAiOiJKV1QiLCJhbGciOiJIUzI1NiJ9.eyJleHAiOjE...HNlfQ.wNvDzYMiY70wWm4xmt698G1WYgPPup6OH1NrcsfaXy0'
        setattr(decorated, name, val)
        # decorated.token = 'eyJ0eXAiOiJKV1QiLCJhbGciOiJIUzI1NiJ9.eyJleHAiOjE...HNlfQ.wNvDzYMiY70wWm4xmt698G1WYgPPup6OH1NrcsfaXy0'
    for name, val in token_payload.items():
    # name = 'expires_at'
    # val = 1565075425
        setattr(decorated, name, val)
        # decorated.expires_at = 1565075425
    return f(*args, **kwargs)
The important thing to grasp is that we are creating attributes on the get_logged_in_user function for each item in token_payload. I’ve isolated the lines from above that only report the value of the decorated object (which is the get_logged_in_user function):
# decorated = <function get_logged_in_user at 0x1080a1f80>
# decorated.public_id = '77e8570c-5432-4a5a-9a5d-71915604a0db
# decorated.admin = False
# decorated.token = 'eyJ0eXAiOiJKV1QiLCJhbGciOiJIUzI1NiJ9.eyJleHAiOjE...HNlfQ.wNvDzYMiY70wWm4xmt698G1WYgPPup6OH1NrcsfaXy0'
# decorated.expires_at = 1565075425
Let’s again look at the code for get_logged_in_user:
| |
Line 56: When this line is executed,
get_logged_in_user.public_idcontains the value oftoken_payload["public_id"], which was decoded from theaccess_tokensent in the request header.Line 57: Retrieve the
Userobject from the database that matches thepublic_iddecoded from the token.Lines 58:
get_logged_in_user.expires_atcontains the value oftoken_payload['expires_at'], which is a timestamp stored as an integer. This value determines when the token is considered to be expired.Lines 59: We can use the
remaining_fromtimestampfunction to calculate the time remaining until a token expires. Since this function returns atimespanobject (this is a custom namedtuple defined in thedatetime_utilmodule), we format it as a string value usingformat_timespan_digits.Finally, we store the formatted string in a new attribute named
token_expires_in, which we defined as a field in theuser_modelAPI model that we created in theflask_api_tutorial.api.auth.dtomodule.
Whew! That was a lot of detail for a simple function. The next step is to define the concrete Resource class for the api.auth_user endpoint.
GetUser Resource
Next, open src/flask_api_tutorial/api/auth/endpoints.py and update the import statements to include the user_model we created in the flask_api_tutorial.api.auth.dto module (Line 6) and the get_logged_in_user function we created in flask_api_tutorial.api.auth.business (Line 10). We also need to register user_model with the auth_ns namespace (Line 14):
| |
Next, add the content below and save the file (this is the same file, src/flask_api_tutorial/api/auth/endpoints.py):
| |
There are a few new concepts to note:
Line 55: When we configured the
apiobject, we specified that the Bearer authentication scheme would be used. In order to mark an HTTP method as a protected resource that requires authorization, we decorate the HTTP method with@auth_ns.docand set the value of thesecurityparameter to"Bearer".Line 56: The
@auth_ns.responsedecorator can be configured with an API model as an optional third argument. This has no effect on the resource's behavior, but the API model is displayed on the Swagger UI page as an example response body for requests that produce a status code 200HTTPStatus.OK.Line 59: The
@auth_ns.marshal_withdecorator is how we tell Flask-RESTx to filter the data returned from this method against the provided API model (user_model), and validate the data against the set of fields configured in the API model.Line 62: Remember,
get_logged_in_userreturns aUserobject. Without the@marshal_withdecorator, this would produce a server error since we are not returning an HTTP response object as expected. The@marshal_withdecorator creates the JSON using theuser_modeland assigns status code 200HTTPStatus.OKbefore returning the response.
We can verify that the new route was correctly registered by running flask routes:
flask-api-tutorial $ flask routes
Endpoint             Methods  Rule
-------------------  -------  --------------------------
api.auth_login       POST     /api/v1/auth/login
api.auth_register    POST     /api/v1/auth/register
api.auth_user        GET      /api/v1/auth/user
api.doc              GET      /api/v1/ui
api.root             GET      /api/v1/
api.specs            GET      /api/v1/swagger.json
restplus_doc.static  GET      /swaggerui/<path:filename>
static               GET      /static/<path:filename>
By now, you should know what’s next: unit tests for the api.auth_user endpoint.
Unit Tests: test_auth_user.py
As with the two previous API endpoints, before we write any test cases we need to update the tests/util.py file with any error/success message string values and functions that will be re-used across the test set. Add WWW_AUTH_NO_TOKEN on Line 7:
| |
Then, create a function to send a GET request to the api.auth_user endpoint. Open the tests/util.py file and add the function below:
| |
Up to this point, we have used the test client to only send POST requests, however the api.auth_user endpoint only responds to GET requests. To accomplish this, we simply use the test client’s get method rather than the post method.
The api.auth_user endpoint requires a valid access token to be included in the request header’s Authorization field. We have already used dict objects to construct response headers, and we can also use a dict as the value of the headers argument. The access_token is provided as a parameter to the get_user function, and the format of the Authorization field is specified in Section 2.1 of RFC6750: “Bearer” plus a single whitespace followed by the access token in url-safe base64 encoding.
Next, create a new file named test_auth_user.py in the tests folder, add the content below and save the file:
| |
test_auth_user is the “happy path” for the api.auth_user endpoint, so we start by registering a new user and logging in. The response from the login request contains an access token, so we retrieve it and send it with the request to get the logged-in user info.
After verifying that the response from the api.auth_user endpoint indicates the request was successful, we check that the response includes the correct user info. Since the response includes the user email and the admin flag, we verify that the email matches the email address we used to register the user and the admin flag should be False.
I’m sure by now you’re getting used to the pattern I use to write test cases. Since we created the test case for the happy path, it’s time to think about all the ways we could send a request that does not succeed. Since api.auth_user is a protected resource, we should get an error if we send a GET request without an access token in the request header.
First, update the import statements to include WWW_AUTH_NO_TOKEN from tests.util (Line 6). This is the value we expect to receive in the WWW-Authenticate header field if a request is sent to a protected resource without an access token.
| |
Copy the test case below and add it to test_auth_user.py:
| |
There are a few things to note about this test case:
Line 21: The first thing we do is send a
GETrequest using the test client to theapi.auth_userendpoint without any headers.Line 22: The expected response code when a request is sent to a protected resource without an access token is 401
HTTPStatus.UNAUTHORIZED.Lines 23-24: These two lines verify that the status and message attributes exist in the response JSON and that the values indicate that the request did not succeed because the requested resource requires authorization which was not included in the request.
Lines 25: We previously explained the different values that the
WWW-Authenticateheader must include based on whether or not the request was successfully authorized, so please refer back to the Decorators section if you are unclear why this is the expected value.When a request for a protected resource does not include an access token,
WWW-Authenticatemust only include the realm attribute and must not contain any error information.
Let’s do one more. In Part 2, when we created test cases for the User class we used the time.sleep method to cause an access token to expire. If we send a request to the api.auth_user endpoint with an expired token, we should receive an error indicating that the token is expired.
First, add the highlighted string values to test_auth_user.py after the import statements (Lines 8-13):
| |
Then, add the content below:
| |
As always, please note the following:
Lines 36-39: The first four lines of this test case are the same as the happy path test case
test_auth_user. We register a new user, login and retrieve theaccess_tokenfrom the sucessful login response.Lines 40: We suspend execution of the test case for six seconds to ensure the access token is expired.
Line 42: The expected response code when a request is sent to a protected resource with an expired access token is 401
HTTPStatus.UNAUTHORIZED.Lines 43-44: These two lines verify that the status and message attributes exist in the response JSON and that the values indicate that the request did not succeed because the access token sent by the client is expired.
Lines 45: We verify that the
WWW-Authenticateheader contains the realm attribute as well as the error attribute and the error_description attribute.
How To: Request a Protected Resource
We just demonstrated how to make a request for a protected resource in code (using the Flask test client). But, for ad hoc testing it would be nice to be able to send requests and include an access token using Swagger UI or a command-line tool like httpie. Let’s go through the process for both tools.
Swagger UI
Did you check out the Swagger UI page after implementing the /auth/user endpoint? Fire up the development server with flask run and navigate to http://localhost:5000/api/v1/ui:
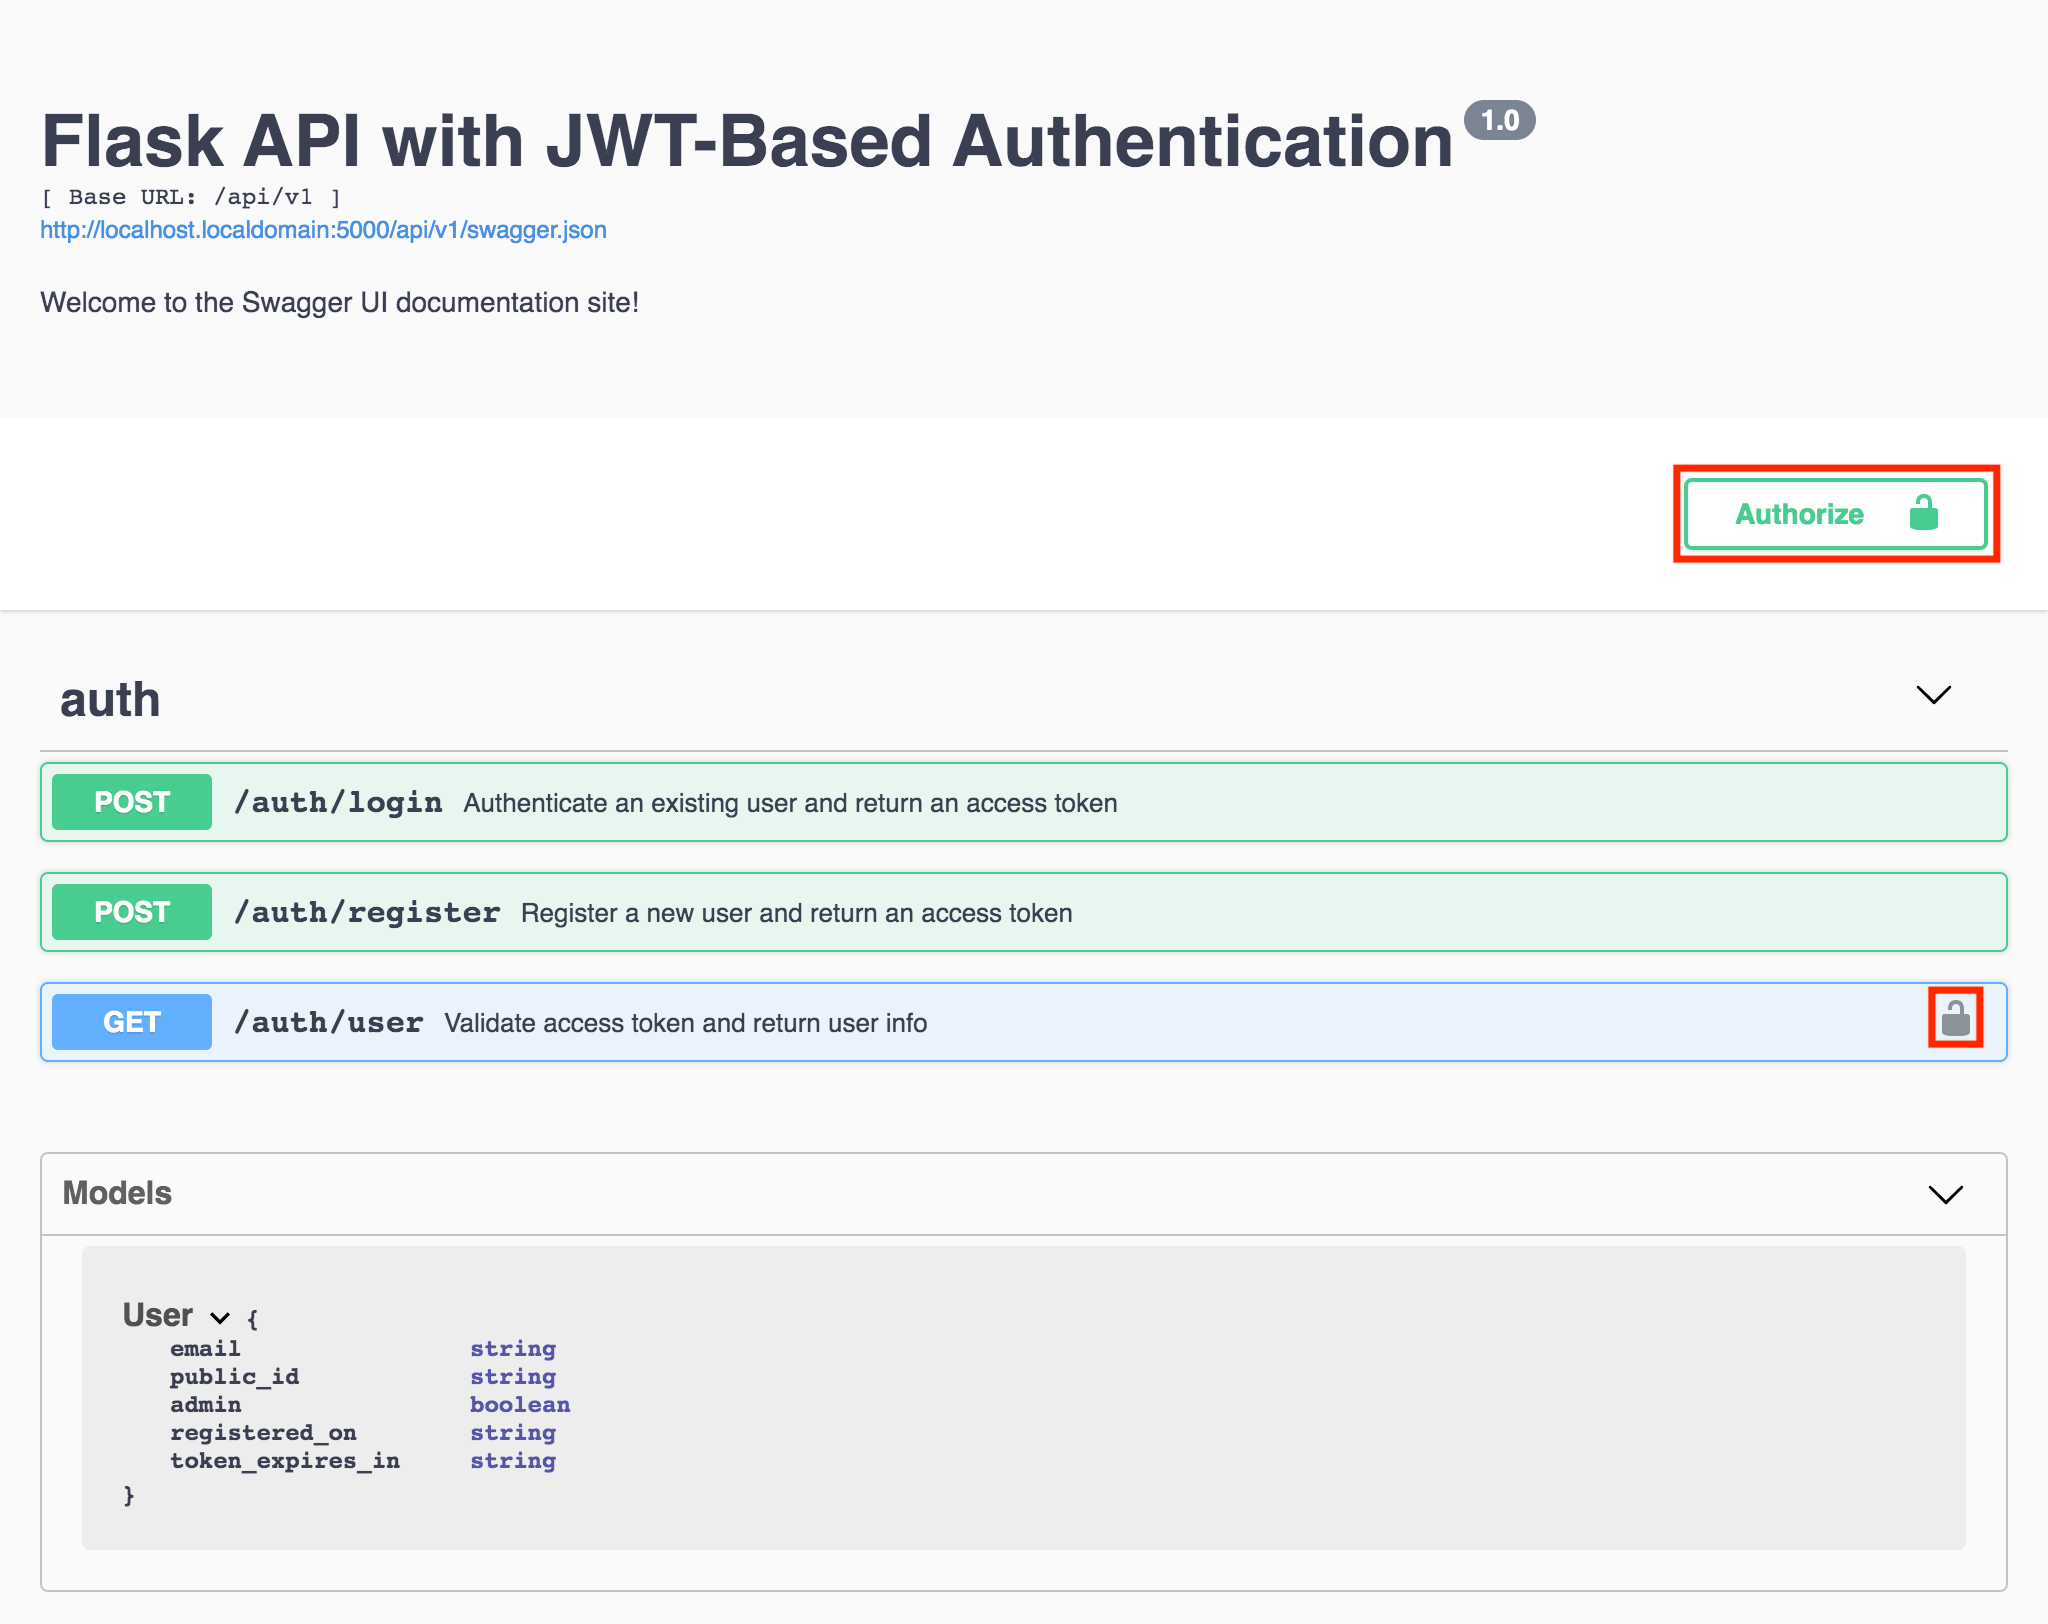
Figure 2 - Swagger UI with /auth/user endpoint
You may have already seen this and wondered, why is the GET /auth/user component the only one with a lock icon (), or more accurately, a unlocked lock icon? And does it have anything to do with that button labeled Authorize that also has a lock icon?
The two are in fact related. The lock icon indicates that the API endpoint requires authorization, and the GET /auth/user component is the only one with a lock icon because the GetUser.get method is the only resource method that we decorated with @doc(security="Bearer"). “Bearer” is the name of the security object that we created in src/flask_api_tutorial/api/__init__.py and provided to the Api constructor, which causes the Authorize button to appear.
Let’s see what happens if we attempt to send a request to /auth/user as the component is currently configured. First, expand the component by clicking anywhere on the blue bar, click Try it out, then click Execute:
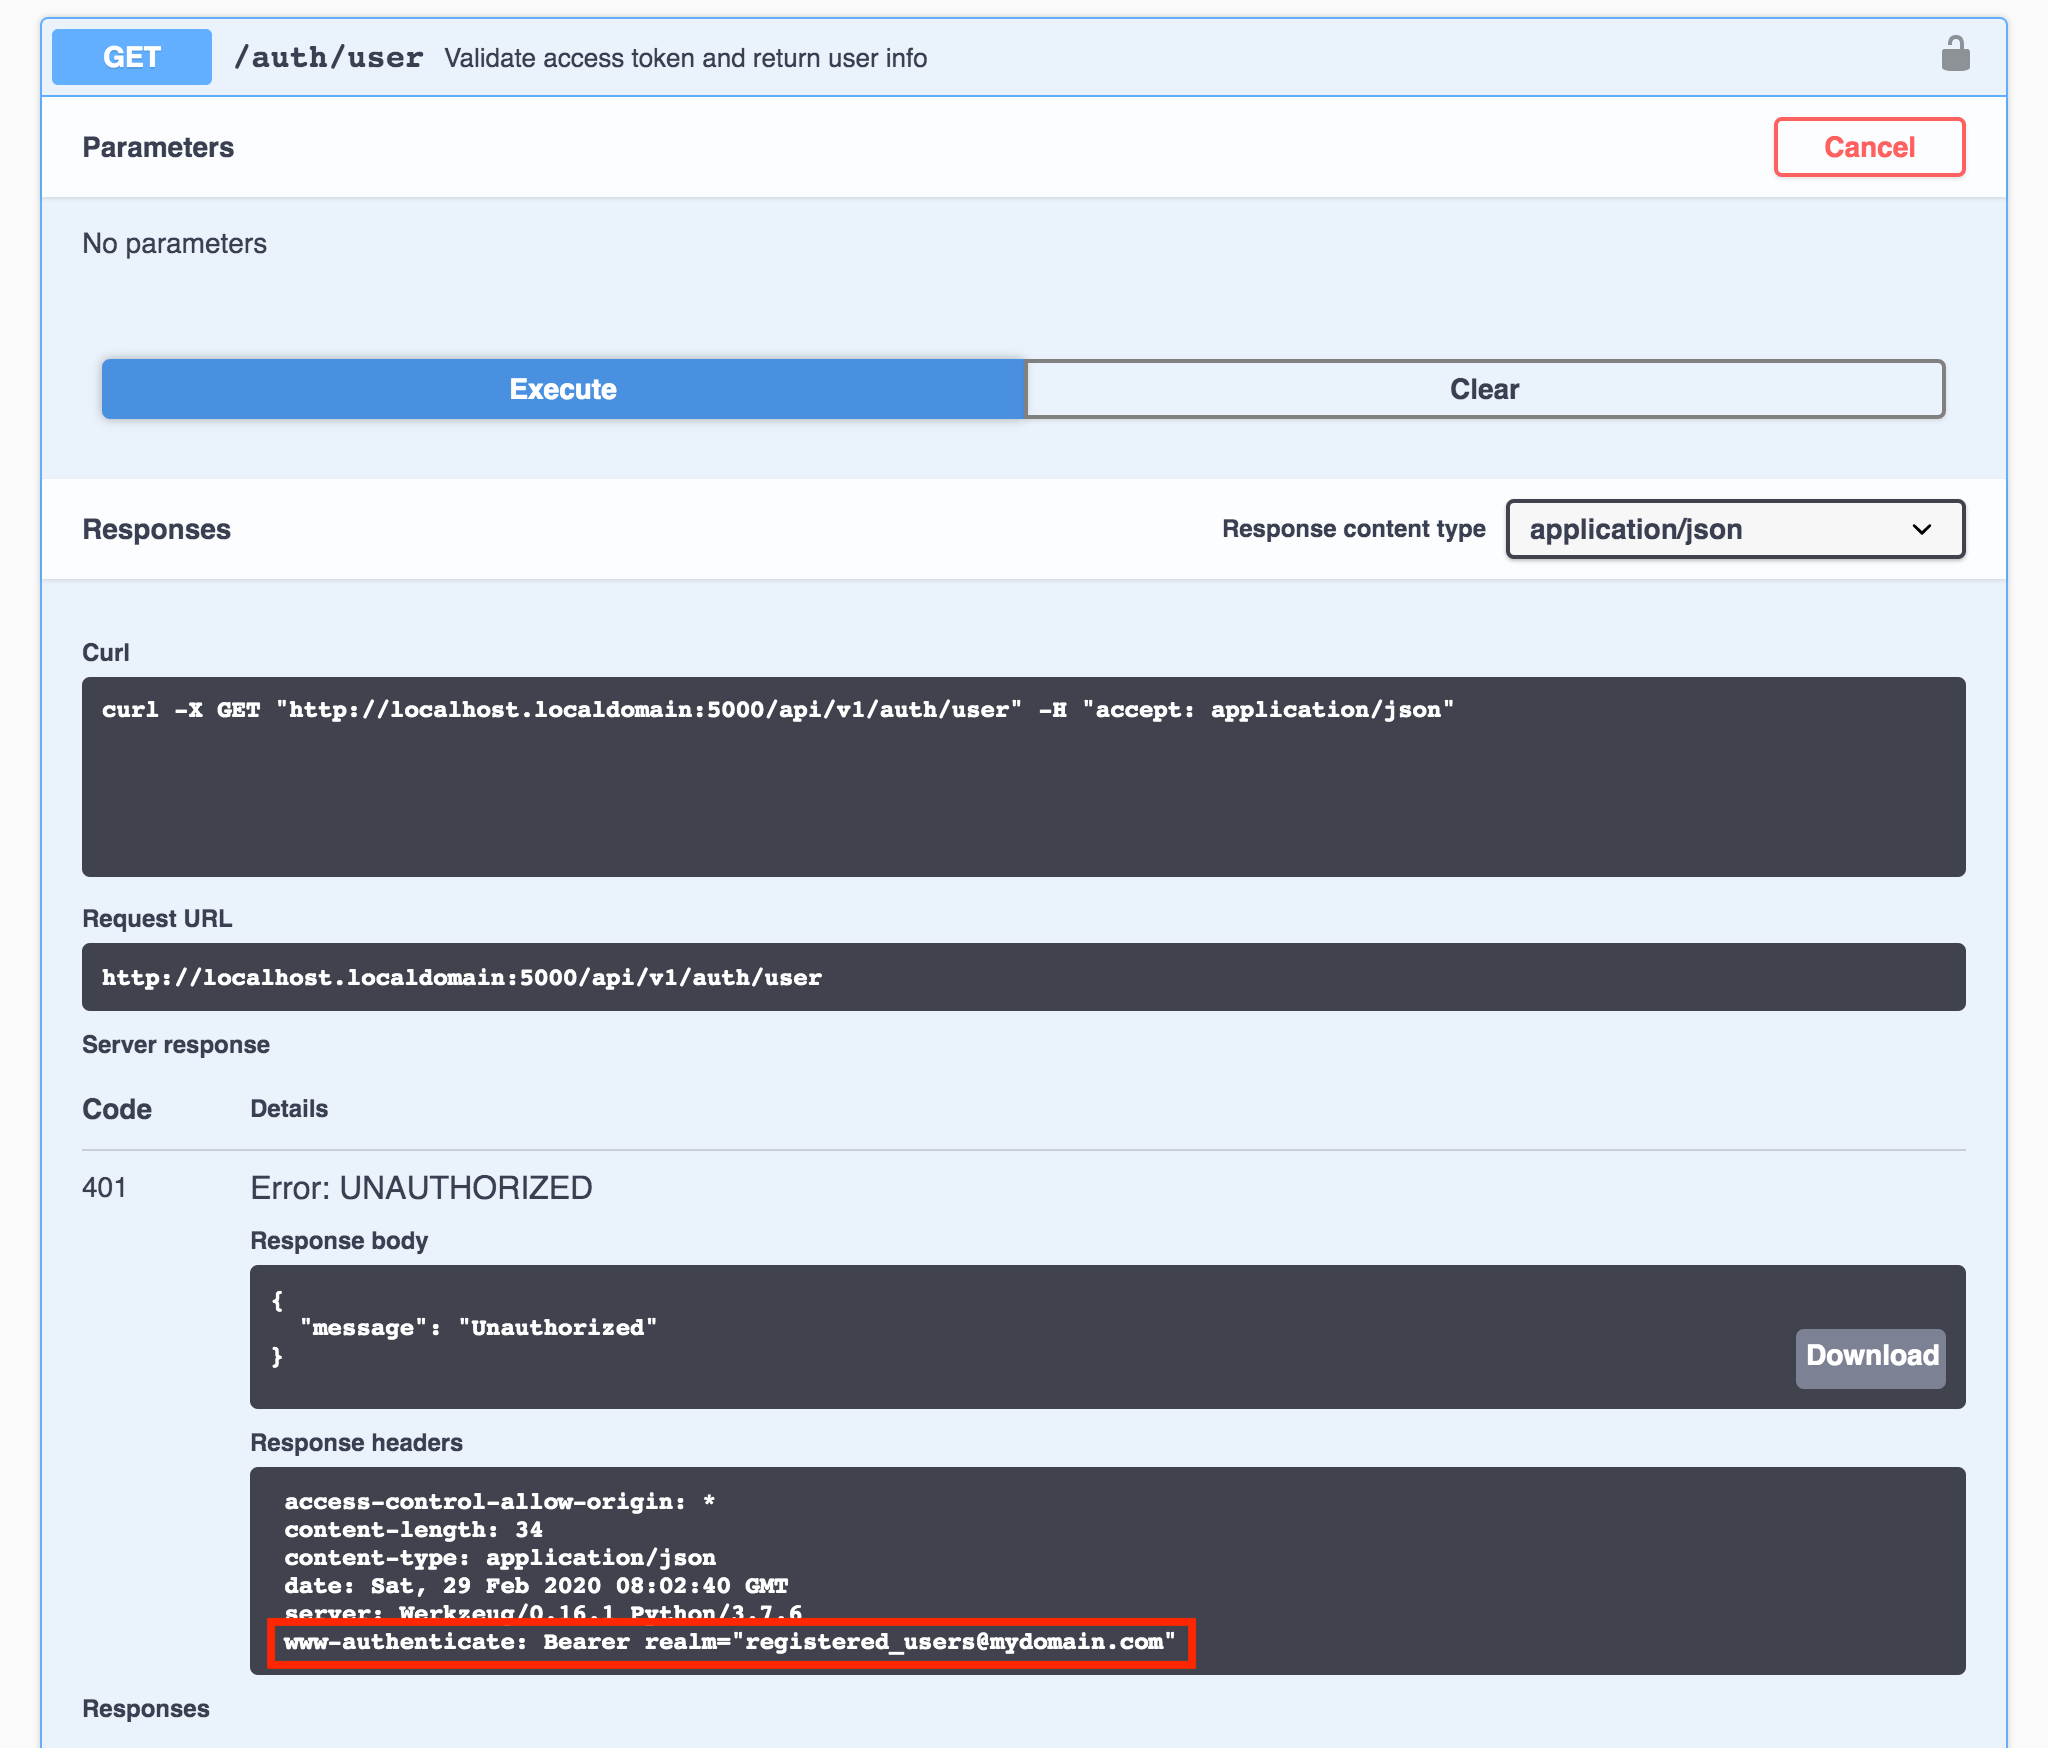
Figure 3 - Endpoint requires authorization (Swagger UI)
We already knew that this would be the response since we created a test case (test_auth_user_no_token) to verify that sending a request to the api.auth_user endpoint without an access token would not succeed. So how do we get an access token and how do we send it in the request header with Swagger UI?
Getting an access token is easy, just register a new user OR login with an existing user and the response will include a token in the access_token field. Copy the access token from the Response body text box:
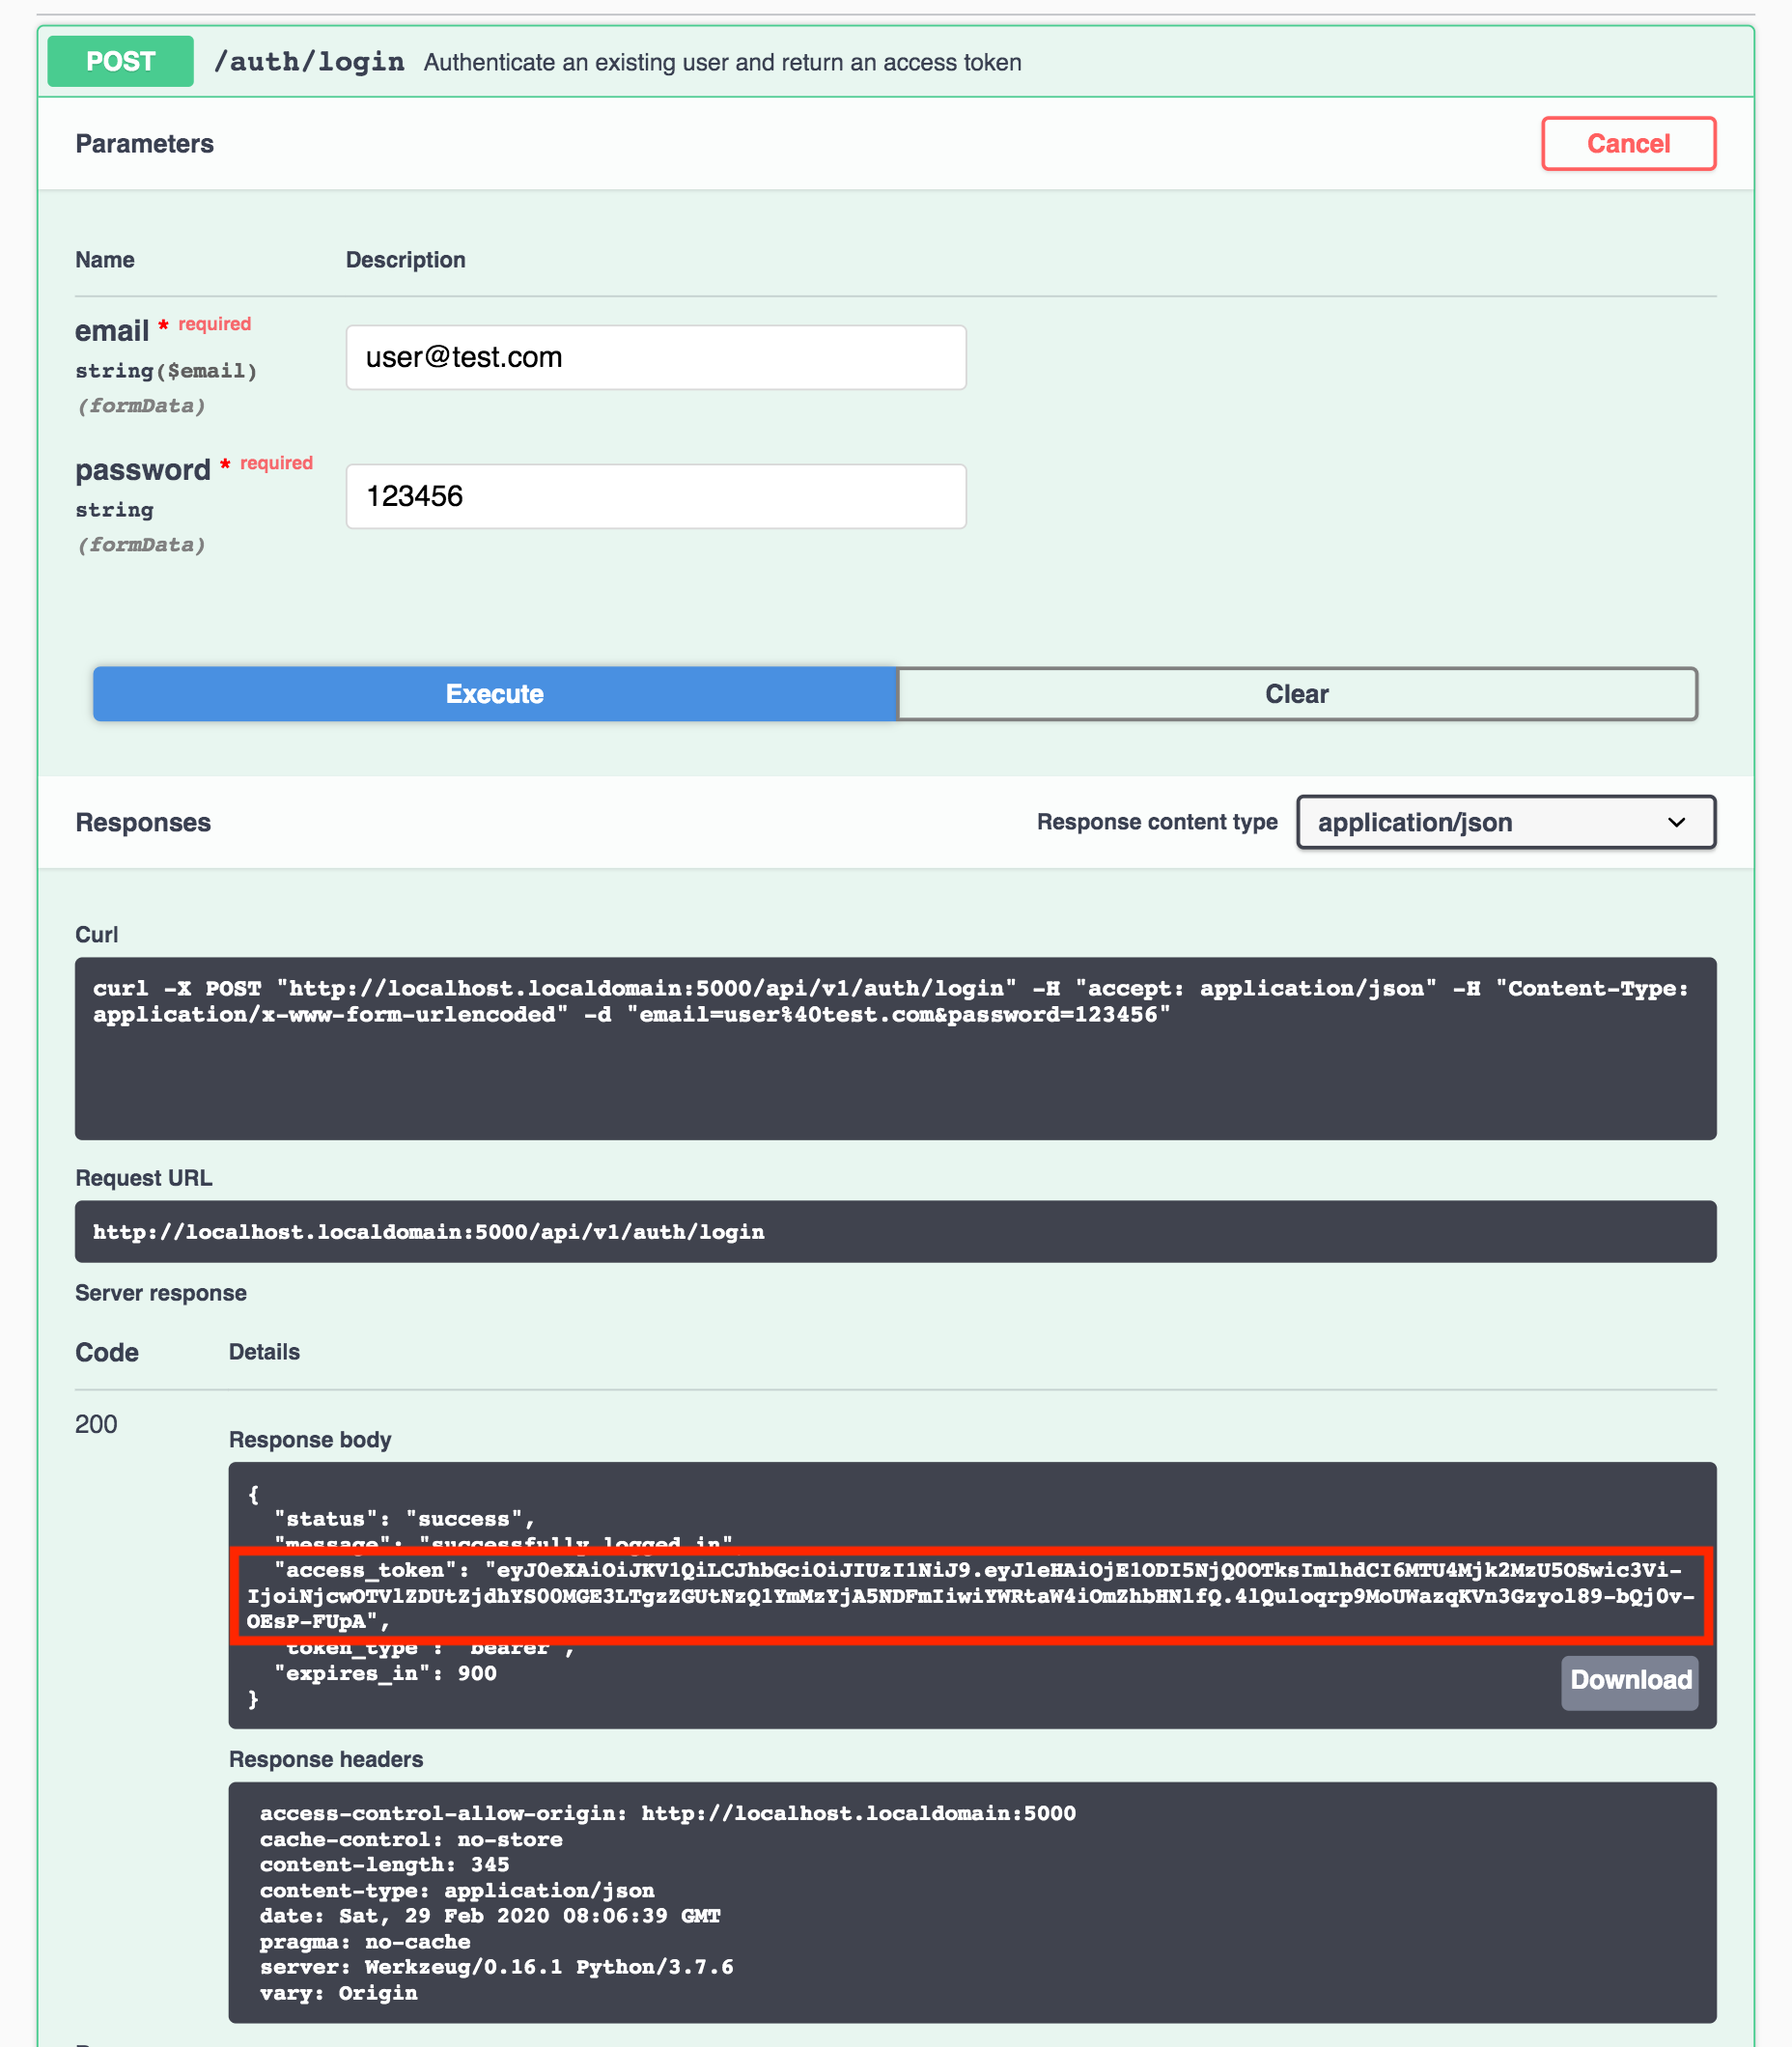
Figure 4 - Retrieve access token from response body (Swagger UI)
Next, click the Authorize button above the API routes (1). A dialog box will appear titled Avaialable authorizations. Paste the access token that was copied from the Response body text box into the Value text box in the dialog (2). Click Authorize (3):
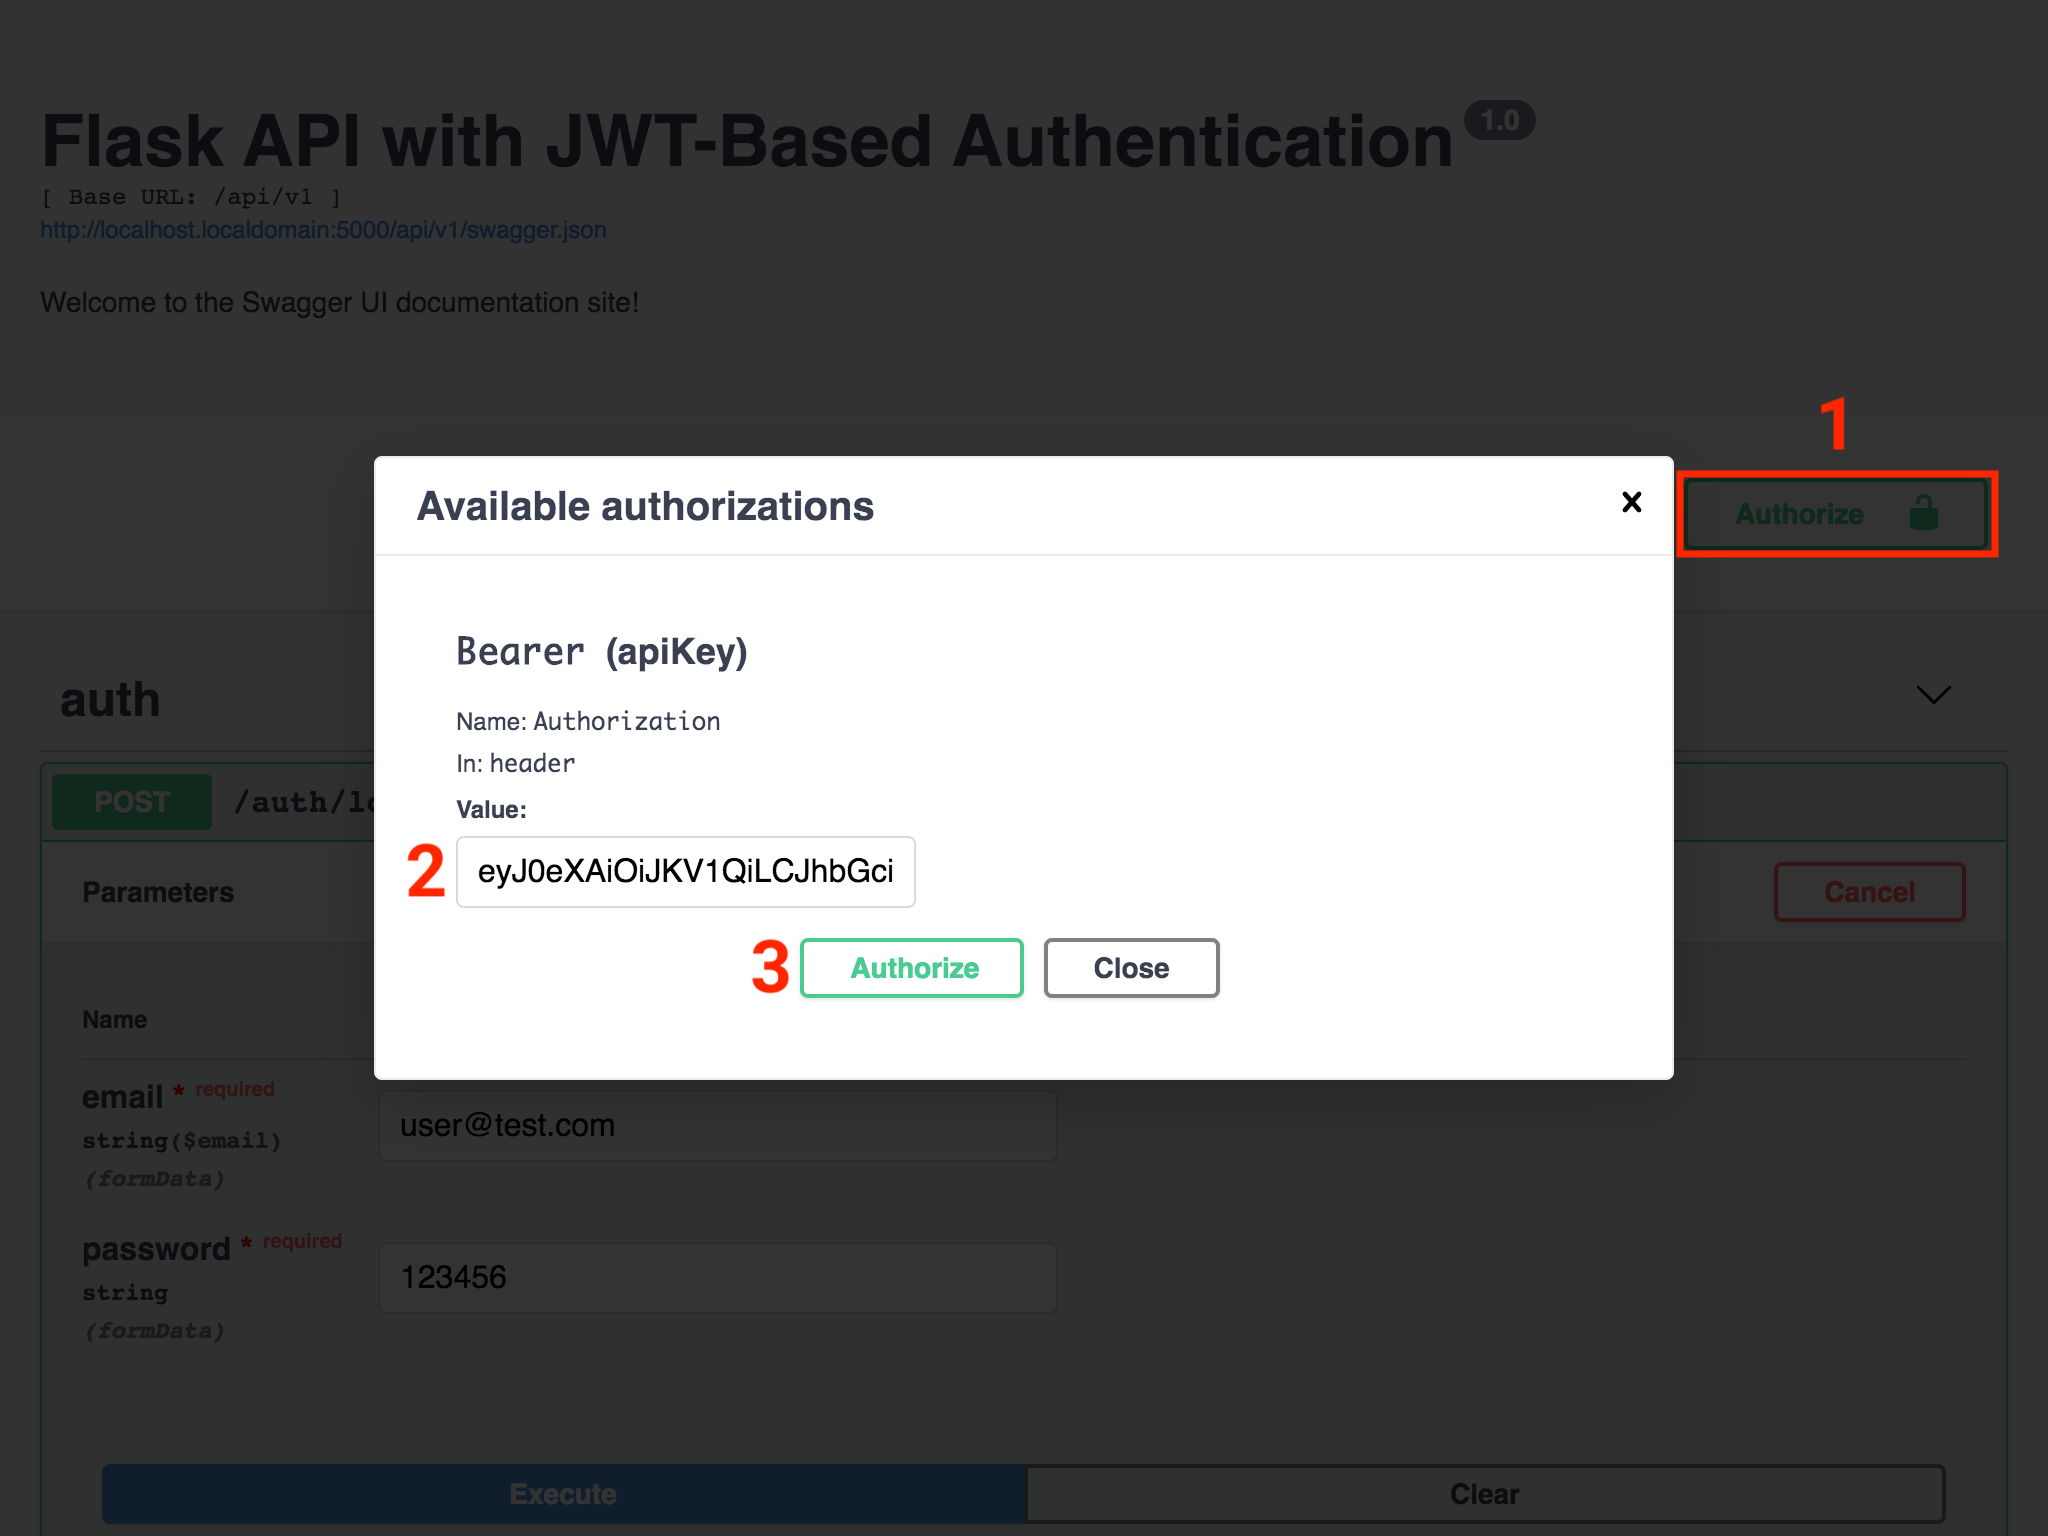
Figure 5 - Configure Swagger UI access token
After clicking Authorize, the button text changes to Logout, and the Value text box is replaced by a label of asterisk characters (see below). Click Close to dismiss the dialog and return to the Swagger UI:
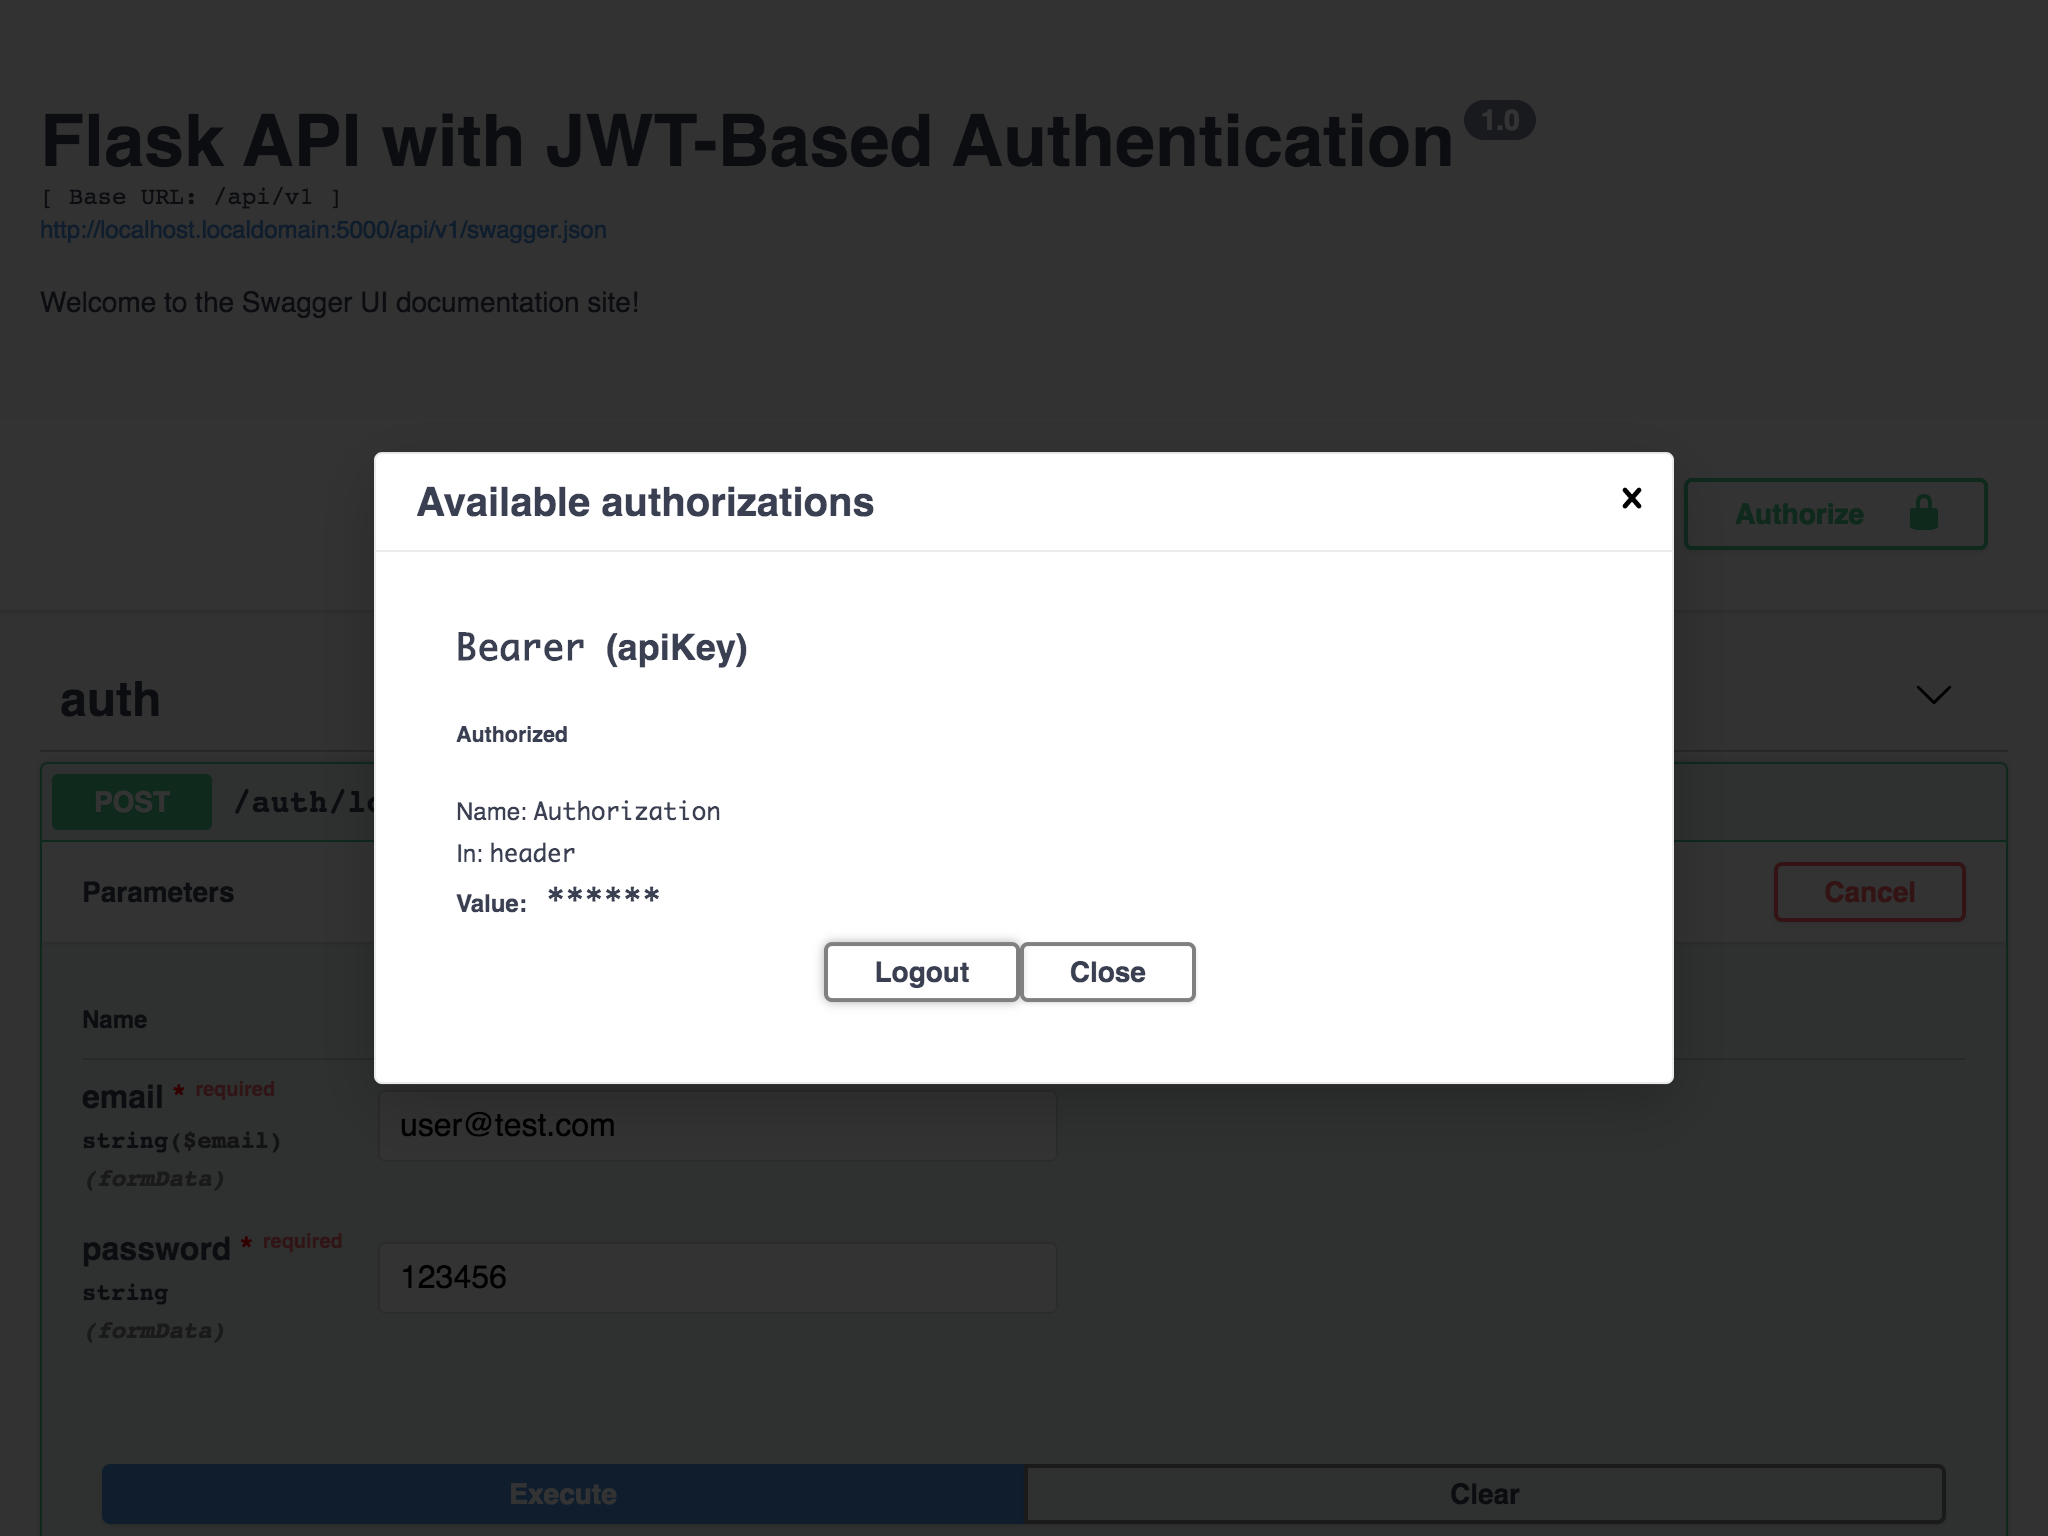
Figure 6 - Access token configuration complete
Notice that with the access token successfully configured, the lock icons have changed from being unlocked () to locked ():
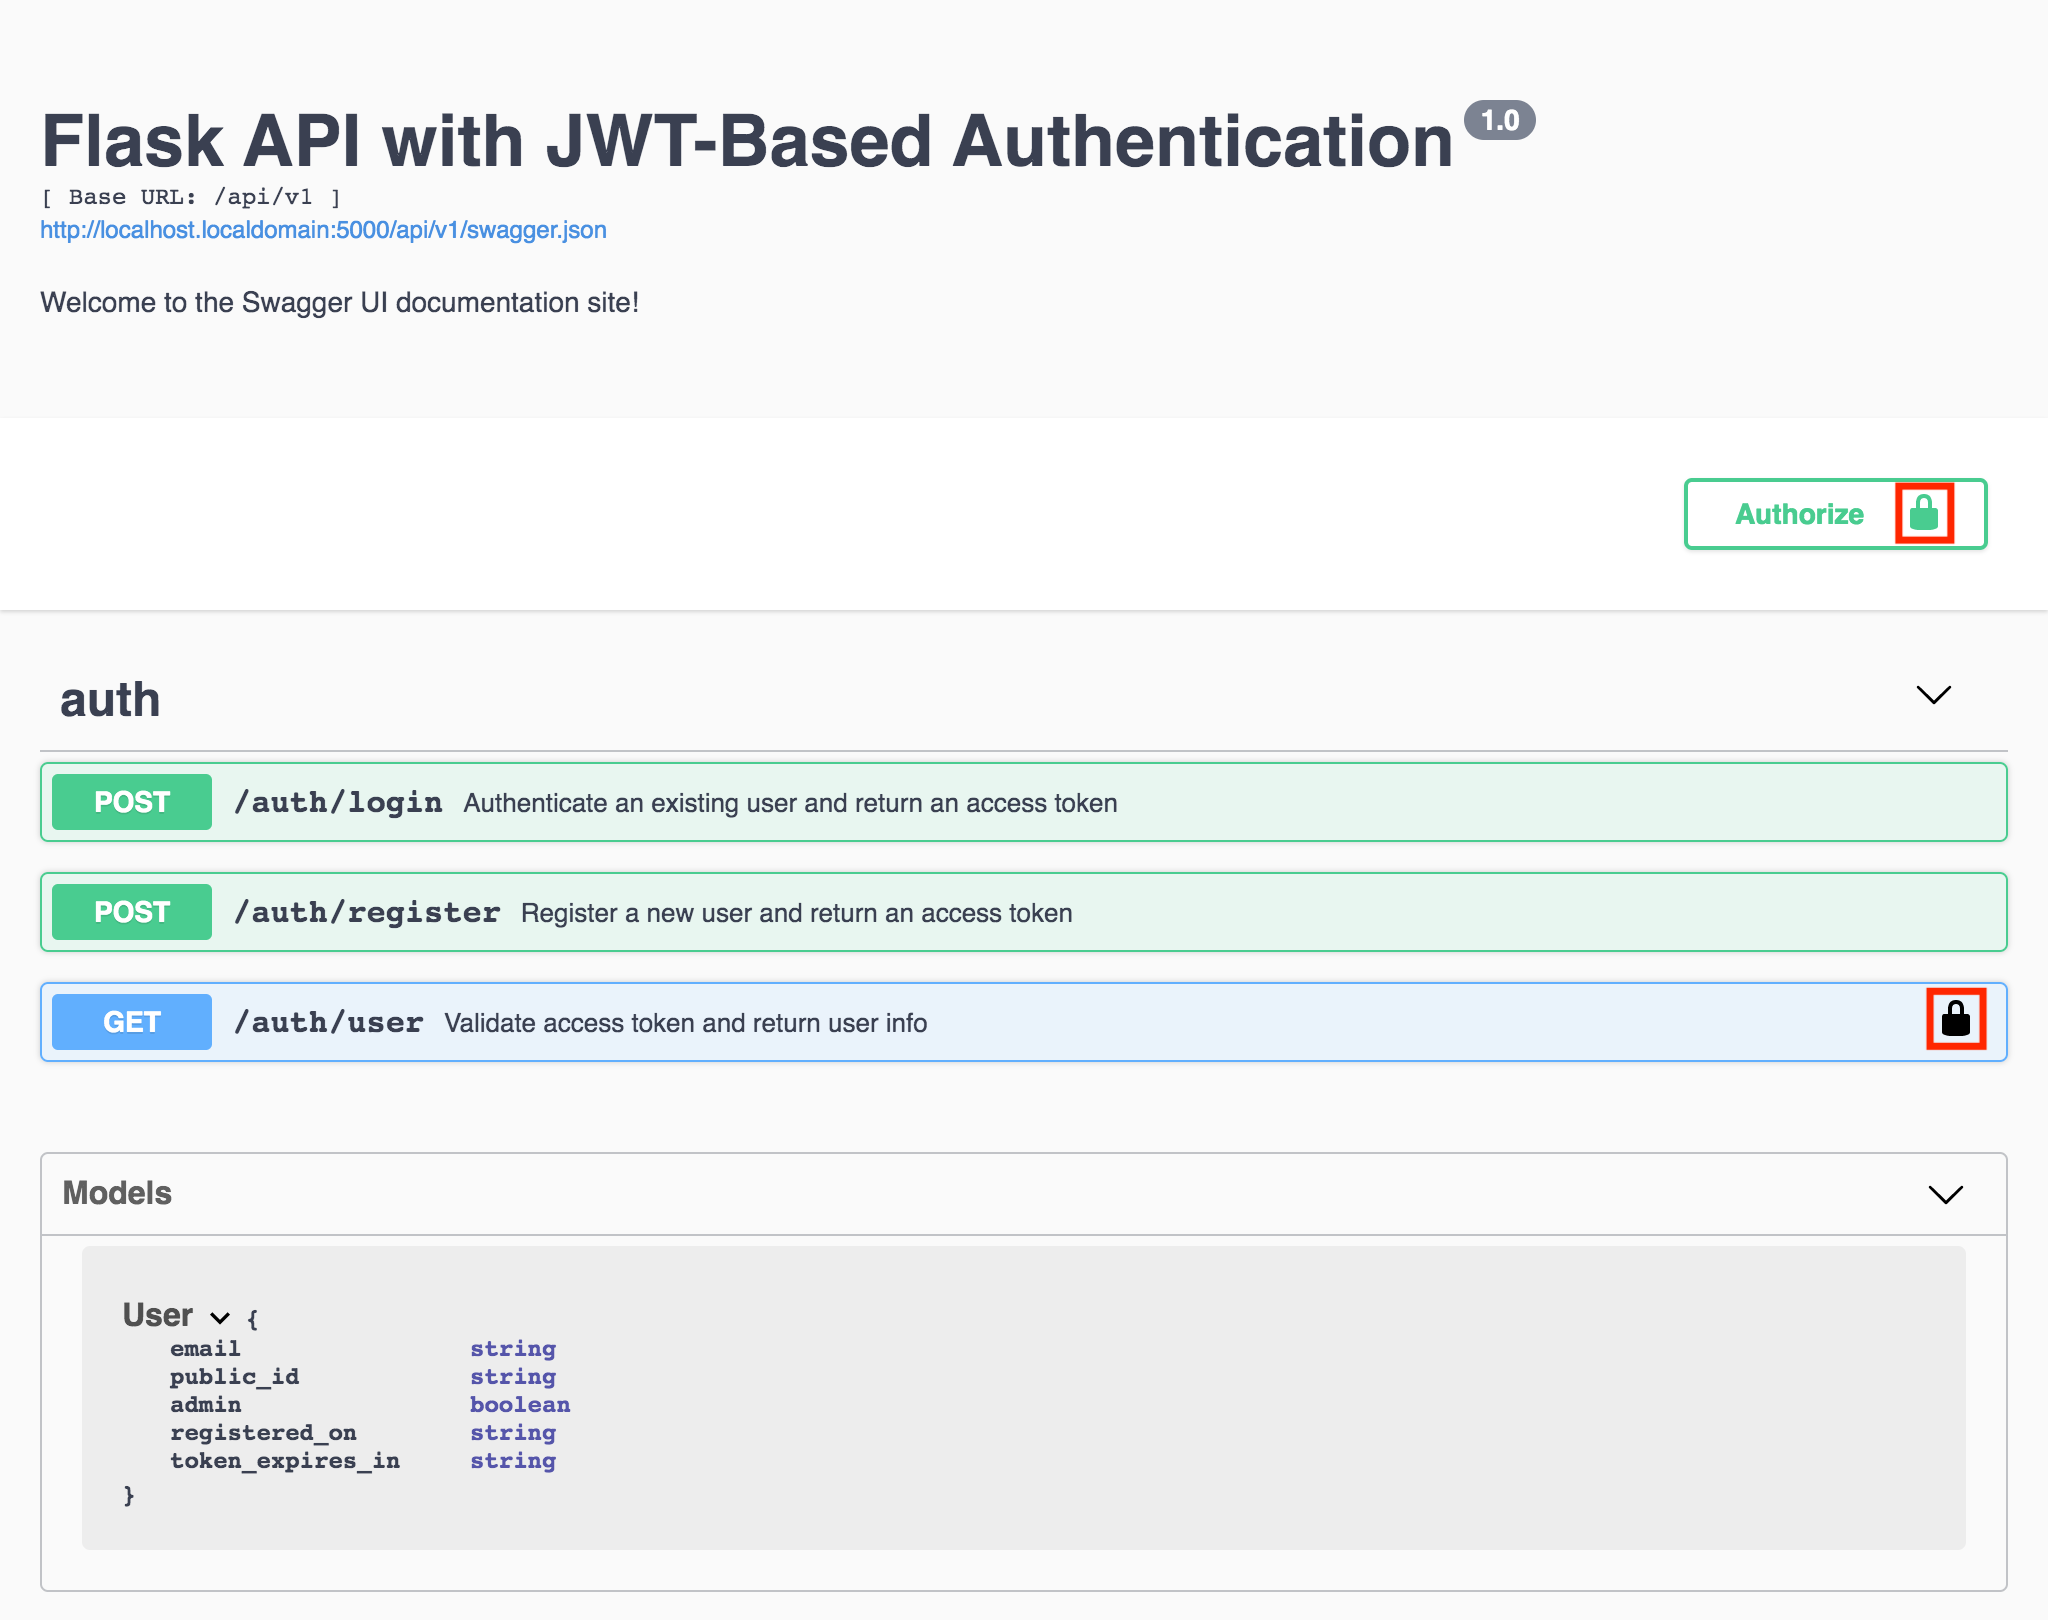
Figure 7 - Authorization required icons are locked after configuring access token
Let’s send a request to the api.auth_user endpoint again, now that the access token will be sent in the request header:
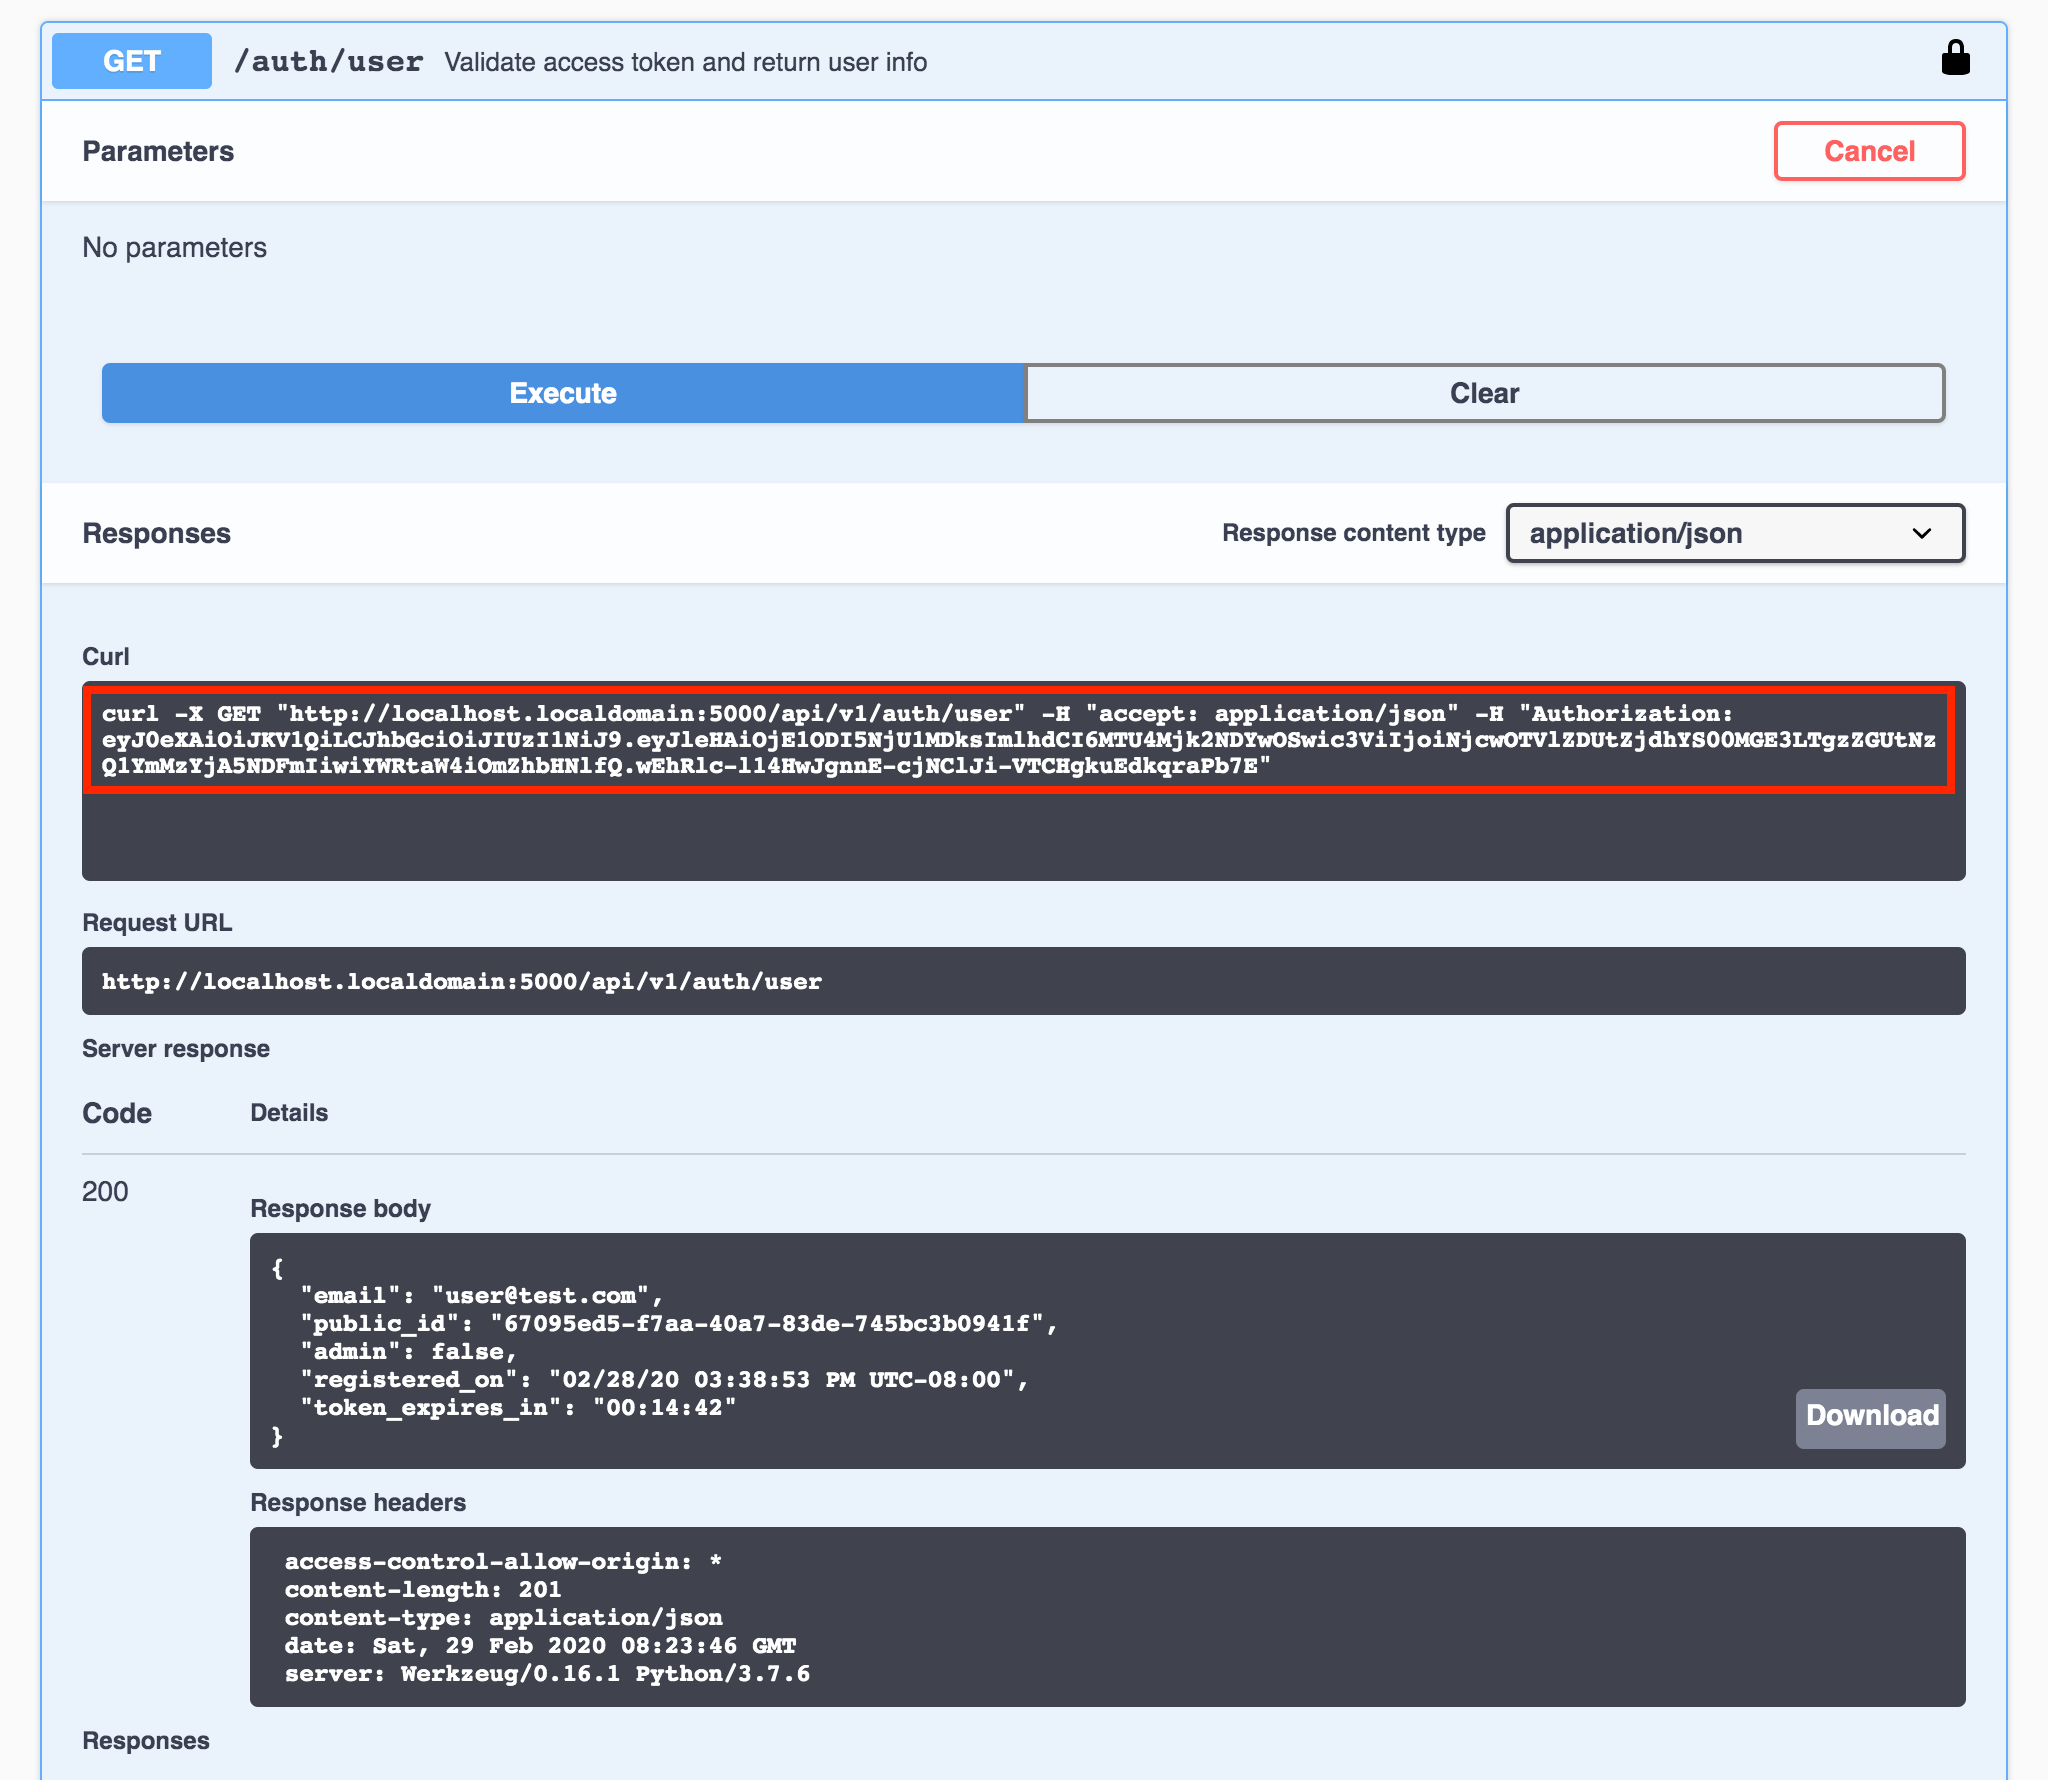
Figure 8 - Request for /auth/user successful (Swagger UI)
As you can see, the access token is sent in the Authorization field of the request header, as required by the specification doc for Bearer Token Authentication (RFC6750).
With the development environment configuration settings, all access tokens expire fifteen minutes after being issued. If a request is sent with an expired access token, both the response body and header should contain error messages explaining why the request was not succesful:
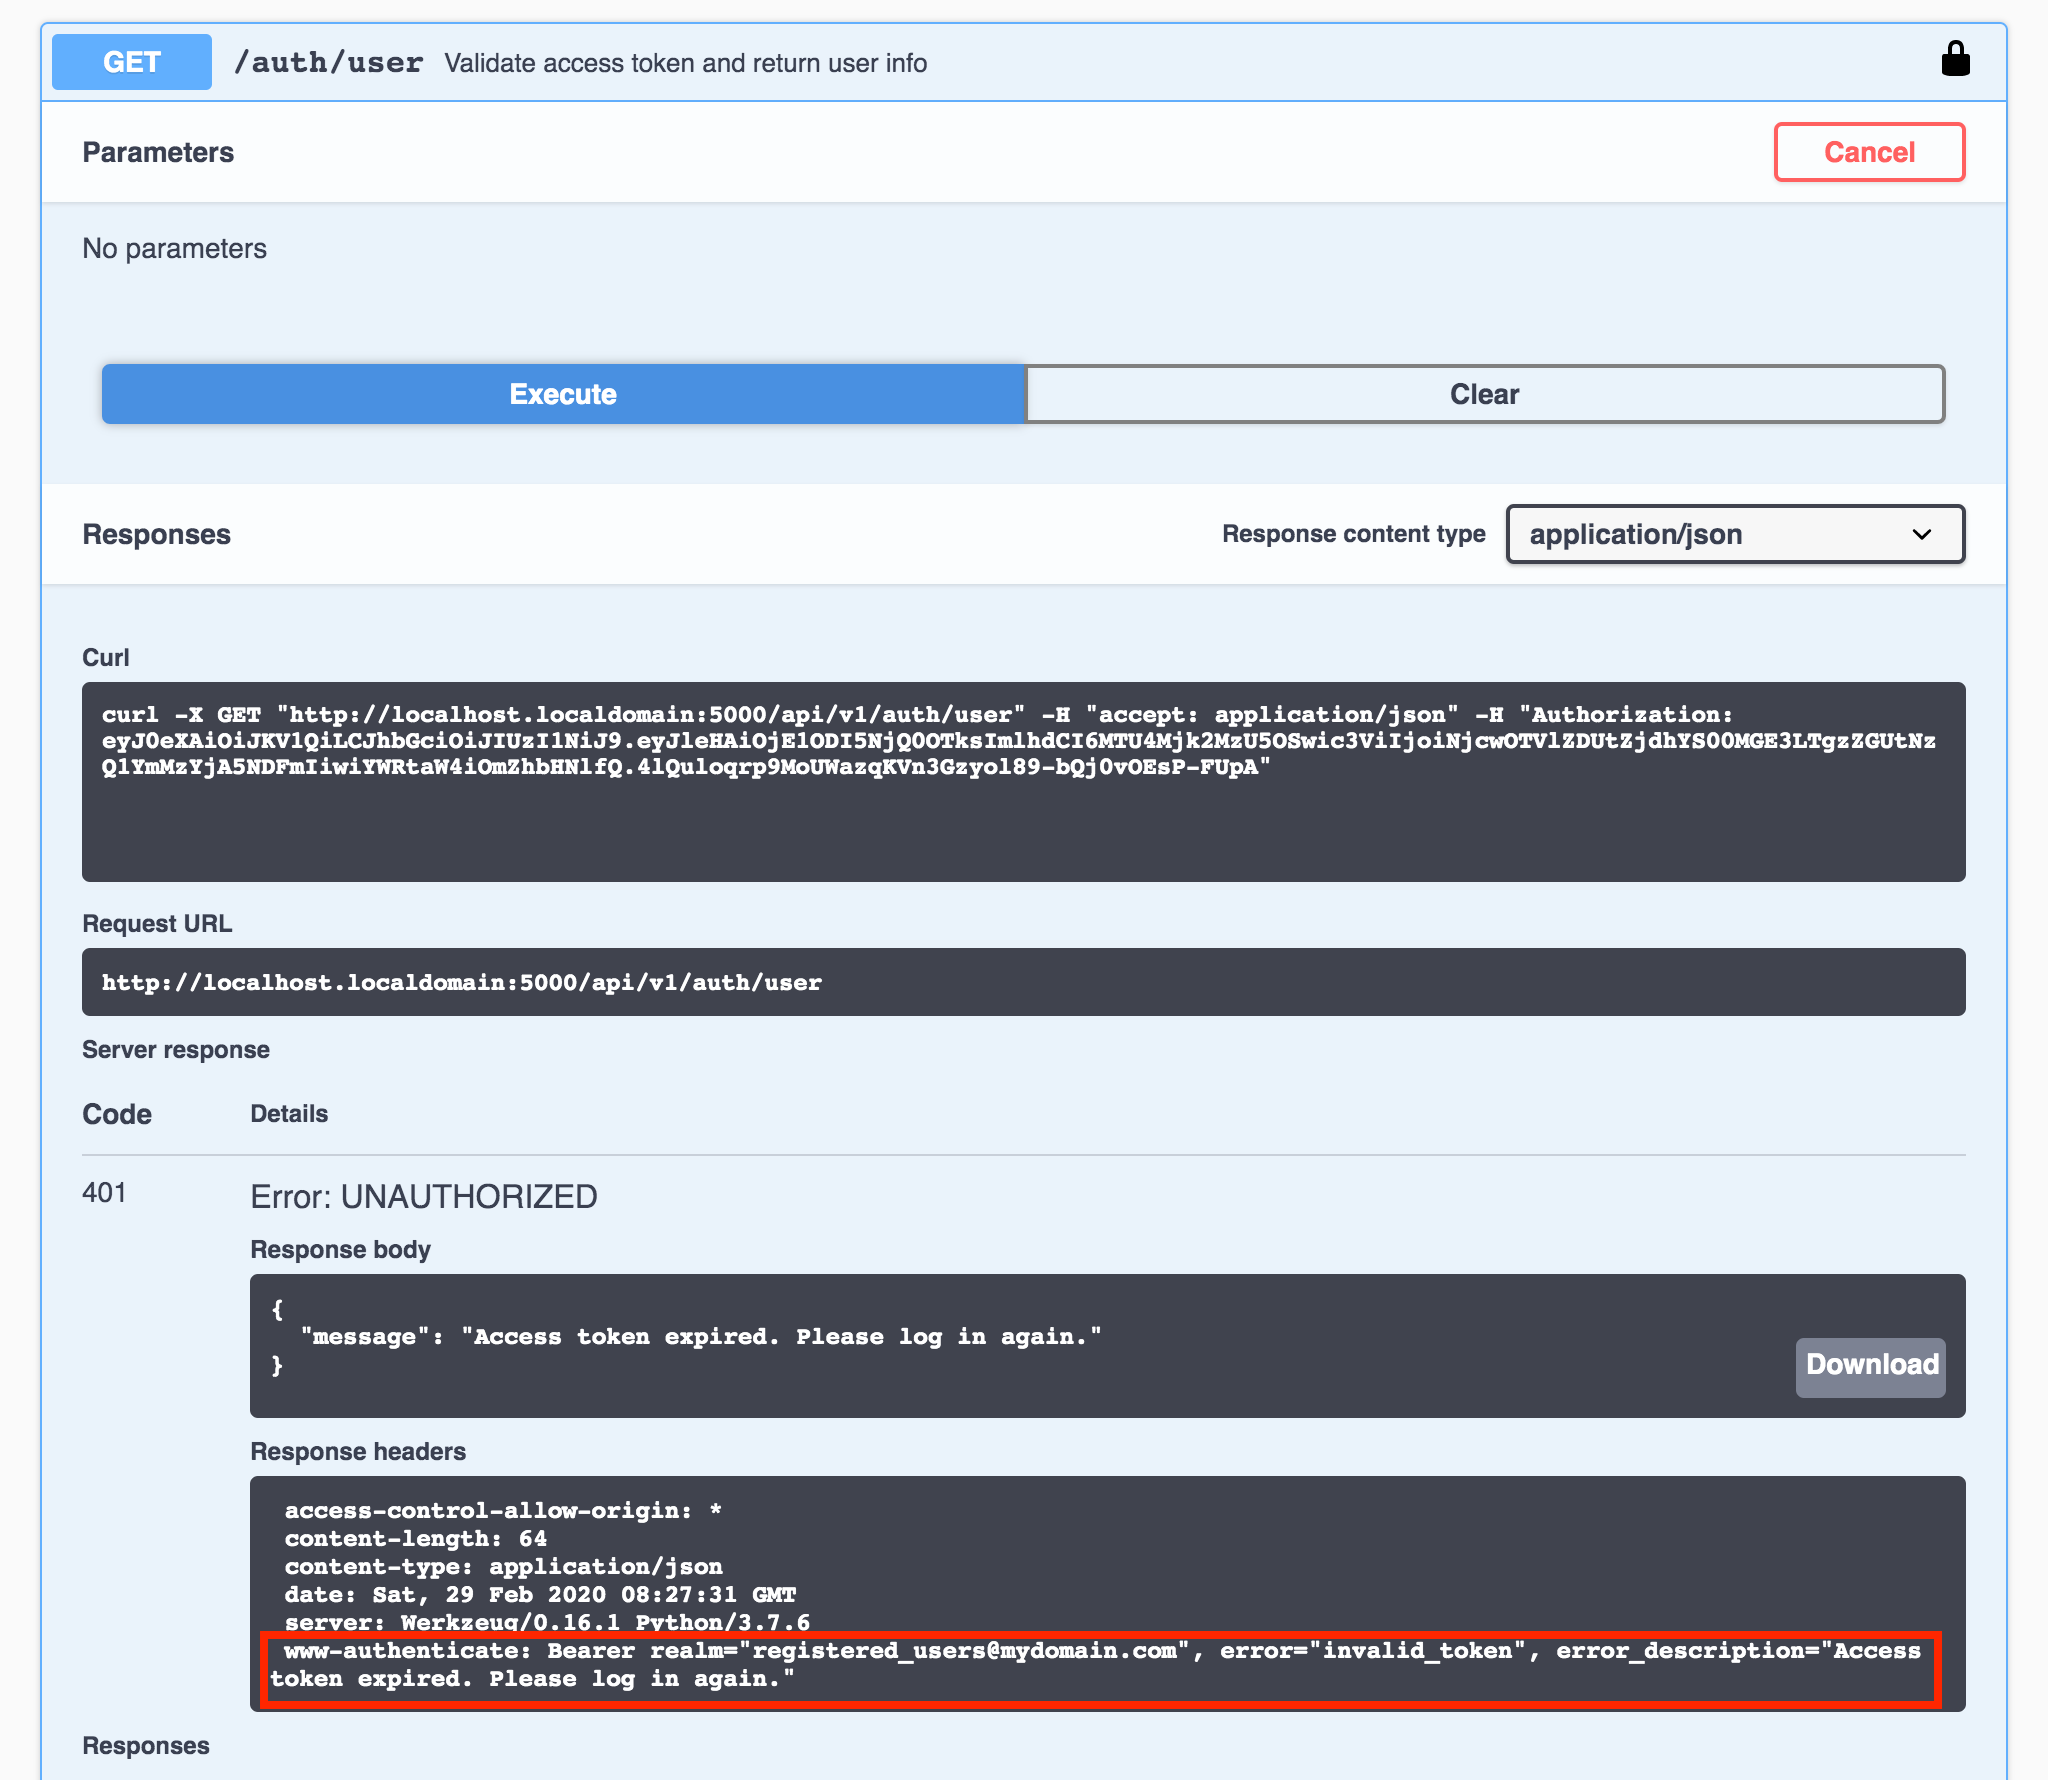
Figure 9 - Request failed (Token expired)
Similarly, try changing any part of an access token (even just a single character) and updating the value in the Available authorizations dialog box. The request will be rejected and the response will contain a different error message than the message for an expired token or for not sending an access token at all:
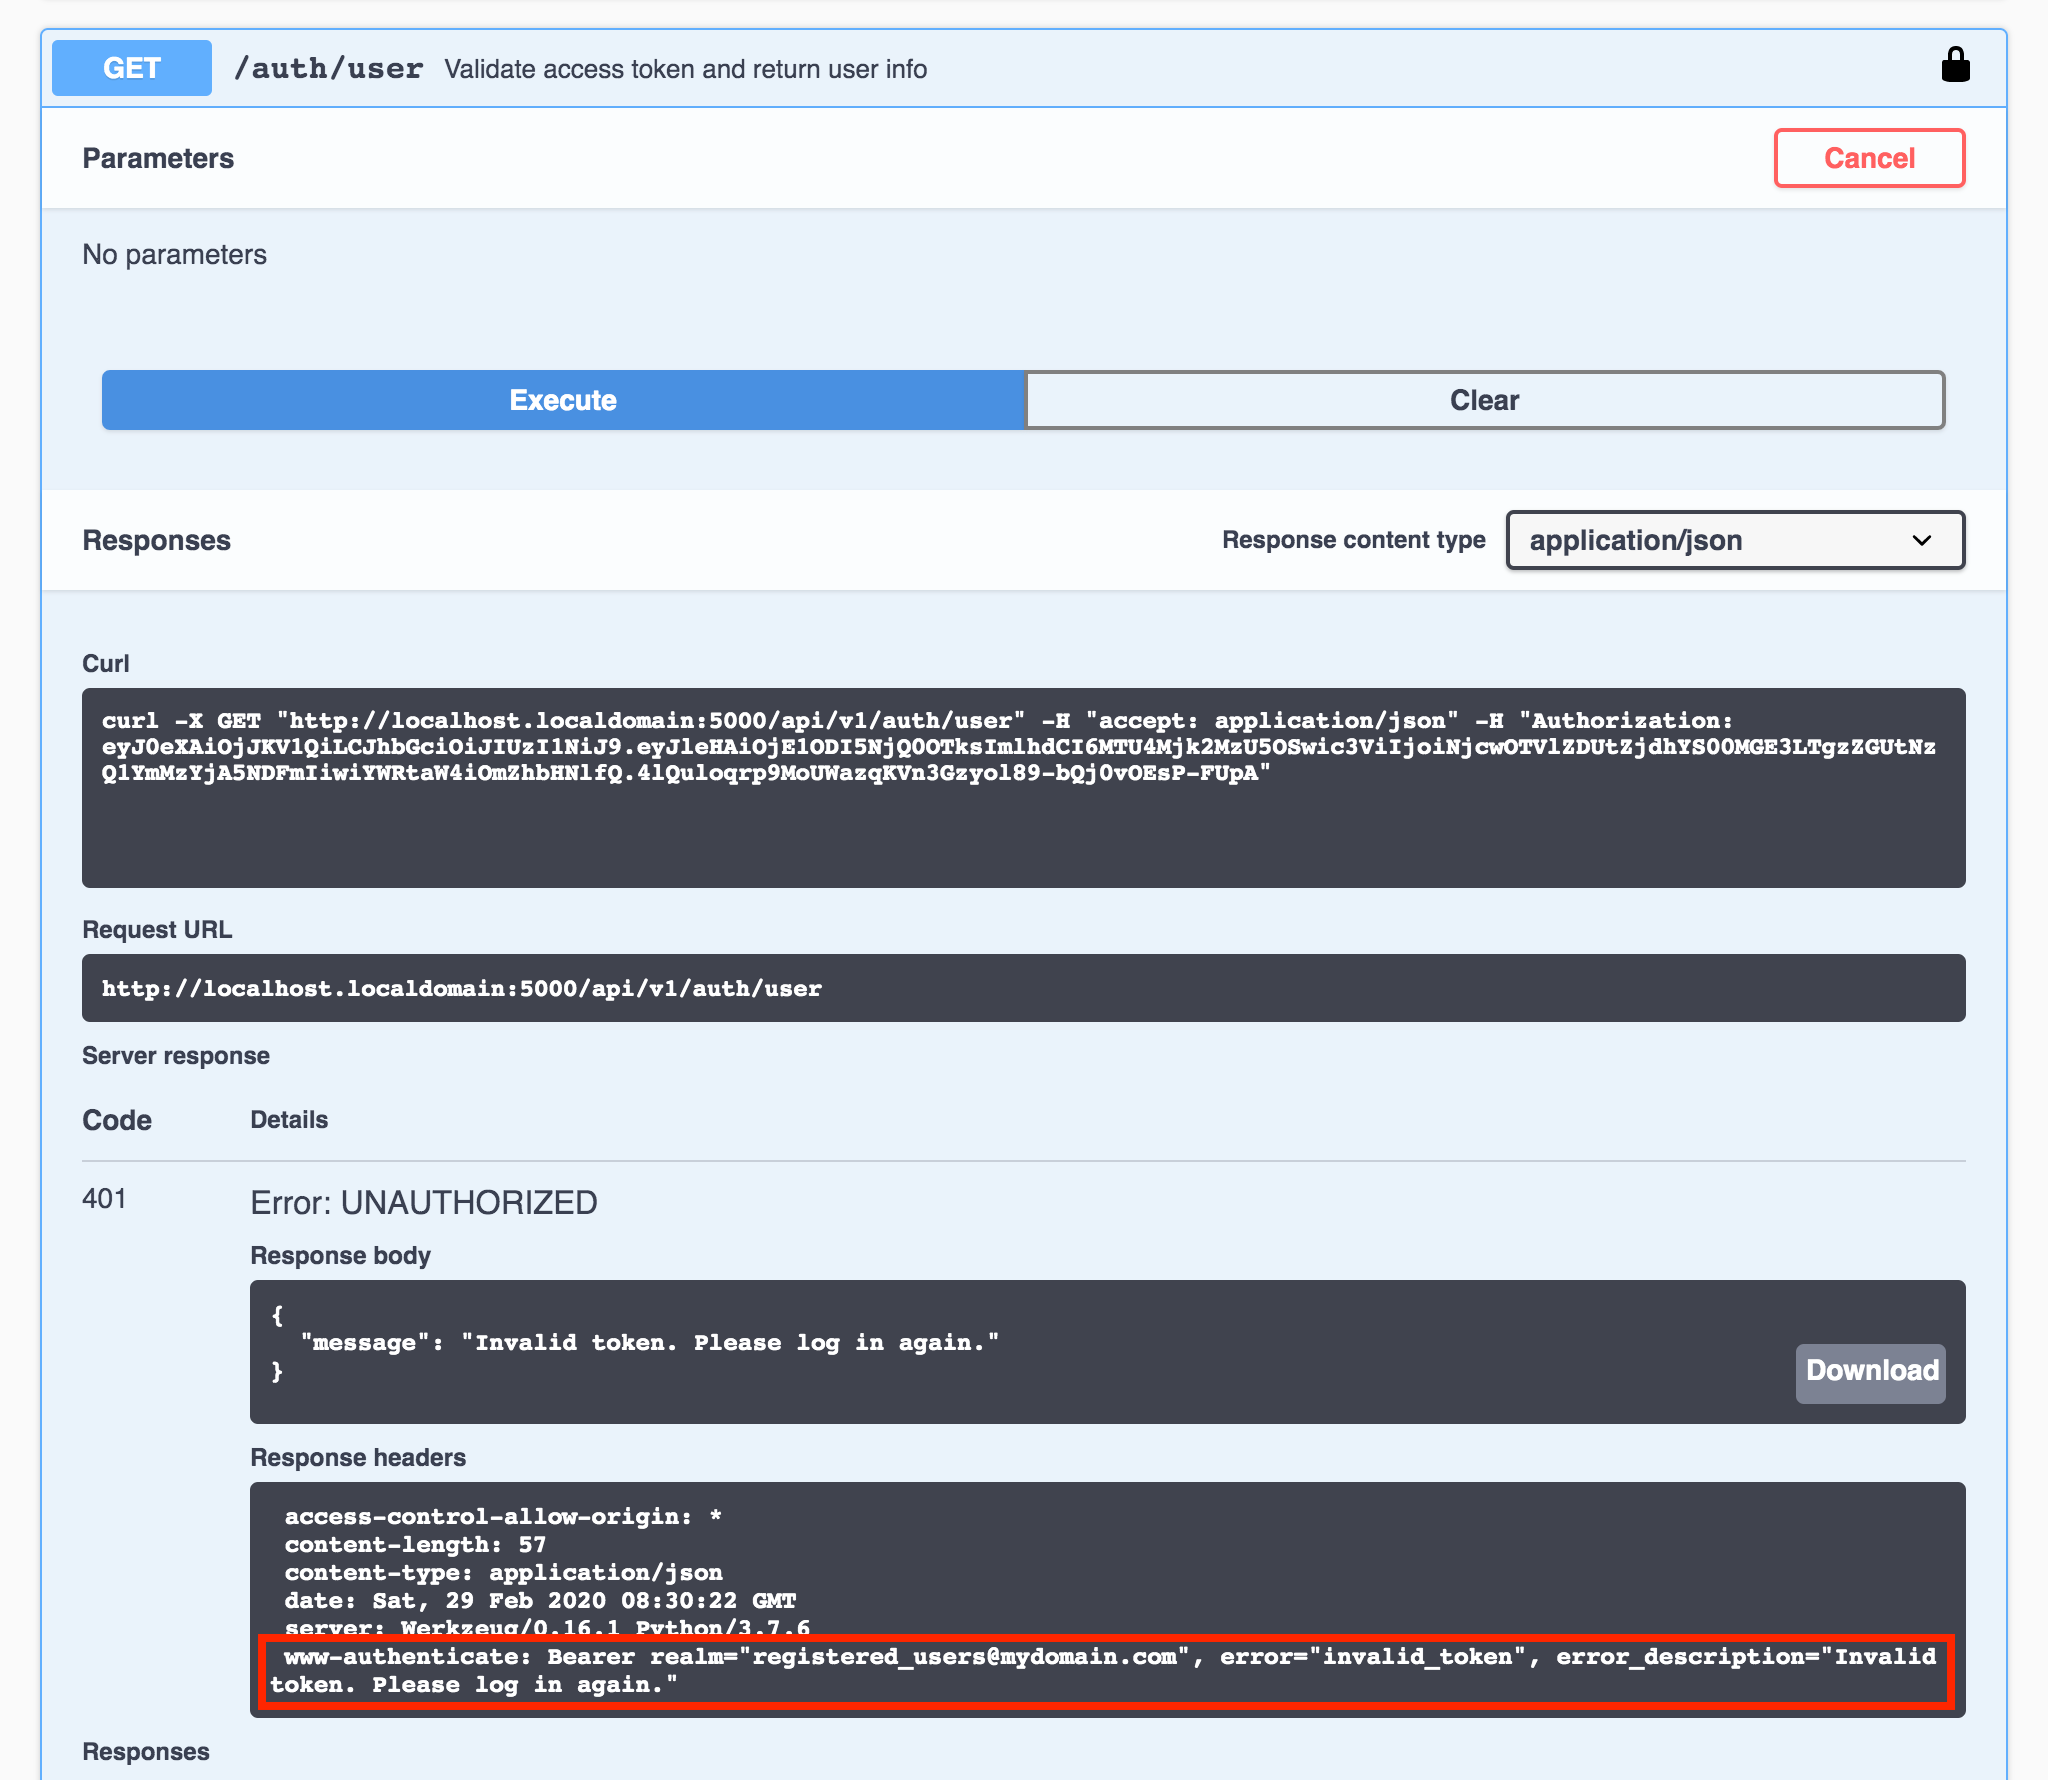
Figure 10 - Request failed (Invalid token)
That’s all you need to do to automatically include the access token when a request is made to a protected resource. Let’s figure out how to do the same with httpie.
httpie
Rather than using screenshots to illustrate the process of requesting a protected resoure with httpie, I will reproduce the text of the CLI commands and output from httpie.
If you enter a URL without a domain, for example :5000/api/v1/auth/user, the URL is automatically expanded to http://localhost:5000/api/v1/auth/user. With that in mind, the command below is a GET request to the api.auth_user endpont that does not include an access token (this is the same request/response pictured in Figure 3):
flask-api-tutorial $ http :5000/api/v1/auth/user

GET /api/v1/auth/user HTTP/1.1
Accept: */*
Accept-Encoding: gzip, deflate
Connection: keep-alive
Host: localhost:5000
User-Agent: HTTPie/2.0.0


HTTP/1.0 401 UNAUTHORIZED
Access-Control-Allow-Origin: *
Content-Length: 53
Content-Type: application/json
Date: Sat, 29 Feb 2020 08:02:40 GMT
Server: Werkzeug/0.16.1 Python/3.7.6
WWW-Authenticate: Bearer realm="registered_users@mydomain.com"

{
  "message": "Unauthorized"
}We need to obtain an access token, so let’s login and retrieve the token generated by the server from the response (this is the same request/response pictured in Figure 4):
flask-api-tutorial $ http -f :5000/api/v1/auth/login email=user@test.com password=123456

POST /api/v1/auth/login HTTP/1.1
Accept: */*
Accept-Encoding: gzip, deflate
Connection: keep-alive
Content-Length: 37
Content-Type: application/x-www-form-urlencoded; charset=utf-8
Host: localhost:5000
User-Agent: HTTPie/2.0.0

email=user%40test.com&password=123456

HTTP/1.0 200 OK
Cache-Control: no-store
Access-Control-Allow-Origin: *
Content-Length: 345
Content-Type: application/json
Date: Sat, 29 Feb 2020 08:06:39 GMT
Pragma: no-cache
Server: Werkzeug/0.16.1 Python/3.7.6

{
  "access_token": "eyJ0eXAiOiJKV1QiLCJhbGciOiJIUzI1NiJ9.eyJleHAiOjE1NjQ4NzUzMjksImlhdCI6MTU2NDg3NDQyOSwic3ViIjoiNzdiNGYzYjctNzg2NC00ZmM0LWE4MzQtZjJhNjQ5OWYxNzJhIiwiYWRtaW4iOmZhbHNlfQ.LBYrCr5-8FqCKIF_1WEpk8ake235cB9hZNL01oQjPvw",
  "expires_in": 900,
  "message": "successfully logged in",
  "status": "success",
  "token_type": "bearer"
}Now that we have an access token, the only thing we need to do is send it in the Authorization field of the request header. httpie makes this really simple, any arguments in the form {name}:{value} will be added as headers (this is the same request/response pictured in Figure 8):
flask-api-tutorial $ http :5000/api/v1/auth/user Authorization:"Bearer eyJ0eXAiOiJKV1QiLCJhbGciOiJIUzI1NiJ9.eyJleHAiOjE1NjQ4NzUzMjksImlhdCI6MTU2NDg3NDQyOSwic3ViIjoiNzdiNGYzYjctNzg2NC00ZmM0LWE4MzQtZjJhNjQ5OWYxNzJhIiwiYWRtaW4iOmZhbHNlfQ.LBYrCr5-8FqCKIF_1WEpk8ake235cB9hZNL01oQjPvw"

GET /api/v1/auth/user HTTP/1.1
Accept: */*
Accept-Encoding: gzip, deflate
Authorization: Bearer eyJ0eXAiOiJKV1QiLCJhbGciOiJIUzI1NiJ9.eyJleHAiOjE1NjQ4NzUzMjksImlhdCI6MTU2NDg3NDQyOSwic3ViIjoiNzdiNGYzYjctNzg2NC00ZmM0LWE4MzQtZjJhNjQ5OWYxNzJhIiwiYWRtaW4iOmZhbHNlfQ.LBYrCr5-8FqCKIF_1WEpk8ake235cB9hZNL01oQjPvw
Connection: keep-alive
Host: localhost:5000
User-Agent: HTTPie/2.0.0


HTTP/1.0 200 OK
Access-Control-Allow-Origin: *
Content-Length: 159
Content-Type: application/json
Date: Sat, 29 Feb 2020 08:23:46 GMT
Server: Werkzeug/0.16.1 Python/3.7.6

{
  "admin": false,
  "email": "user@test.com",
  "public_id": "77b4f3b7-7864-4fc4-a834-f2a6499f172a",
  "registered_on": "02/28/20 03:38:53 PM UTC-08:00",
  "token_expires_in": "00:14:42"
}
api.auth_logout Endpoint
The “logout” process for the API is really simple since we don’t actually implement any session handling. The api.auth_logout endpoint will use the @token_required decorator, just like the api.auth_user endpoint. Therefore, if a request is received without an access token or with an invalid/expired token, it will be aborted without executing any of the business logic we define for the logout process.
One of the requirements states: If user logs out, their JWT is immediately invalid/expired. In order to satisfy this requirement, when a user logs out and their access token is NOT invalid/expired, we must add the token to a blacklist and ensure that any subsequent request for a protected resource that includes the token is unsuccessful.
Even though access tokens are typically configured to expire less than a day after being issued, the blacklist should be persistent (i.e., stored in a database, NOT in RAM). We can create a database table to store blacklisted tokens, which is what we will do next.
BlacklistedToken DB Model
Create a new file token_blacklist.py in src/flask_api_tutorial/models and add the content below:
| |
The BlacklistedToken class is pretty simple, but please note the following:
Line 14:
tokenis the string value of the access token.Line 15: Notice that we are capturing the current time with
utc_now, which is a function from theflask_api_tutorial.util.datetime_utilmodule. What is the difference between using this function which returns a timezone-awaredatetimeobject anddatetime.utcnowwhich returns a naivedatetime? Consider the REPL commands below:>>> from flask_api_tutorial.util.datetime_util import utc_now >>> from datetime import datetime >>> utc_now() datetime.datetime(2019, 8, 8, 9, 52, 4, tzinfo=datetime.timezone.utc) >>> datetime.utcnow() datetime.datetime(2019, 8, 8, 9, 52, 6, 793105)Working with
datetimeobjects can be a source of insidious bugs that are very difficult to diagnose. For a thorough explanation of best practices that will prevent such issues, read this post by Travis Mick. The TL;DR version boils down to two guidelines:- Always ensure that your code produces and handles
datetimeobjects that are timezone-aware. - Always ensure that the
datetimeobjects produced and utilized by your code are localized to the UTC timezone when written to the database (i.e.,tzinfo=datetime.timezone.utc).
A simple example of why you should always use timezone "aware"
datetimevalues is given below. When we create aBlacklistedTokenobject, the requiredexpires_atparameter is a UNIX timestamp (i.e., an integer value) which can be converted to adatetimeobject using thefromtimestampmethod:>>> expires_at = 1565257955 >>> datetime.fromtimestamp(expires_at).astimezone(timezone.utc) datetime.datetime(2019, 8, 8, 9, 52, 35, tzinfo=datetime.timezone.utc) >>> datetime.fromtimestamp(expires_at) datetime.datetime(2019, 8, 8, 2, 52, 35) >>> exit()Python assumes that the
datetimevalue produced fromdatetime.fromtimestamp(expires_at)should be converted to the local time zone (in my case, PST or -700 UTC at the time this was written). You will quickly encounter bugs that are extremely difficult to diagnose unless you ensure that you are always dealing with "aware"datetimeobjects in the same timezone.- Always ensure that your code produces and handles
Lines 25-28: Whenever we need to check a user's access token, we will call
BlacklistedToken.check_blacklistwhich will return aboolvalue based on whether or not the token has been added to the blacklist.
In order to register the BlacklistedToken model with the Flask application, we need to make a couple changes to run.py in the project root folder:
| |
Line 5: We need to import the new model class as shown here.
Line 13: We should add the new model class here to make it available in the
flask shellwithout needing to import it explicitly.
Finally, we need to create a new migration script and upgrade the database to create the actual token_blacklist table. We already went through this in Part 2 when we created the User model class, but let’s demonstrate the process once more.
First, run flask db migrate and add a message explaining the changes that will be made by running this migration:
(flask-api-tutorial) flask-api-tutorial $ flask db migrate --message "add BlacklistedToken model"
INFO  [alembic.runtime.migration] Context impl SQLiteImpl.
INFO  [alembic.runtime.migration] Will assume non-transactional DDL.
INFO  [alembic.autogenerate.compare] Detected added table 'token_blacklist'
  Generating /Users/aaronluna/Projects/flask-api-tutorial/migrations/versions/079d26d45cc9_add_blacklistedtoken_model.py
  ...  done
Next, run flask db upgrade to run the migration script and add the new table to the database:
(flask-api-tutorial) flask-api-tutorial $ flask db upgrade
INFO  [alembic.runtime.migration] Context impl SQLiteImpl.
INFO  [alembic.runtime.migration] Will assume non-transactional DDL.
INFO  [alembic.runtime.migration] Running upgrade eb6c2faa0708 -> 079d26d45cc9, add BlacklistedToken model
With the BlacklistedToken class fully implemented, we have everything we need to create the business logic for the api.auth_logout endpoint.
process_logout_request Function
After receiving a logout request containing a valid, unexpired token, the server then proceeds to create a BlasklistedToken object, add it to the database and commit the changes. Then, the server sends an HTTP response indicating that the logout request succeeded.
The function that performs this process will be defined insrc/flask_api_tutorial/api/auth/business.py. Open that file and update the import statements to include the BlacklistedToken class: (Line 9)
| |
Next, add the process_logout_request function and save the file:
| |
As explained in the Decorators section of this post, the access_token and expires_at attributes on process_logout_request come from decoding the access token’s payload, which takes place whenever the @token_required decorator is used (these values are required to create the BlacklistedToken object). Then, a HTTP response indicating the operation succeeded is sent to the client.
Update decode_access_token Method
There’s one more process we need to update in order to make the blacklist fully functional. Currently, when verifying an access token, it is only rejected by the server if the token is invalid or expired. Now, the server must also check if the token has been blacklisted before processing the client’s request.
Open src/flask_api_tutorial/models/user.py and update the import statements to include the BlacklistedToken class: (Line 10)
| |
We need to modify the decode_access_token method to reurn a Result object indicating the token has been blacklisted if that is the case. Add Lines 76-78 and save the changes:
| |
With that out of the way, we can create the concrete Resource class for the api.auth_logout endpoint.
LogoutUser Resource
Open src/flask_api_tutorial/api/auth/endpoints.py and update the import statements to include the process_logout_request function we just created (Line 11):
| |
Next, add the content below and save the file:
| |
This should all look very familiar, the only difference between the LogoutUser and GetUser is the HTTP method name (post vs get). Also, GetUser returned a JSON object which we defined in user_model and LogoutUser returns a regular HTTP response.
Unit Tests: test_auth_logout.py
Before we create any test cases, we need a way to send a POST request to the api.auth_logout endpoint. Open tests/util.py and add the logout_user function:
| |
The “happy path” test case shown below simply registers a new user, logs in and then logs out. Create a new file /test/test_auth_logout.py and add the content below:
| |
There are a few things in this test case that we are seeing for the fist time, please note:
Line 15-16: After retrieving the
access_token, we verify that theblacklistis currently empty (i.e., no tokens have been blacklisted at this point).Line 17-20: We submit a request to the
api.auth_logoutendpoint and verify that the response indicates that the request succeeded.Line 21-22: If the logout request succeeded, the token must have been added to the
blacklist. The first way we verify this is by checking that theblacklistnow contains one token.Line 23: Finally, we verify that the blacklisted token is the same
access_tokenthat was submitted with the logout request.
We should definitely ensure that any requests for a protected resource using a blacklisted token does not succeed, and that the response indicates that the reason the request failed is due to the token being blacklisted.
First, update the import statements to include the WWW_AUTH_NO_TOKEN string from tests.util (Line 5), and then add the highlighted lines to test_auth_logout.py
| |
This is the scenario contained in test_logout_token_blacklisted, below. Add the function to test_auth_logout.py:
| |
Line 33-38: We begin by performing the same actions as the previous test case, registering a new user, logging in and finally logging out.
Line 39-44: The second time we call
POST /api/v1/auth/logoutwith the sameaccess_token, the status code of the HTTP response is401 HTTPStatus.UNAUTHORIZED. This is the expected behavior since the token has not been tampered with, has not yet expired BUT has been added to thetoken_blacklist.
There are plenty of necessary test cases that are missing from the current set. You should try to identify as many different scenarios as you can think of and create test cases. You should compare your set to the final version in the github repository.
You should run tox to make sure the new test case passes and that nothing else broke because of the changes:
(flask-api-tutorial) flask-api-tutorial $ tox
GLOB sdist-make: /Users/aaronluna/Projects/flask-api-tutorial/setup.py
py37 create: /Users/aaronluna/Projects/flask-api-tutorial/.tox/py37
py37 installdeps: black, flake8, pydocstyle, pytest, pytest-black, pytest-clarity, pytest-dotenv, pytest-flake8, pytest-flask
py37 inst: /Users/aaronluna/Projects/flask-api-tutorial/.tox/.tmp/package/1/flask-api-tutorial-0.1.zip
py37 installed: alembic==1.4.0,aniso8601==8.0.0,appdirs==1.4.3,attrs==19.3.0,bcrypt==3.1.7,black==19.10b0,certifi==2019.11.28,cffi==1.14.0,chardet==3.0.4,Click==7.0,entrypoints==0.3,flake8==3.7.9,Flask==1.1.1,flask-api-tutorial==0.1,Flask-Bcrypt==0.7.1,Flask-Cors==3.0.8,Flask-Migrate==2.5.2,flask-restx==0.1.1,Flask-SQLAlchemy==2.4.1,idna==2.9,importlib-metadata==1.5.0,itsdangerous==1.1.0,Jinja2==2.11.1,jsonschema==3.2.0,Mako==1.1.1,MarkupSafe==1.1.1,mccabe==0.6.1,more-itertools==8.2.0,packaging==20.1,pathspec==0.7.0,pluggy==0.13.1,py==1.8.1,pycodestyle==2.5.0,pycparser==2.19,pydocstyle==5.0.2,pyflakes==2.1.1,PyJWT==1.7.1,pyparsing==2.4.6,pyrsistent==0.15.7,pytest==5.3.5,pytest-black==0.3.8,pytest-clarity==0.3.0a0,pytest-dotenv==0.4.0,pytest-flake8==1.0.4,pytest-flask==0.15.1,python-dateutil==2.8.1,python-dotenv==0.12.0,python-editor==1.0.4,pytz==2019.3,regex==2020.2.20,requests==2.23.0,six==1.14.0,snowballstemmer==2.0.0,SQLAlchemy==1.3.13,termcolor==1.1.0,toml==0.10.0,typed-ast==1.4.1,urllib3==1.25.8,wcwidth==0.1.8,Werkzeug==0.16.1,zipp==3.0.0
py37 run-test-pre: PYTHONHASHSEED='3206075645'
py37 run-test: commands[0] | pytest
================================================= test session starts ==================================================
platform darwin -- Python 3.7.6, pytest-5.3.5, py-1.8.1, pluggy-0.13.1 -- /Users/aaronluna/Projects/flask-api-tutorial/.tox/py37/bin/python
cachedir: .tox/py37/.pytest_cache
rootdir: /Users/aaronluna/Projects/flask-api-tutorial, inifile: pytest.ini
plugins: clarity-0.3.0a0, black-0.3.8, dotenv-0.4.0, flask-0.15.1, flake8-1.0.4
collected 71 items

run.py::FLAKE8 PASSED                                                                                            [  1%]
run.py::BLACK PASSED                                                                                             [  2%]
setup.py::FLAKE8 PASSED                                                                                          [  4%]
setup.py::BLACK PASSED                                                                                           [  5%]
src/flask_api_tutorial/__init__.py::FLAKE8 PASSED                                                                [  7%]
src/flask_api_tutorial/__init__.py::BLACK PASSED                                                                 [  8%]
src/flask_api_tutorial/config.py::FLAKE8 PASSED                                                                  [  9%]
src/flask_api_tutorial/config.py::BLACK PASSED                                                                   [ 11%]
src/flask_api_tutorial/api/__init__.py::FLAKE8 PASSED                                                            [ 12%]
src/flask_api_tutorial/api/__init__.py::BLACK PASSED                                                             [ 14%]
src/flask_api_tutorial/api/exceptions.py::FLAKE8 PASSED                                                          [ 15%]
src/flask_api_tutorial/api/exceptions.py::BLACK PASSED                                                           [ 16%]
src/flask_api_tutorial/api/auth/__init__.py::FLAKE8 PASSED                                                       [ 18%]
src/flask_api_tutorial/api/auth/__init__.py::BLACK PASSED                                                        [ 19%]
src/flask_api_tutorial/api/auth/business.py::FLAKE8 PASSED                                                       [ 21%]
src/flask_api_tutorial/api/auth/business.py::BLACK PASSED                                                        [ 22%]
src/flask_api_tutorial/api/auth/decorators.py::FLAKE8 PASSED                                                     [ 23%]
src/flask_api_tutorial/api/auth/decorators.py::BLACK PASSED                                                      [ 25%]
src/flask_api_tutorial/api/auth/dto.py::FLAKE8 PASSED                                                            [ 26%]
src/flask_api_tutorial/api/auth/dto.py::BLACK PASSED                                                             [ 28%]
src/flask_api_tutorial/api/auth/endpoints.py::FLAKE8 PASSED                                                      [ 29%]
src/flask_api_tutorial/api/auth/endpoints.py::BLACK PASSED                                                       [ 30%]
src/flask_api_tutorial/api/widgets/__init__.py::FLAKE8 PASSED                                                    [ 32%]
src/flask_api_tutorial/api/widgets/__init__.py::BLACK PASSED                                                     [ 33%]
src/flask_api_tutorial/models/__init__.py::FLAKE8 PASSED                                                         [ 35%]
src/flask_api_tutorial/models/__init__.py::BLACK PASSED                                                          [ 36%]
src/flask_api_tutorial/models/token_blacklist.py::FLAKE8 PASSED                                                  [ 38%]
src/flask_api_tutorial/models/token_blacklist.py::BLACK PASSED                                                   [ 39%]
src/flask_api_tutorial/models/user.py::FLAKE8 PASSED                                                             [ 40%]
src/flask_api_tutorial/models/user.py::BLACK PASSED                                                              [ 42%]
src/flask_api_tutorial/util/__init__.py::FLAKE8 PASSED                                                           [ 43%]
src/flask_api_tutorial/util/__init__.py::BLACK PASSED                                                            [ 45%]
src/flask_api_tutorial/util/datetime_util.py::FLAKE8 PASSED                                                      [ 46%]
src/flask_api_tutorial/util/datetime_util.py::BLACK PASSED                                                       [ 47%]
src/flask_api_tutorial/util/result.py::FLAKE8 PASSED                                                             [ 49%]
src/flask_api_tutorial/util/result.py::BLACK PASSED                                                              [ 50%]
tests/__init__.py::FLAKE8 PASSED                                                                                 [ 52%]
tests/__init__.py::BLACK PASSED                                                                                  [ 53%]
tests/conftest.py::FLAKE8 PASSED                                                                                 [ 54%]
tests/conftest.py::BLACK PASSED                                                                                  [ 56%]
tests/test_auth_login.py::FLAKE8 PASSED                                                                          [ 57%]
tests/test_auth_login.py::BLACK PASSED                                                                           [ 59%]
tests/test_auth_login.py::test_login PASSED                                                                      [ 60%]
tests/test_auth_login.py::test_login_email_does_not_exist PASSED                                                 [ 61%]
tests/test_auth_logout.py::FLAKE8 PASSED                                                                         [ 63%]
tests/test_auth_logout.py::BLACK PASSED                                                                          [ 64%]
tests/test_auth_logout.py::test_logout PASSED                                                                    [ 66%]
tests/test_auth_logout.py::test_logout_token_blacklisted PASSED                                                  [ 67%]
tests/test_auth_register.py::FLAKE8 PASSED                                                                       [ 69%]
tests/test_auth_register.py::BLACK PASSED                                                                        [ 70%]
tests/test_auth_register.py::test_auth_register PASSED                                                           [ 71%]
tests/test_auth_register.py::test_auth_register_email_already_registered PASSED                                  [ 73%]
tests/test_auth_register.py::test_auth_register_invalid_email PASSED                                             [ 74%]
tests/test_auth_user.py::FLAKE8 PASSED                                                                           [ 76%]
tests/test_auth_user.py::BLACK PASSED                                                                            [ 77%]
tests/test_auth_user.py::test_auth_user PASSED                                                                   [ 78%]
tests/test_auth_user.py::test_auth_user_no_token PASSED                                                          [ 80%]
tests/test_auth_user.py::test_auth_user_expired_token PASSED                                                     [ 81%]
tests/test_config.py::FLAKE8 PASSED                                                                              [ 83%]
tests/test_config.py::BLACK PASSED                                                                               [ 84%]
tests/test_config.py::test_config_development PASSED                                                             [ 85%]
tests/test_config.py::test_config_testing PASSED                                                                 [ 87%]
tests/test_config.py::test_config_production PASSED                                                              [ 88%]
tests/test_user.py::FLAKE8 PASSED                                                                                [ 90%]
tests/test_user.py::BLACK PASSED                                                                                 [ 91%]
tests/test_user.py::test_encode_access_token PASSED                                                              [ 92%]
tests/test_user.py::test_decode_access_token_success PASSED                                                      [ 94%]
tests/test_user.py::test_decode_access_token_expired PASSED                                                      [ 95%]
tests/test_user.py::test_decode_access_token_invalid PASSED                                                      [ 97%]
tests/util.py::FLAKE8 PASSED                                                                                     [ 98%]
tests/util.py::BLACK PASSED                                                                                      [100%]

=================================================== warnings summary ===================================================
src/flask_api_tutorial/api/exceptions.py::FLAKE8
  /Users/aaronluna/Projects/flask-api-tutorial/.tox/py37/lib/python3.7/site-packages/flask_restx/model.py:12: DeprecationWarning: Using or importing the ABCs from 'collections' instead of from 'collections.abc' is deprecated since Python 3.3,and in 3.9 it will stop working
    from collections import OrderedDict, MutableMapping

src/flask_api_tutorial/api/exceptions.py::FLAKE8
  /Users/aaronluna/Projects/flask-api-tutorial/.tox/py37/lib/python3.7/site-packages/flask_restx/api.py:28: DeprecationWarning: The import 'werkzeug.cached_property' is deprecated and will be removed in Werkzeug 1.0. Use 'from werkzeug.utils import cached_property' instead.
    from werkzeug import cached_property

src/flask_api_tutorial/api/exceptions.py::FLAKE8
  /Users/aaronluna/Projects/flask-api-tutorial/.tox/py37/lib/python3.7/site-packages/flask_restx/swagger.py:12: DeprecationWarning: Using or importing the ABCs from 'collections' instead of from 'collections.abc' is deprecated since Python 3.3,and in 3.9 it will stop working
    from collections import OrderedDict, Hashable

-- Docs: https://docs.pytest.org/en/latest/warnings.html
=========================================== 71 passed, 3 warnings in 29.32s ============================================
_______________________________________________________ summary ________________________________________________________
  py37: commands succeeded
  congratulations :)
Checkpoint
As promised, we have implemented all of the required features in the User Management/JWT Authentication section of the requirements list:
User Management/JWT Authentication
New users can register by providing an email address and password
Existing users can obtain a JWT by providing their email address and password
JWT contains the following claims: time the token was issued, time the token expires, a value that identifies the user, and a flag that indicates if the user has administrator access
JWT is sent in access_token field of HTTP response after successful authentication with email/password
JWTs must expire after 1 hour (in production)
JWT is sent by client in Authorization field of request header
Requests must be rejected if JWT has been modified
Requests must be rejected if JWT is expired
If user logs out, their JWT is immediately invalid/expired
If JWT is expired, user must re-authenticate with email/password to obtain a new JWT
API Resource: Widget List
All users can retrieve a list of all widgets
All users can retrieve individual widgets by name
Users with administrator access can add new widgets to the database
Users with administrator access can edit existing widgets
Users with administrator access can delete widgets from the database
The widget model contains a "name" attribute which must be a string value containing only lowercase-letters, numbers and the "-" (hyphen character) or "_" (underscore character).
The widget model contains a "deadline" attribute which must be a datetime value where the date component is equal to or greater than the current date. The comparison does not consider the value of the time component when this comparison is performed.
URL and datetime values must be validated before a new widget is added to the database (and when an existing widget is updated).
The widget model contains a "name" field which must be a string value containing only lowercase-letters, numbers and the "-" (hyphen character) or "_" (underscore character).
Widget name must be validated before a new widget is added to the database (and when an existing widget is updated).
If input validation fails either when adding a new widget or editing an existing widget, the API response must include error messages indicating the name(s) of the fields that failed validation.
Creating the Widget API will build upon the concepts introduced while the Auth API was being implemented. We will use most of these concepts and encounter many new ones in order to build the Widget API. If you have any questions/feedback, please leave a comment!