Part 3: API Configuration and User Registration

Photo by ZSun Fu on Unsplash
Tutorial Sections
- Project Overview
- Part 1: Project Setup and Environment Configuration
- Part 2: Database Models, Migrations and JWT Setup
- Part 3: API Configuration and User Registration
- Part 4: JWT Authentication, Decorators and Blacklisting Tokens
- Part 5: RESTful Resources and Advanced Request Parsing
- Part 6: Pagination, HATEOAS and Parameterized Testing
Table of Contents
Github Links for Part 3
Project Structure
The chart below shows the folder structure for this section of the tutorial. In this post, we will work on all files marked as NEW CODE. Files that contain code from previous sections but will not be modified in this post are marked as NO CHANGES.
. (project root folder) |- src | |- flask_api_tutorial | |- api | | |- auth | | | |- __init__.py | | | |- business.py | | | |- dto.py | | | |- endpoints.py | | | | | |- widgets | | | |- __init__.py | | | | | |- __init__.py | | | |- models | | |- __init__.py | | |- user.py | | | |- util | | |- __init__.py | | |- datetime_util.py | | |- result.py | | | |- __init__.py | |- config.py | |- tests | |- __init__.py | |- conftest.py | |- test_auth_register.py | |- test_config.py | |- test_user.py | |- util.py | |- .env |- .gitignore |- .pre-commit-config.yaml |- pyproject.toml |- pytest.ini |- README.md |- run.py |- setup.py |- tox.iniKEY:FOLDERNEW CODENO CHANGESEMPTY FILE
Introduction
It’s finally time to start configuring the API! Keep in mind that the URL routes and the business logic that takes place when a user sends a GET, POST, PUT or DELETE request could all be accomplished using the functions, classes and decorators provided in Flask (that is, without using the Flask-RESTx extension). However, doing so would require considerably more code and would not give us the Swagger UI page to document and test the API.
Before we begin, let’s discuss what makes a REST API RESTful and make a decision to abide (or not to abide) by the requirements and constraints of REST.
Understanding REST
The term “REST” was introduced in 2000 by Roy Fielding in his doctoral thesis, titled Architectural Styles and the Design of Network-based Software Architectures. I strongly recommend trying to fully digest Fielding’s thesis. At the very least you should read Chapter 5 Representational State Transfer (REST).
What makes an API RESTful is much more than creating a set of URIs and implementing the response to GET, POST, PUT, etc. requests. First of all, REST does not require HTTP – REST is protocol-agnostic. HTTP just happens to be very popular and well-suited to REST systems. REST is truly about resource state, and how hypermedia defines the actions available to these resources. REST is also about the media types that the system uses to represent the resources.
I say these things because most so-called REST APIs and articles explaining how to design and construct a REST API are not truly RESTful. In this section of the tutorial we will implement the user registration and authentication processes. What is the correct way to design a REST API to perform these actions? Are these actions even appropriate for a REST API? The answer is not as straightforward or obvious as you might think.
User Authentication in a RESTful System
The following questions/topics are from stackoverflow:
- Understanding REST: Verbs, error codes, and authentication
- RESTfully design /login or /register resources?
- Which HTTP method should Login and Logout Actions use in a “RESTful” setup
- How to design a restful url for login?
- Do sessions really violate RESTfulness?
- RESTful Authentication
I recommend skimming these discussions. What I took away from them is that there is nothing close to a consensus on the topic of the “correct” way to design a RESTful authentication system. The design that we will implement ensures that the client’s application state is never stored by the server, which adheres to the statelessness constraint of REST. However, the design I chose for the endpoint names clearly violates the naming requirements for RESTful URIs.
I believe that you should follow the tenets of REST as long as it makes sense for your application. For an authentication API, I believe the best design is to use routes with the verbs /register, /login, etc. A RESTful design where all routes strictly refer to a resource such as /session is far less intuitive, IMO.
Bearer Token Authentication
RFC6750 is the specification document that defines an authorization process where clients utilize tokens issued by a resource server to access protected resources. The tokens are exchanged via HTTP response fields and header fields. RFC6750 defines the required format and contents of these fields, as well as recommended best practices for mitigating possible security threats.
RFC6750 is a concrete implementation of the OAuth 2.0 Authorization Framework. OAuth 2.0 has its own specification document, RFC6749. To avoid duplicating work and to make maintenance of these reference docs easier, quite often terminology referred to in the Bearer Token Authentication spec references RFC6749 for the full definition/explanation. Because of this, I will refer to both documents and reproduce text whenever I am implementing something in order to fulfull a requirement for Bearer Token Authentication.
My intent is to adhere to the requirements in every possible case. Please let me know if you believe I have implemented anything incorrectly.
API Versioning
After you develop and release an API, it is important to remember that even minor changes such as a value in the request or response data changing from a string to an int could be a breaking change for clients. The best way to avoid causing frustration is to apply strict versioning with the promise that no breaking changes will be introduced within a major version.
There are several approaches to API versioning, but the one I prefer is the most explicit – embed the version number in the URL route. For example, the API route that registers a new user account will be /api/v1/auth/register. The /api/v1 prefix will apply to all API routes, and clients will expect that any tools or proceses that integrate with our API will continue to function as long as they use the same URI.
This post on the SparkNotes blog provides a nice summary of the types of changes that are breaking changes and the types that are not:
Breaking Changes (Very Bad)
- A new required parameter
- A new required key in POST bodies
- Removal of an existing endpoint
- Removal of an existing endpoint request method
- A materially different internal behavior of an API call – such as a change to the default behavior.
NOT Breaking Changes (Good)
- A new resource or API endpoint
- A new optional parameter
- A change to a non-public API endpoint
- A new optional key in the JSON POST body
- A new key returned in the JSON response body
API Configuration with Flask-RESTx
Just like every other extension, Flask-RESTx can be initialized with a Flask application object (i.e., api.init_app(app) – doing so would place the API at the website root). However, in most applications we would rather have the API routes configured with a prefix such as /api/v1 to enforce our versioning system.
The best way to accomplish this is with Flask blueprints. Typically, blueprints are used to factor a large, monolithic Flask application into logical groupings based on the functional areas of your website. Using a blueprint to isolate the API will allow us to define a url_prefix for the API endpoints.
api_bp Blueprint
In the src/flask_api_tutorial/api/__init__.py file, add the following content:
| |
There are a few important things to note about how we are configuring the api and api_bp objects:
Line 5: This is where we create the Flask blueprint object for our API. The first parameter,
"api", is the name of the blueprint. All API endpoint names will be prefixed with this value (e.g.,api.func_name). Theurl_prefixvalue makes all API routes begin with/api/v1(e.g.,api/v1/auth/login).Lines 6, 14: The API will implement Bearer token authentication. Providing a value for
authorizationsto the Flask-RESTxApiconstructor will allow the user to add a JWT to the header of all requests sent through the Swagger UI. Specifically, the Swagger UI will contain a button labeled "Authorize" that opens a modal dialog prompting the user for the value of theBeareraccess token.Line 9: Passing the
api_bpblueprint object to the Flask-RESTxApiconstructor links the two objects and is how all API routes become prefixed with theurl_prefixvalue fromapi_bp. Later, we will import theapi_bpobject in therunmodule and register the blueprint with the Flask application object to complete the process of configuring the API.Lines 10-12: All of these string values are displayed in the Swagger UI.
Line 13: The
docvalue controls the URL path of the Swagger UI. With this value, the Swagger UI path is/api/v1/ui.
The next step in configuring the API is registering the api_bp blueprint with our Flask application. The correct place to do this is within the create_app method in the src/flask_api_tutorial/__init__.py file. Open this file and add the highlighted lines below:
| |
It’s a good idea to make sure that everything still works and we have not broken anything, so run the unit tests with tox. They should all pass. Then, run flask routes to see the new URL routes that have been registered in our application:
(flask-api-tutorial) flask-api-tutorial $ flask routes
Endpoint             Methods  Rule
-------------------  -------  --------------------------
api.doc              GET      /api/v1/ui
api.root             GET      /api/v1/
api.specs            GET      /api/v1/swagger.json
restplus_doc.static  GET      /swaggerui/<path:filename>
static               GET      /static/<path:filename>
The first four routes in the list were added by registering the api_bp blueprint with our application. Next, run flask run to start the development server and point your browser to http://localhost:5000/api/v1/ui (if you are using a different port or hostname on your dev machine, adjust accordingly).
You should see something similar to the screenshot below. Note that the URL path, API version, title and description are taken directly from values we provided to the Api constructor in the src/flask_api_tutorial/api/__init__.py file.

Figure 1 - Swagger UI without API Routes
API Namespaces
In the same way that we can organize our Flask project with blueprints, we can organize our Flask-RESTx API with namespace objects. Our API will contain two namespaces: auth_ns and widget_ns, which correspond to the flask_api_tutorial.api.auth and flask_api_tutorial.api.widgets packages, respectively. For now, we will focus on auth_ns, since this is the namespace that handles authentication requests.
Currently, the src/flask_api_tutorial/api/auth folder only contains the __init__.py file. We need to create 3 new files in the auth folder: business.py, dto.py and endpoints.py. Run the command below from the project root folder to create the files (or create them yourself however you wish):
(flask-api-tutorial) flask-api-tutorial $ cd src/flask_api_tutorial/api/auth && touch business.py dto.py endpoints.py
(flask-api-tutorial) flask-api-tutorial/src/flask_api_tutorial/api/auth $ ls -al
total 8
drwxr-xr-x  7 aaronluna  staff  224 Dec 30 01:20 .
drwxr-xr-x  5 aaronluna  staff  160 Dec 27 02:47 ..
-rw-r--r--  1 aaronluna  staff    0 Dec 29 13:05 __init__.py
-rw-r--r--  1 aaronluna  staff    0 Dec 30 01:20 business.py
-rw-r--r--  1 aaronluna  staff    0 Dec 30 01:20 dto.py
-rw-r--r--  1 aaronluna  staff    0 Dec 30 01:20 endpoints.py
All of these files are standard for any Flask-RESTx API namespace package that I create. These files perform specific roles that are common to request handling and response formatting:
business.py: This file contains the business logic that executes when an API endpoint in this namespace receives a valid request. (e.g., process registration request, process login request, etc.)
dto.py: DTO stands for data transfer object. This file will contain custom objects that parse and validate request data, and API model classes that will serialize our database model classes to JSON objects before sending them in an HTTP response.
endpoints.py: This file will contain Flask-RESTx
Resourceclasses. Resources are the most important individual parts of a REST API. Each resource is an API endpoint, and the methods we add to eachResourceclass control the HTTP methods the endpoint responds to . The following method names are automatically mapped to the corresponding HTTP methods:get,post,put,delete,patch,optionsandhead.
Before we begin implementing the API routes and business logic for the authentication processes, we need to understand how to parse the information sent by the client in a HTTP request.
Request Parsing and Response Marshalling
Flask-RESTx provides two different approaches for parsing and validating request data. Deciding which method to use will depend on the complexity of the data and the interface you provide to the client.
In many cases the source of an HTTP POST request is a form submission from a page. Another common scenario is an HTTP GET request that occurs when a client accesses a URL with a query string containing pertinent request data. In these cases, you should use the RequestParser class provided in the reqparse module.
If your API endpoint expects a complex object (e.g., a blog post containing full content and metadata) and the source of the reqeust data is NOT a web form (i.e., client is accessing the API programmatically), then you should use the fields module to document the format of the object and instruct the client to send the object as serialized JSON. The expected JSON format is defined as an API model, and is used both for validating request data and documenting the output format for objects returned from HTTP GET requests.
Documenting the expected format of request and response data has an additional benefit – the Swagger UI automatically documents the expected format for any API routes we specify.
Request Parser Configuration
Flask-RESTx provides the RequestParser class as a way to parse data from the Flask request object. For each value to be parsed, we add an instance of the Argument class to the RequestParser. The Argument class is very flexible and is configured by the parameters listed below:
- name: The name of the argument to parse from the request.
- default: The value to use if the argument is not found in the request, default value is
None. - type: The type to convert the parsed argument to. This can be any primitive (e.g., int, str, etc.), but Flask-RESTx also provides more advanced types in the
inputsmodule (e.g., email address, URL, etc.). You can also define your own custom data types. - required: By default, arguments that are added to a
RequestParserthat are not found in the request are set to the default value. Ifrequired=True, any request where the argument is not found will be aborted with HTTP exception 400HTTPStatus.BAD_REQUEST. location: Where to look on the
Flask.requestobject for the argument (can beargs,form,headers,json,valuesorfiles). The default behavior is to parse values fromvaluesandjson.valuesis actually a dictionary that conbinesargsandform. Also, you can specify multiple locations with a list (e.g.,["form", "args"]), the last location in the list takes precedence in the result set.I'm sure that this explanation is confusing. I think that you should explicitly define the location on the request object where you expect the data to be found. Since this value is documented on the Swagger UI, it is beneficial to users of the API to know how their requests should be constructed.
- help: If you provide a value, it will be pre-pended to any error message that is raised while parsing the argument.
- nullable: Whether a null or
Nonevalue is allowed. By default, this is True.
I recommend reading and fully understanding the documentation explaining how to specify input validation for advanced and custom data types. Also, please review the API documentation for the inputs module which contains a list of advanced data types that are available before you create your own custom validator.
Defining API Models
For POST and PUT requests that create a new resource or update an existing resource in a collection, you should instruct the client to send the resource as a JSON object in the request body. You can define the expected API model by creating a dict object where the keys are the names of the attributes on the JSON object and the values are a class that will validate and convert the attribute to the required data type.
In the same way that the inputs module provides primitive data types and a set of predefined data formats to specify the type of each RequestParser Argument, the fields module fulfills the same role for model objects. You can find a list of pre-defined fields in the API documentation. You can also easily create your own custom field by subclassing fileds.Raw, as shown in the Flask-RESTx docs.
To avoid duplicating code, if you need to define two models which represent the same ORM object but expose slightly different sets of attributes, you can inherit a model rather than defining the same set of fields twice.
Response Marshalling
API models can be used to document the output of an API operation as well as the expected request format. This is most often used to return a representation of an ORM object with a subset of the attributes defined by the actual ORM model. For example, the User class includes id and password_hash attributes which store the primary key for the database table and password hash used to verify a user’s password during login. There’s very little security risk to exposing these two values, but at the bare minimum they expose implementation details which the client has no need for.
We will see this shortly in the auth/user API route which inspects the access token of the current user and returns a representation of the User object as the HTTP response. The API model we define as the expected output of this API route omits the id and password_hash attributes from the response.
auth_ns Endpoints
Within the auth_ns namespace, we will create the four API endpoints listed in the table below:
| Endpoint Name | URL Path | HTTP Method | Authentication Process |
|---|---|---|---|
| api.auth_register | /api/v1/auth/register | POST | Register new user |
| api.auth_login | /api/v1/auth/login | POST | Authenticate user |
| api.auth_user | /api/v1/auth/user | GET | Get logged-in user info |
| api.auth_logout | /api/v1/auth/logout | POST | Blacklist access token |
We will implement each endpoint in the same way, following the steps listed below:
- Create request parsers/API models to validate request data and serialize response data.
- Define the business logic necessary to process the request if validation succeeds.
- Create a class that inherits from
Resourceand bind it to the API endpoint/URL route. - Define the set of HTTP methods that the API endpoint will support and expose methods on the concrete
Resourceclass for each. Methods namedget,post,put,delete,patch,optionsorheadwill be called when the API endpoint receives a request of the same HTTP method type. - Document the
Resourceclass and all methods as explained in the Flask-RESTx docs. Most of the content on the Swagger UI page is generated by decorating your concreteResourceclasses and their methods. - Utilize the business logic created in Step 2 within the approprate HTTP methods to process the request.
- Create unit tests to verify that the input validation provided by the request parsers/API models is working correctly, and verify the endpoint behaves as expected.
This process will result in an updated Swagger UI page containing a documented version of the API endpoint which allows clients to construct data in the expected format, send HTTP requests and inspect responses from the server.
api.auth_register Endpoint
The first resource we create will handle the process of registering a new user account. If this were a full-stack tutorial, we would probably create a registration form that calls this API endpoint when a user clicks the Submit button. I’m leaving all decisions regarding the front-end in your hands, therefore designing such a form is your task to conquer.
auth_reqparser Request Parser
When a new user attempts to register, what data is required? The way our User model is defined, the value for email must be unique (i.e., two users cannot register with the same email address). The only other value which is provided by the user is their password, which is not stored in the database (the actual password is ony needed to create the password_hash value and to authenticate a user attempting to login). Open src/flask_api_tutorial/api/auth/dto.py, add the content below and save the file:
"""Parsers and serializers for /auth API endpoints."""
from flask_restx.inputs import email
from flask_restx.reqparse import RequestParser


auth_reqparser = RequestParser(bundle_errors=True)
auth_reqparser.add_argument(
    name="email", type=email(), location="form", required=True, nullable=False
)
auth_reqparser.add_argument(
    name="password", type=str, location="form", required=True, nullable=False
)
The first thing to note here is the parameter bundle_errors=True when we instantiate auth_reqparser. This value is false by default, which means that only a single error is reported whenever the request data fails validation. I prefer to have all error messages reported for all arguments in our request parser.
Next, notice that we have specified type=email() for the email argument. This is a pre-defined type provided by Flask-RESTx that verifies that the value sent in the request is a valid email address. If a request includes a value of “213323 kjljk” for email, we expect that the user will not be registered and the response will include a status code indicating that a validation error occurred and a message explaining that the value for email is not valid.
The remaining parameters are the same for both arguments: location="form", required=True, nullable=False. The purpose of each parameter was explained previously, and should answer any questions you have about these settings.
Process Registration Request
Next, we need to create a function that performs the following actions:
- Add a new user to the database
- Issue an access token for the new user
- Construct an HTTP response including the access token and send the response the client
For any response containing sensitive information (e.g., access tokens, credentials, etc), RFC6749 (OAuth 2.0) defines the required and optional fields in both the response body and header:
5.1 Successful ResponseThe authorization server issues an access token and optional refresh token, and constructs the response by adding the following parameters to the entity-body of the HTTP response:
access_token
REQUIRED. The access token issued by the authorization server.
token_type
REQUIRED. The type of the token issued as described in Section 7.1. Value is case insensitive.
expires_in
RECOMMENDED. The lifetime in seconds of the access token. For example, the value "3600" denotes that the access token will expire in one hour from the time the response was generated. If omitted, the authorization server SHOULD provide the expiration time via other means or document the default value.
refresh_token
OPTIONAL. The refresh token, which can be used to obtain new access tokens using the same authorization grant as described in Section 6.
scope
OPTIONAL, if identical to the scope requested by the client; otherwise, REQUIRED. The scope of the access token as described by Section 3.3.
The parameters are included in the entity-body of the HTTP response using the "application/json" media type as defined by [RFC4627]. The parameters are serialized into a JavaScript Object Notation (JSON) structure by adding each parameter at the highest structure level. Parameter names and string values are included as JSON strings. Numerical values are included as JSON numbers. The order of parameters does not matter and can vary.
The authorization server MUST include the HTTP "Cache-Control" response header field [RFC2616] with a value of "no-store" in any response containing tokens, credentials, or other sensitive information, as well as the "Pragma" response header field [RFC2616] with a value of "no-cache".
For example:
HTTP/1.1 200 OK
Content-Type: application/json;charset=UTF-8
Cache-Control: no-store
Pragma: no-cache
{
  "access_token": "2YotnFZFEjr1zCsicMWpAA",
  "token_type": "example",
  "expires_in": 3600,
  "refresh_token": "tGzv3JOkF0XG5Qx2TlKWIA",
  "example_parameter": "example_value"
}
Open src/flask_api_tutorial/api/auth/business.py, add the content below and save the file:
| |
Lines 12-13: The first thing we do is verify that the email address provided by the user has not been registered. If a
Useralready exists with the same email address, the request is aborted.Line 14-16: If the email address has not been registered, we proceed to create a
Userobject with the provided email and password values, and then commit the new user to the database.Line 17: The response needs to include an access token and we can issue one by calling
encode_access_tokenon theuserobject.Line 18: The specification cited above requires that any response containing an access token must have the
Cache-ControlandPragmafields present in the header. The only way to add the necessary headers is by constructing the response object ourselves.Flask provides the
jsonifyfunction which takes either a dict, a list of arguments, or a list of keyword-arguments and converts the data to a JSON object (similar to callingjson.dumpson an object). Finally,jsonifyreturns a response object with the JSON object as the response body.Line 21: Per the specification, the
access_tokenattribute is included as a parameter of the serialized JSON in the response body.Line 22: Per the specification, the
token_typeattribute is included as a parameter of the serialized JSON in the response body.Line 23: Per the specification, the
expires_inattribute is included as a parameter of the serialized JSON in the response body.We calculate the lifespan of the
access_tokenfrom theapp.configvaluesTOKEN_EXPIRE_HOURSandTOKEN_EXPIRE_MINUTES. If theapp.config["TESTING"]flag is set, then five seconds is used as the lifespan of the token. Otherwise, the lifespan in seconds is calculated withTOKEN_EXPIRE_HOURS * 3600 + TOKEN_EXPIRE_MINUTES * 60.Line 25: The most appropriate HTTP status code for a response indicating we have created a new resource is 201
HTTPStatus.CREATED.Line 26-27: The final requirement in the specification cited above is that the response must include the HTTP
Cache-Controlresponse header field with a value ofno-store, and thePragmaresponse header field with a value ofno-cacheLine 28: After ensuring that all required response body and header elements have been created and populated correctly, we send the HTTP response containing the newly issued
access_tokento the client.
Next, we need to create the API endpoint and incorporate it with the auth_reqparser and process_registration_request function.
RegisterUser Resource
If you look back at all of the material covered in this tutorial, it’s amazing (IMO) that we haven’t written one line of code that that makes our Flask application perform one of the basic functions of a web server: URL routing. It’s time to fix that.
In an application that adheres to the principles of REST, each API endpoint (IOW, each URL) is a representation of a resource. Clients interact with resources by sending HTTP requests. The method type of the client’s request (e.g., GET, PUT, POST) is used to perform different operations, and the nature of the operation should be related to the. For this reason, when we need to add a URL route to the API, we define a class that inherits from the flask_restx.Resource base class.
According to the table defining the API endpoints for the auth_ns namespace, users can register for a new account by sending a POST request to /api/v1/auth/register. To create this API endpoint, open src/flask_api_tutorial/api/auth/endpoints.py, add the content below and save the file:
| |
Line 9: Flask-RESTx
Namespaceobjects are used to group a related set of API endpoints in the same way that FlaskBlueprintobjects can be used to group related URL routes.In this file, we will use the
auth_nsobject repeatedly as a decorator. Most of these have an effect on the behavior of the class or method they decorate, some do not. All of these decorators have one thing in common — they all produce some sort of documentation on the Swagger UI page.These decorators can inform clients about the expected format of request and response data or the set of possible HTTP status codes that the client can expect to receive from the server in a response. Also, docstrings for HTTP methods are rendered on the Swagger UI page and should be used to provide a short description of the method's purpose.
Check out the Flask-RESTx docs for examples of using decorators to document the Swagger UI page (if you need even more info it's probably in the API documentation).
Line 12: The
routedecorator is used to decorate a class that inherits fromResource. Here, the@auth_ns.routedecorator registers theRegisterUserresource with theauth_nsnamespace.The first argument (
"/register") is the URL route to register. Theendpointparameter overrides the default value for the endpoint name. I like to specify this value to enforce a consistent naming scheme for all endpoints within the same namespace.Line 13: The
RegisterUserclass, which adds the "/register" endpoint to theauth_nsnamespace, inherits from theResourcebase class.Line 16: The
expectdecorator is used to specify the data that the server expects the client to send in the HTTP request. The first argument can be either a request parser or an API model that defines the expected input model. The optional second argument is a bool value namedvalidate. Ifvalidate=True, the request data will be checked to make sure it matches the expected input model.You can also control validation behavior for an entire namespace, which we did when the
auth_nsnamespace was created in Line 9. You can also define this behavior for the entire API when instantiating theapiobject, or by setting the value of the app configuration settingRESTPLUS_VALIDATE. You can override the validation behavior for each method using theexpectdecorator.We are using the
auth_reqparserwe created insrc/flask_api_tutorial/api/auth/dto.py. In the Swagger UI, this renders a form with textboxes for the email and password values and also enforces the rules we configured for each argument. If we had used an API model, the Swagger UI instead renders a single textbox and an example of the expected JSON.Line 17-20: The
responsedecorator is solely for documentation purposes, removing these lines would have no impact on the behavior of this API endpoint. Still, you should document all of the response codes that can possibly be received from this endpoint. The second argument is a string value explaining why the client's request resulted in the response code that was sent, and is included in the Swagger UI page.Line 21: Since the only supported HTTP method for this endpoint is
POST, the only method exposed by theRegisterUserclass is namedpost.Line 22: This docstring will be rendered on the Swagger UI page.
Line 23-25: In order to access the email and password values provided by the user, we call the
parse_argsmethod on theauth_reqparerobject. This method returns a dict object containing the validated arguments.Line 26: Finally, we call the method we created to process a registration request and provide the email and password provided by the user.
Add auth_ns Namespace to api
In order to register the auth_ns namespace with the api object, open src/flask_api_tutorial/api/__init__.py and add the highlighted lines (Line 5 and Line 19):
| |
The path parameter in the add_namespace method sets the prefix for all endpoints in the auth_ns namepsace. This, along with the url_prefix value in Line 8, is why all URL routes in the auth_ns namespace begin with /api/v1/auth.
We can verify that our route has been correctly registered by running flask routes:
flask-api-tutorial $ flask routes
Endpoint             Methods  Rule
-------------------  -------  --------------------------
api.auth_register    POST     /api/v1/auth/register
api.doc              GET      /api/v1/ui
api.root             GET      /api/v1/
api.specs            GET      /api/v1/swagger.json
restplus_doc.static  GET      /swaggerui/<path:filename>
static               GET      /static/<path:filename>
The presence of the api.auth_register endpoint in the list of routes confirms a number of things:
- The
RegisterUserresource supports HTTPPOSTrequests, and no other method types. RegisterUseris within theauth_nsnamespace.- Because the
api_bpBlueprintobject is linked with theapiobject AND registered with theappFlaskapplication object, adding theauth_nsNamespaceobject to theapiobject with theadd_namespacemethod automatically registers all routes within the namespace with theFlaskapplication object.
Start the development server by running flask run and point your browser to http://localhost:5000/api/v1/ui to check out the Swagger UI:
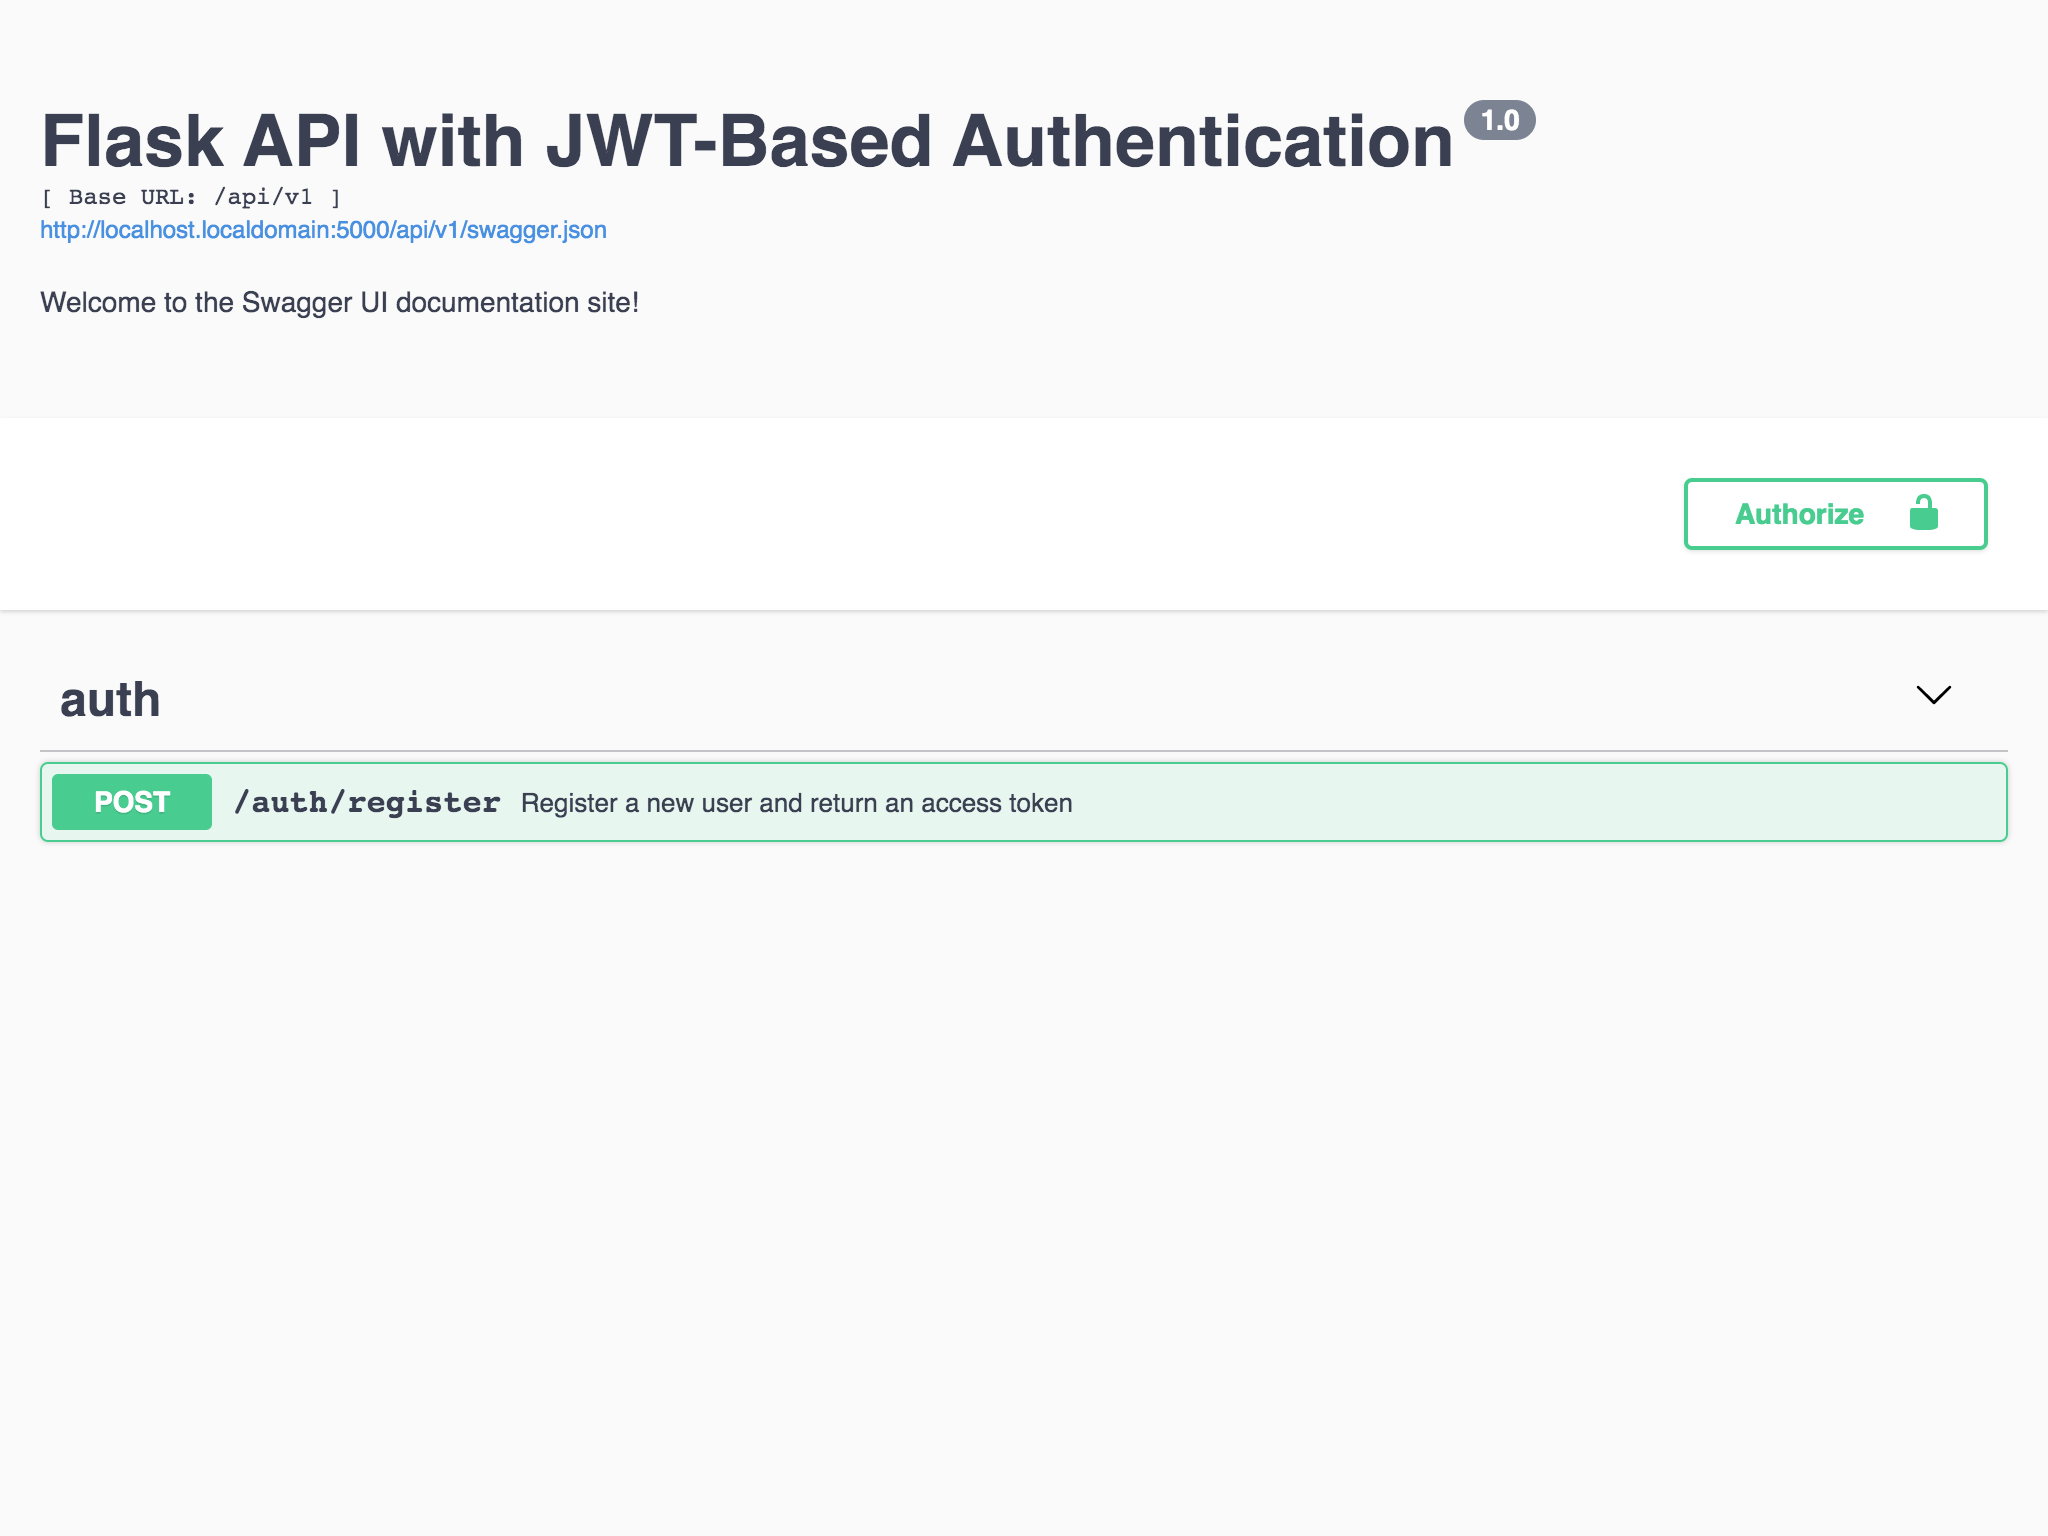
Figure 2 - Swagger UI with api.auth_register endpoint
You can click anywhere on the green bar to expand the component. It might not seem like a huge deal, but everything you see was automatically generated by Flask-RESTx (from the api object, auth_ns object, auth_reqparser, RegisterUser, etc):
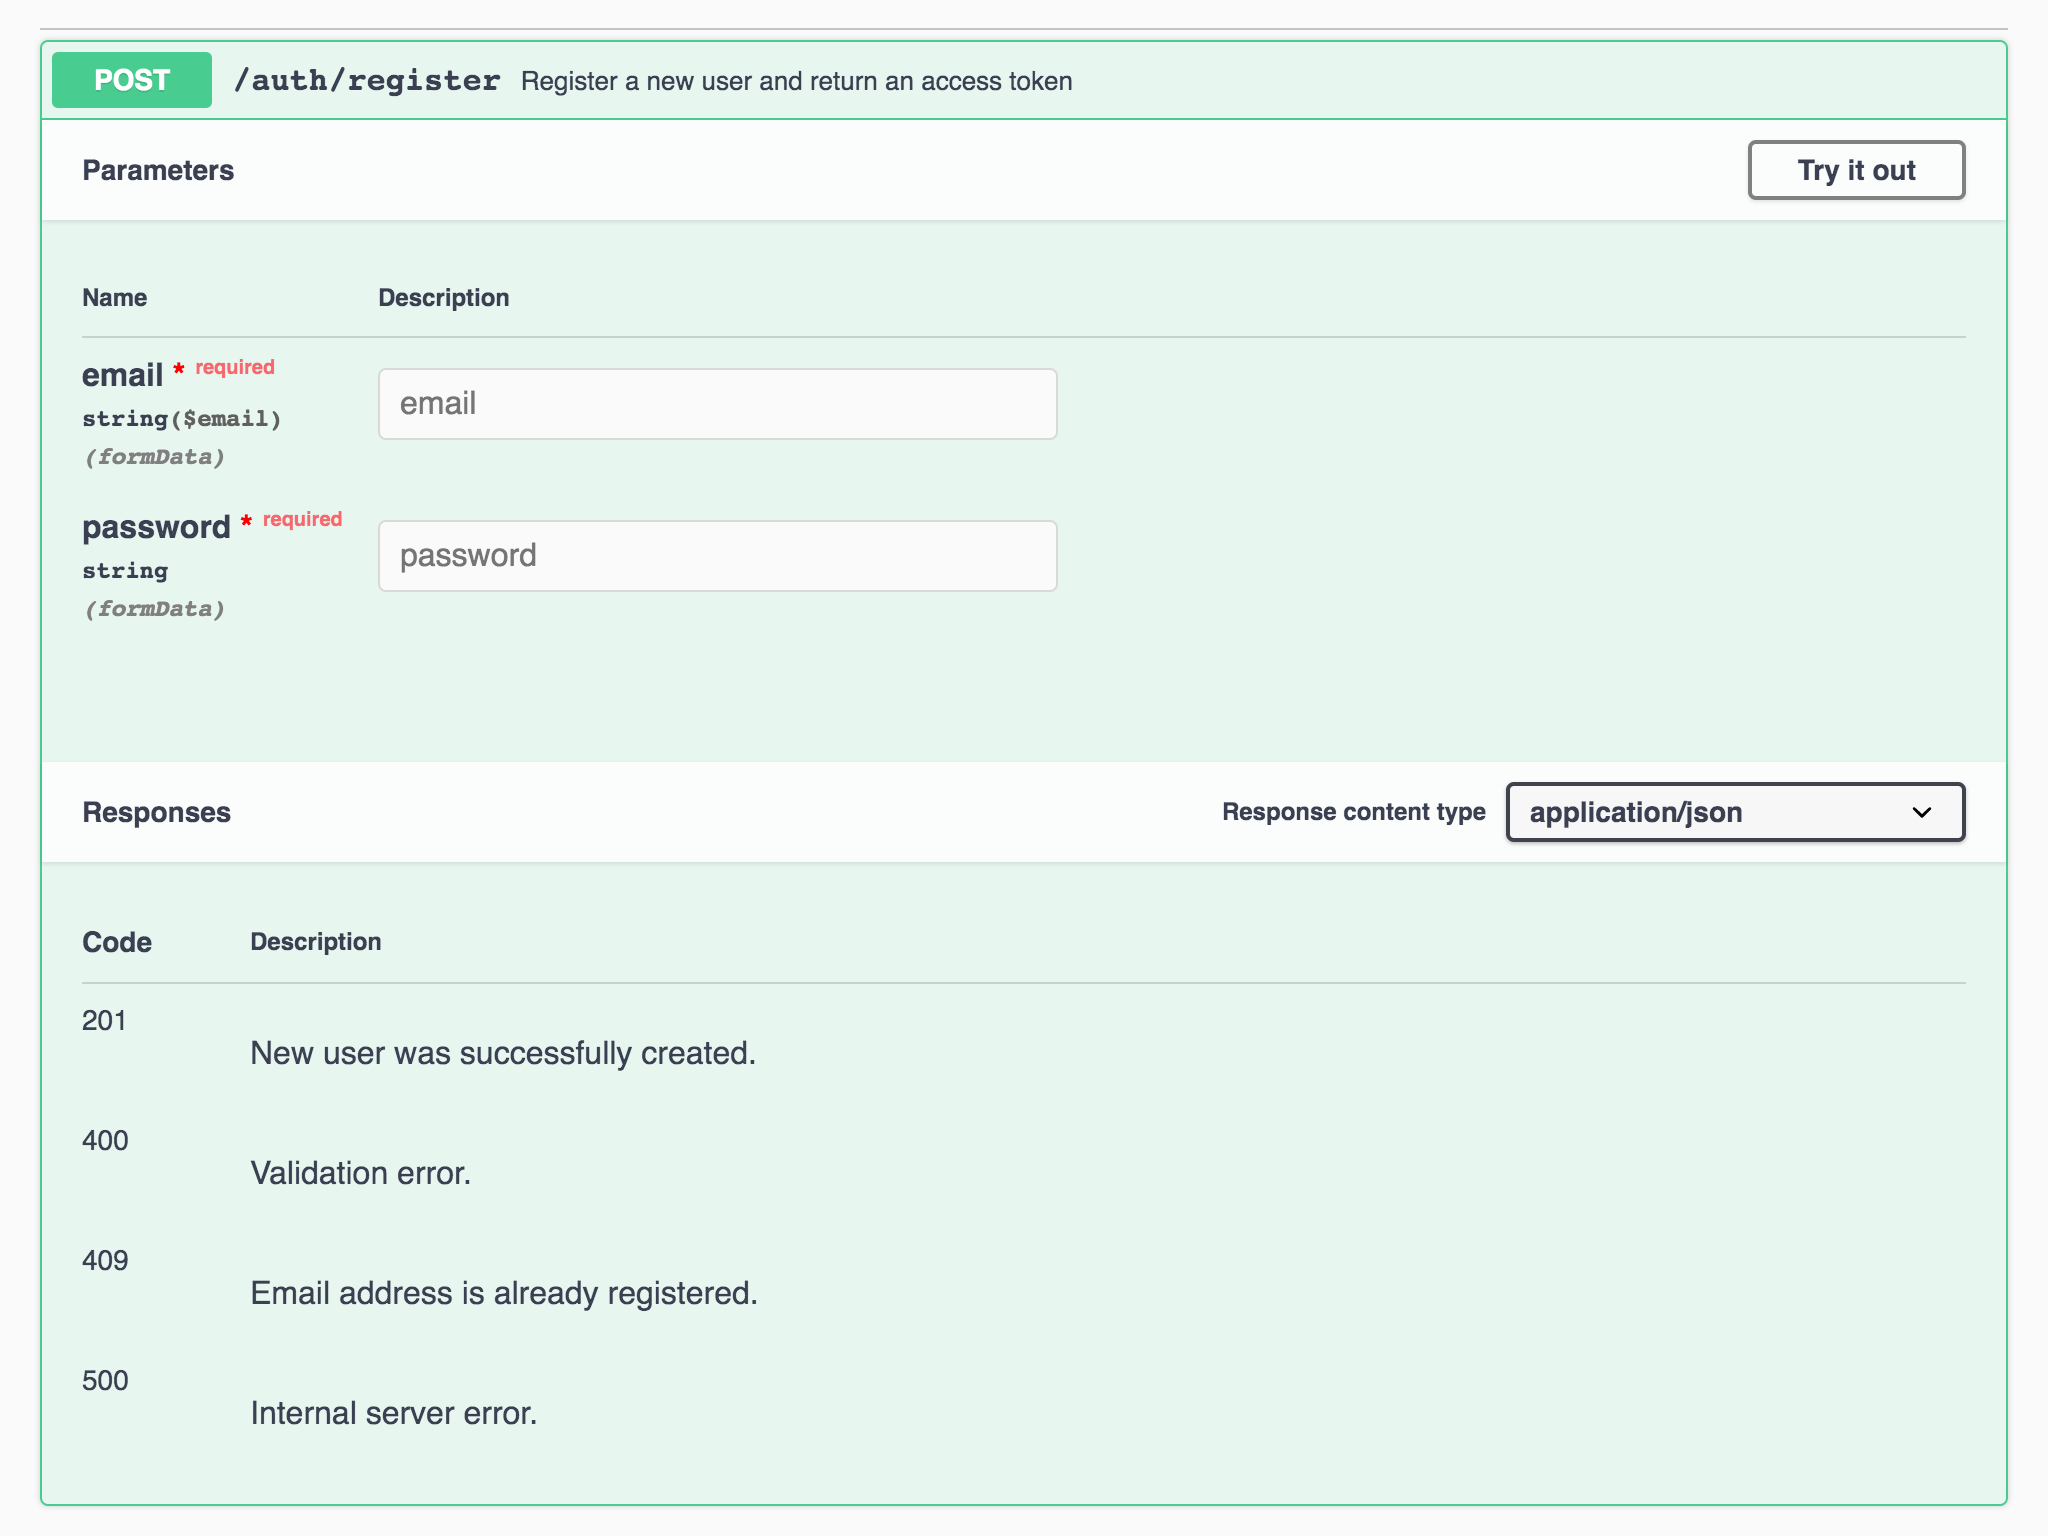
Figure 3 - api.auth_register endpoint expanded
If you’d like to send a request, click the Try It Out button. Then, enter any valid email address and any value for password and click Execute:
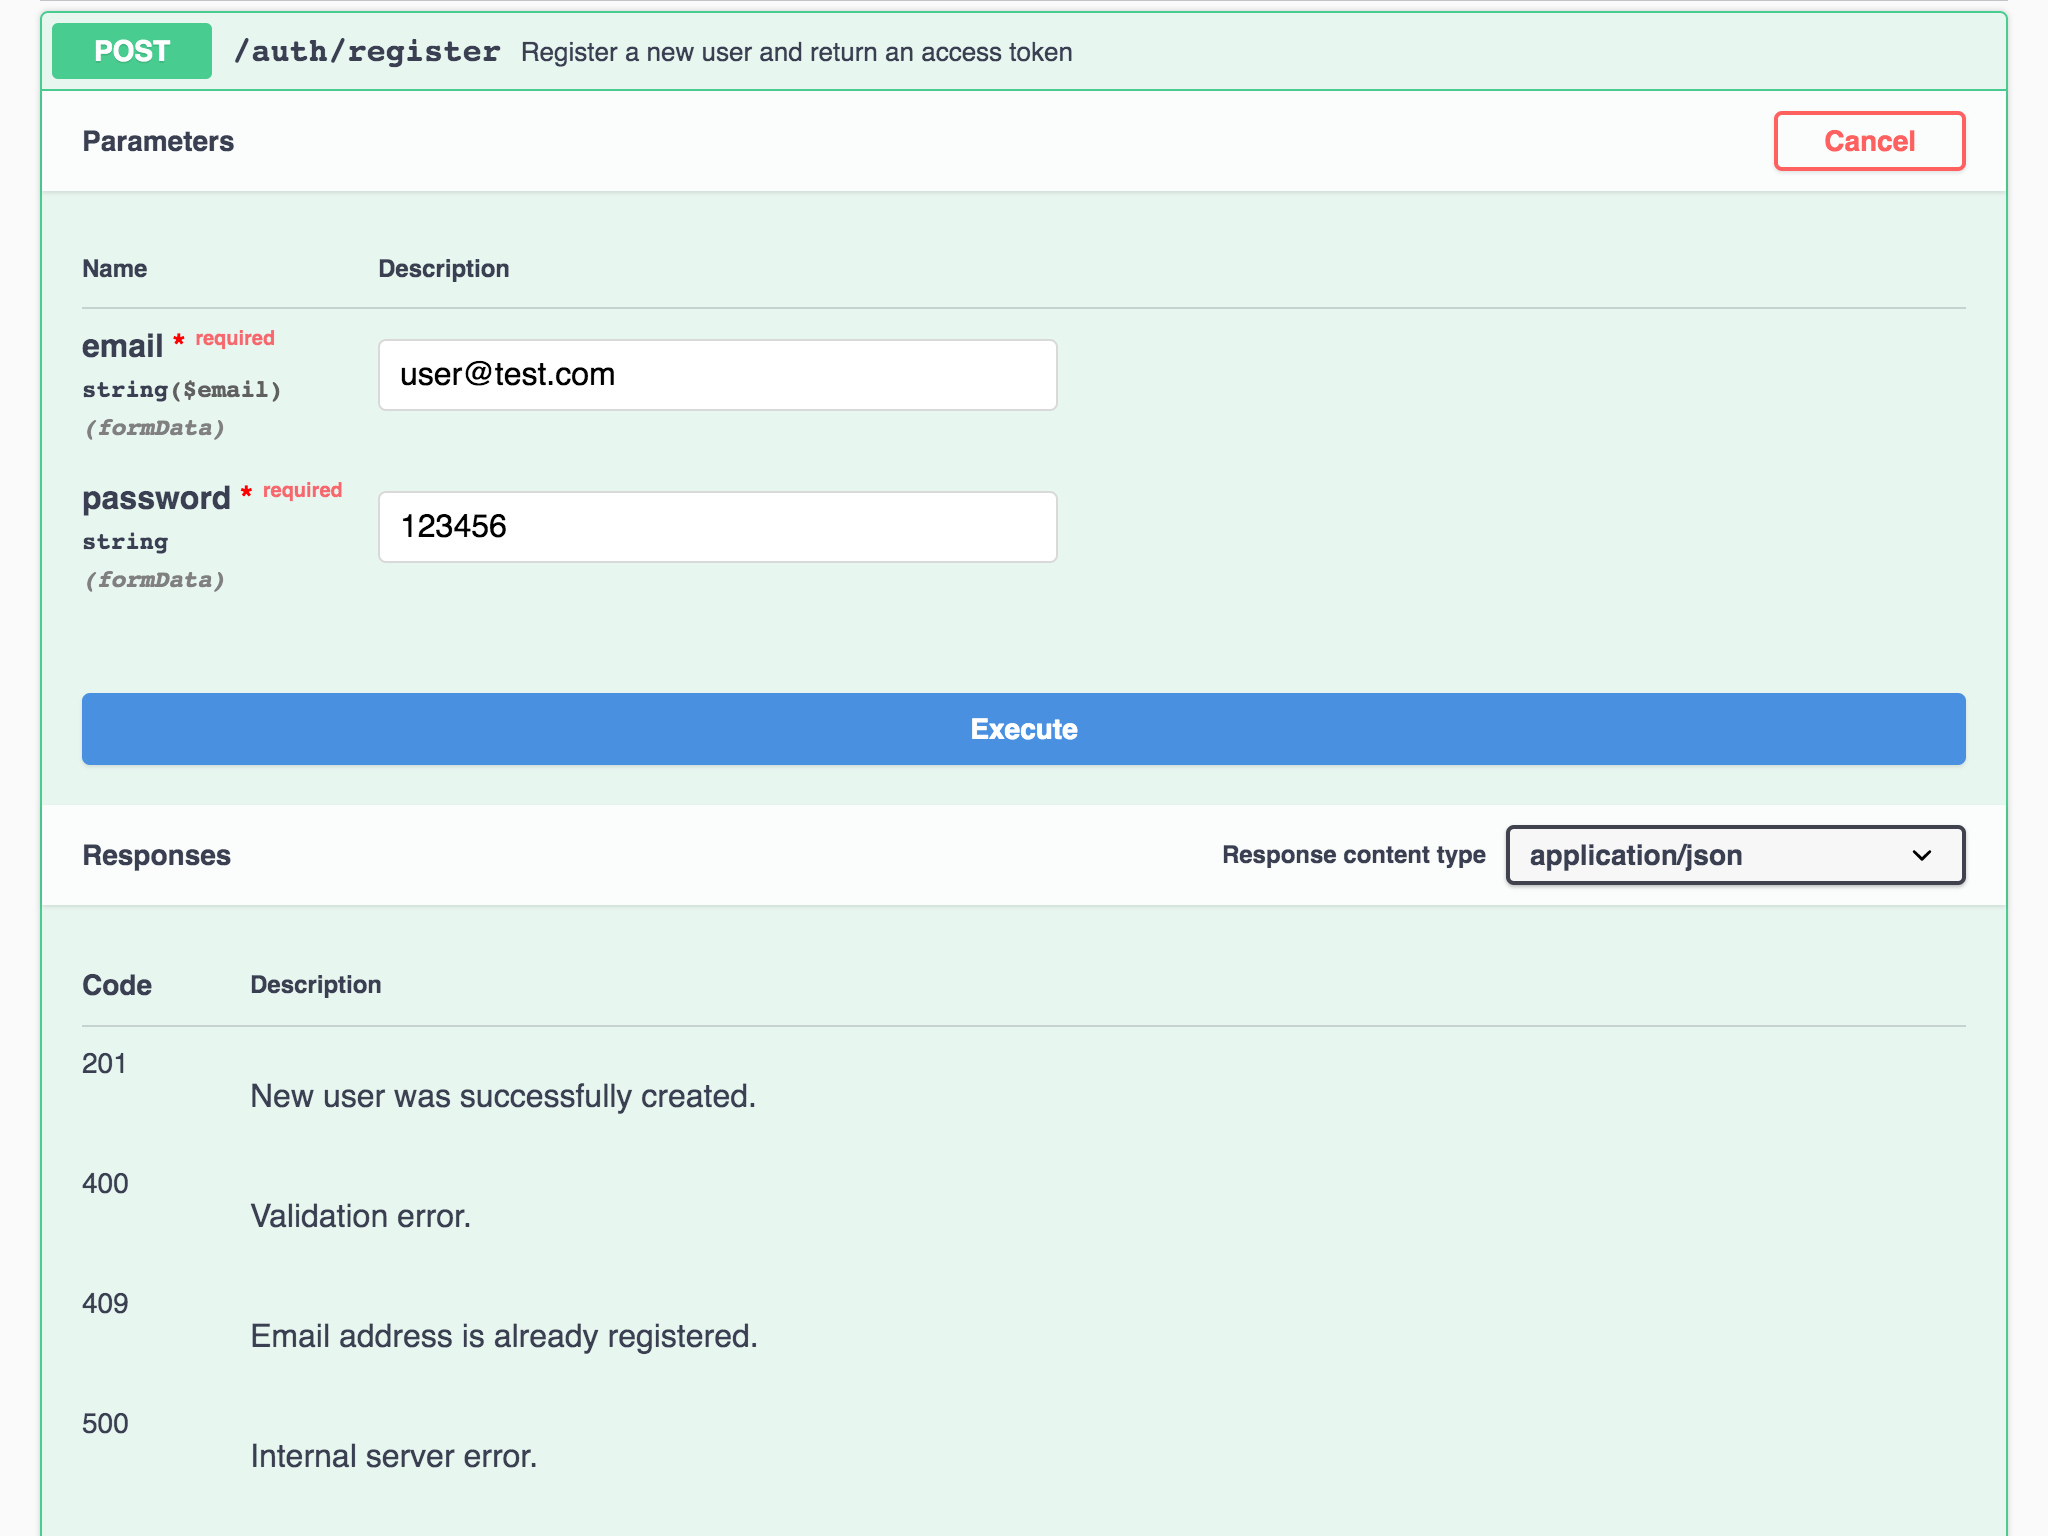
Figure 4 - api.auth_register endpoint ready to test
You should receive a response with status code 201 HTTPStatus.CREATED if the email address is formatted correctly (this is the only validation process being performed by auth_reqparser):
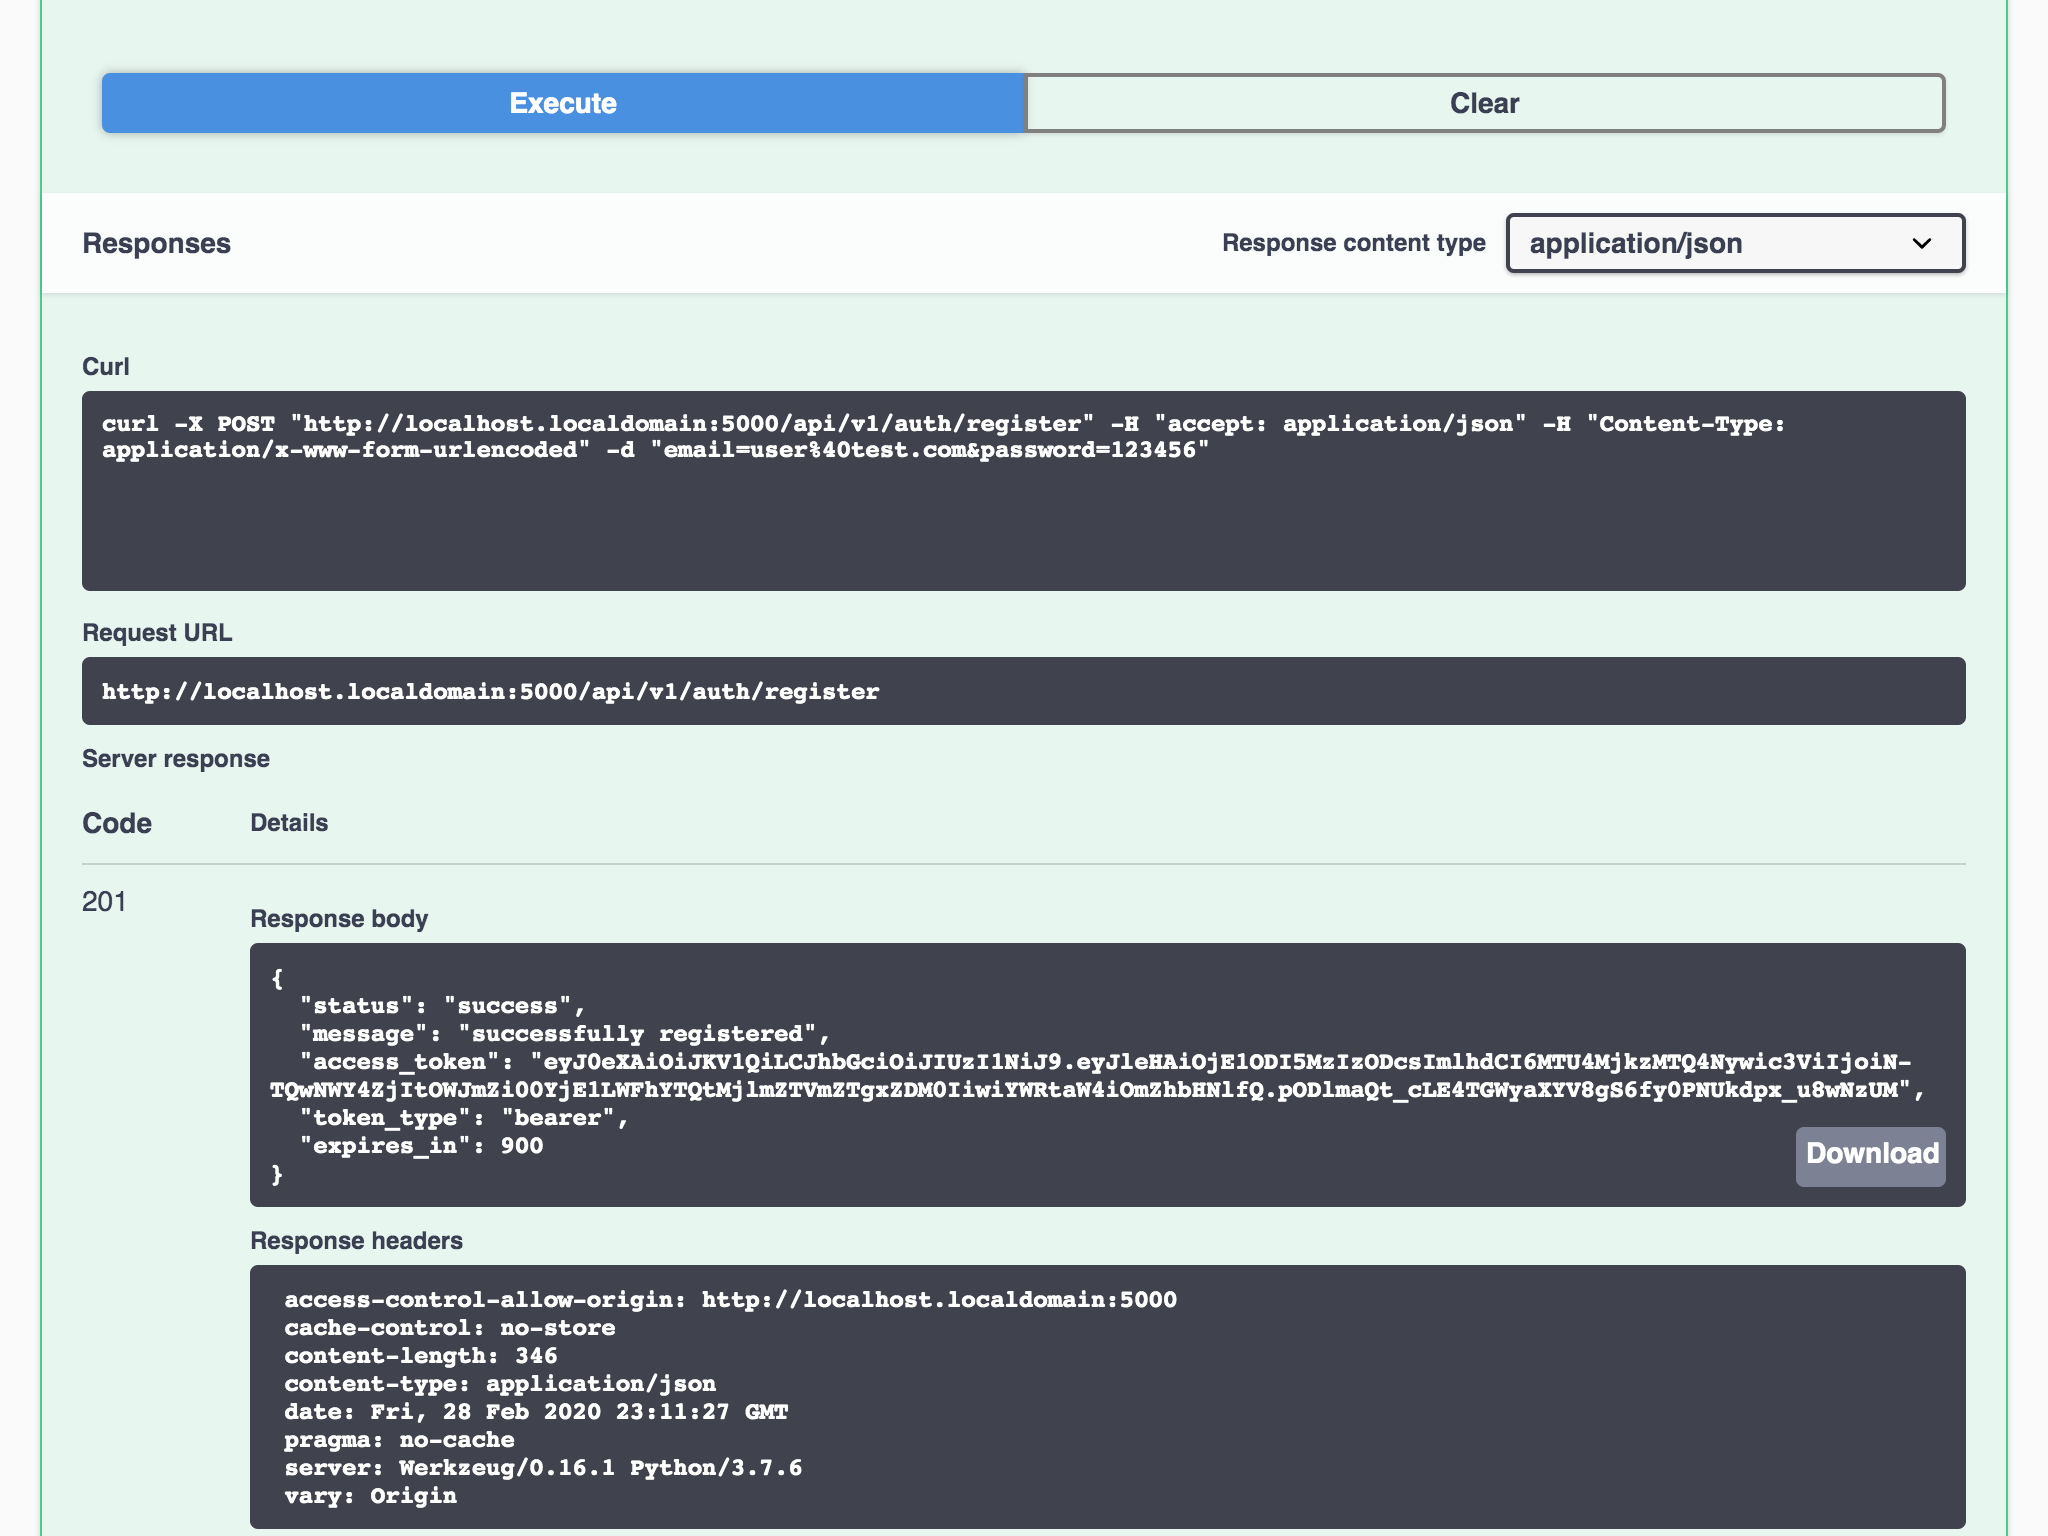
Figure 5 - New user successfully registered (Swagger UI)
If you attempt to register with an email address that already exists in the database, you should receive a response with status code 409 HTTPStatus.CONFLICT. You can also test the API with a command-line tool (e.g., httpie, curl, wget, etc):
flask-api-tutorial $ http -f :5000/api/v1/auth/register email=user@test.com password=123456

POST /api/v1/auth/login HTTP/1.1
Accept: */*
Accept-Encoding: gzip, deflate
Connection: keep-alive
Content-Length: 37
Content-Type: application/x-www-form-urlencoded; charset=utf-8
Host: localhost:5000
User-Agent: HTTPie/2.0.0

email=user%40test.com&password=123456

HTTP/1.0 409 CONFLICT
Access-Control-Allow-Origin: *
Content-Length: 79
Content-Type: application/json
Date: Sat, 03 Aug 2019 23:20:29 GMT
Server: Werkzeug/0.16.1 Python/3.7.6

{
  "message": "user@test.com is already registered",
  "status": "fail",
}Here’s an example of a successful request using httpie. Note that on the command-line or Swagger UI the response from the server is always formatted as JSON:
flask-api-tutorial $ http -f :5000/api/v1/auth/register email=user2@test.com password=123456

POST /api/v1/auth/login HTTP/1.1
Accept: */*
Accept-Encoding: gzip, deflate
Connection: keep-alive
Content-Length: 37
Content-Type: application/x-www-form-urlencoded; charset=utf-8
Host: localhost:5000
User-Agent: HTTPie/2.0.0

email=user2%40test.com&password=123456

HTTP/1.0 201 CREATED
Access-Control-Allow-Origin: *
Content-Length: 79
Content-Type: application/json
Date: Sat, 03 Aug 2019 23:20:29 GMT
Server: Werkzeug/0.16.1 Python/3.7.6

{
  "access_token": "eyJ0eXAiOiJKV1QiLCJhbGciOiJIUzI1NiJ9.eyJleHAiOjE1ODI5MzQwMzMsImlhdCI6MTU4MjkzMzEzMywic3ViIjoiNjcwOTVlZDUtZjdhYS00MGE3LTgzZGUtNzQ1YmMzYjA5NDFmIiwiYWRtaW4iOmZhbHNlfQ.ylvNfoWwhI-NRU2WS65t4ti6sTbOEDQcJYIQC6ua0Do",
  "expires_in": 900,
  "message": "successfully registered",
  "status": "success",
  "token_type": "bearer"
}
Everything appears to be working correctly for the /register endpoint. Next, we will figure out how to create unit tests that interact with the API.
Unit Tests: test_auth_register.py
Before we start writing test cases for the newly-created endpoint, we need to add a function to tests/util.py. Open the file and add the lines highlighted below (Lines 2, 8-13):
| |
Let’s take a moment and discuss the register_user function. Understanding how we are using this method to test our API is absolutely vital to successfully completing this project:
Line 8: This function is not a test case (since the name does not begin with
test_).register_usertakes a Flask test client instance, and values foremailandpasswordas parameters. The test client instance must always be passed when using this function, butemailandpasswordwill use the default values if none are specified.Line 9: The Flask test client allows us to make HTTP requests. In order to register a new user, we must send a
POSTrequest to theapi.auth_registerendpoint. To do so, we call the test client'spostmethod. The test client is capable of sending requests for all HTTP method types:get,post,put,delete,patch,options,headandtrace.Line 10: The first argument to the
postmethod is the URL is the target of our request. Since the target URL is within our Flask application, we can dynamically construct the URL using theurl_forfunction. This is really useful because it allows us to create links within our application without hardcoding any part of the path. All we need to do to use theurl_forfunction is provide the name of the API endpoint, and voila, the URL is dynamically generated and provided to thepostmethod.Line 11: For a
POSTrequest, the server expects the data to be sent in the request body. Since we are simulating a form submission, we must format the data as a series of name/value pairs, each pair separated by an ampersand (&), and for each pair, the name is separated from the value by an equals (=) sign.Line 12: This is how we specify the value of the
Content-TypeHTTP header. The value of this header is very important because it tells the server what type of data is being sent. The valueapplication/x-www-form-urlencodedtells the server that the request contains form data encoded as URL parameters.
Wow, that required a lot more detail than I originally anticipated. I hope it helps you understand how the test client is used within our test cases to interact with the API. Next, create a new file test_auth_register.py in the tests folder, add the content below and save the file:
| |
In the previous post, I explained the meaning and purpose of the app and client test fixtures. In order to send and receive HTTP requests from our API, the test function must include client as a parameter.
Let’s go through the test_auth_register function and explain what is being tested:
Line 5: The `register_user` function which we just dissected and documented is imported.
Line 7: This string value will occur multiple times in the test cases we created in this test file, but it will not occur in any other test cases, so we do not need to refactor it and move it to the `tests/util.py` file.
Line 10:
test_auth_registeris a test case, andclientanddbare test fixtures defined inconftest.py. The reason for invoking theclientfixture is obvious — we need it to test the API. However, the reason for invokingdbis not so obvious since it isn't actually being called in the test function. This fixture initializes the database by creating tables for each database model class (the only model class at this point isUser).In this test case, we are sending a request to register a new user and expecting the request to succeed. This will only work if the database has been initialized and the
site_usertable exists in the database since the SQLAlchemy extension will attempt to execute aINSERT INTO site_user...SQL statement.BOTTOM LINE Invoking the
dbfixture is necessary for any test cases that add or modify database objects.Line 11: We start off the test case by submitting the registration request with the default values. This is really the only action performed in this test case, the rest of the code just verifies the server response to the registration request.
Line 12: Next, we verify that the HTTP status code of the server response is 201
HTTPStatus.CREATEDwhich indicates that a new user was created in the database.Line 13-14: These two lines verify that the
statusandmessageattributes exist in the response JSON and that the values indicate that the user was successfully registered.Line 15: This
assertstatement verifies that thetoken_typeattribute exists in the response JSON and that the value isbearer.Line 16: This
assertstatement verifies that theexpires_inattribute exists in the response JSON and that the value is5.Line 17-18: Next, we verify that the
access_tokenexists and retrieve theaccess_token.Line 19-22: Next, we call
User.decode_access_tokenand verify the operation was successful. Then, we retrieve theuser_dictand verify that the token (for the user that we just registered) does not have administrator priveleges.Line 23-24: The next thing we do is call
User.find_by_public_idwith thepublic_idvalue decoded fromaccess_token. This verifies that the user we registered actually exists within the database. Using the object from the database, we verify that the email address for the user matches the value submitted in the original HTTP request.
test_auth_register verifies the “happy path” for the api.auth_register endpoint. We obviously need to test scenarios where a registration request is not successful, as well. Before we create the next test case, update test_auth_register.py to import the PASSWORD value from tests/util.py (Line 5) and define a new string value (Line 8):
| |
To verify the expected behavior when a registration request is sent for an email address that has already been registered, add the content below and save the file:
| |
Line 29-32: The first thing we do in this test case is manually create a
Userinstance and add it to the database. Then, we send the same registration request that was sent in the previous test case.Line 33: Since a
Useralready exists in the database with the same email address that is sent in the registration request, the response code 409 (HTTPStatus.CONFLICT) indicates that the request could not be completed, but the user might be able to resolve the source of the conflict and resubmit the request.Line 34-37: Next, we verify that "status" and "message" attributes exist in the JSON object sent in the response body and the value for each indicates that the registration request was not successful.
Line 38-40: The final three lines verify that the "token_type", "expires_in" and "access_token" attributes are not present in the JSON object sent in the response body.
The last test case we will cover at this point is where the client submits an email address that is not in the correct format (the final version of the API will have more test cases). Let’s take a look at the actual response that is sent if the email value in a registration request is not a valid email (the example below uses httpie):
flask-api-tutorial $ http -f :5000/api/v1/auth/register email="first last" password=123456

POST /api/v1/auth/register HTTP/1.1
Accept: */*
Accept-Encoding: gzip, deflate
Connection: keep-alive
Content-Length: 32
Content-Type: application/x-www-form-urlencoded; charset=utf-8
Host: localhost:5000
User-Agent: HTTPie/2.0.0

email=first+last&password=123456

HTTP/1.0 400 BAD REQUEST
Access-Control-Allow-Origin: *
Content-Length: 127
Content-Type: application/json
Date: Fri, 02 Aug 2019 17:45:40 GMT
Server: Werkzeug/0.16.1 Python/3.7.6

{
  "errors": {
    "email": "first last is not a valid email"
  },
  "message": "Input payload validation failed"
}
You might notice that none of the code we wrote for the api.auth_register endpoint generated the response above. That is because this response was automatically generated by Flask-RESTx based on the auth_reqparser we configured in src/flask_api_tutorial/api/auth/dto.py.
Whenever a request is rejected because of one or more RequestParser arguments failed validation, the format of the response will always contain a message attribute equal to “Input payload validation failed” and a an errors attribute with the value being another embedded list. The embedded list contains an entry for each argument in the parser that failed validation, with the name of the argument as the attribute name and the value equal to a message describing the failure that occurred.
The information above should make writing the test case pretty easy. Since the error message for an invalid parameter will occur in nearly every set of test cases we create, we need to add it to tests/util.py (Line 6):
| |
We need to import this value into test_auth_register.py (Line 5):
| |
Next, add the content below to test_auth_register.py and save the file:
| |
I don’t think there’s anything that needs to be explained since most of it is the same as the previous test case, and the difference in the response JSON was explained thoroughly.
There are quite a few more test cases that we need to create for the api.auth_register endpoint. I will not go through any more at this point, since you can find the full set in the github repo. Also, trying to define the necessary test coverage yourself is a very worthwhile exercise.
You should run tox to make sure the new test cases all pass and that nothing else broke because of the changes:
(flask-api-tutorial) flask-api-tutorial $ tox
GLOB sdist-make: /Users/aaronluna/Projects/flask-api-tutorial/setup.py
py37 create: /Users/aaronluna/Projects/flask-api-tutorial/.tox/py37
py37 installdeps: black, flake8, pydocstyle, pytest, pytest-black, pytest-clarity, pytest-dotenv, pytest-flake8, pytest-flask
py37 inst: /Users/aaronluna/Projects/flask-api-tutorial/.tox/.tmp/package/1/flask-api-tutorial-0.1.zip
py37 installed: alembic==1.4.0,aniso8601==8.0.0,appdirs==1.4.3,attrs==19.3.0,bcrypt==3.1.7,black==19.10b0,certifi==2019.11.28,cffi==1.14.0,chardet==3.0.4,Click==7.0,entrypoints==0.3,flake8==3.7.9,Flask==1.1.1,flask-api-tutorial==0.1,Flask-Bcrypt==0.7.1,Flask-Cors==3.0.8,Flask-Migrate==2.5.2,flask-restx==0.1.1,Flask-SQLAlchemy==2.4.1,idna==2.9,importlib-metadata==1.5.0,itsdangerous==1.1.0,Jinja2==2.11.1,jsonschema==3.2.0,Mako==1.1.1,MarkupSafe==1.1.1,mccabe==0.6.1,more-itertools==8.2.0,packaging==20.1,pathspec==0.7.0,pluggy==0.13.1,py==1.8.1,pycodestyle==2.5.0,pycparser==2.19,pydocstyle==5.0.2,pyflakes==2.1.1,PyJWT==1.7.1,pyparsing==2.4.6,pyrsistent==0.15.7,pytest==5.3.5,pytest-black==0.3.8,pytest-clarity==0.3.0a0,pytest-dotenv==0.4.0,pytest-flake8==1.0.4,pytest-flask==0.15.1,python-dateutil==2.8.1,python-dotenv==0.12.0,python-editor==1.0.4,pytz==2019.3,regex==2020.2.20,requests==2.23.0,six==1.14.0,snowballstemmer==2.0.0,SQLAlchemy==1.3.13,termcolor==1.1.0,toml==0.10.0,typed-ast==1.4.1,urllib3==1.25.8,wcwidth==0.1.8,Werkzeug==0.16.1,zipp==3.0.0
py37 run-test-pre: PYTHONHASHSEED='1825844209'
py37 run-test: commands[0] | pytest
================================================= test session starts ==================================================
platform darwin -- Python 3.7.6, pytest-5.3.5, py-1.8.1, pluggy-0.13.1 -- /Users/aaronluna/Projects/flask-api-tutorial/.tox/py37/bin/python
cachedir: .tox/py37/.pytest_cache
rootdir: /Users/aaronluna/Projects/flask-api-tutorial, inifile: pytest.ini
plugins: clarity-0.3.0a0, black-0.3.8, dotenv-0.4.0, flask-0.15.1, flake8-1.0.4
collected 52 items

run.py::FLAKE8 PASSED                                                                                            [  1%]
run.py::BLACK PASSED                                                                                             [  3%]
setup.py::FLAKE8 PASSED                                                                                          [  5%]
setup.py::BLACK PASSED                                                                                           [  7%]
src/flask_api_tutorial/__init__.py::FLAKE8 PASSED                                                                [  9%]
src/flask_api_tutorial/__init__.py::BLACK PASSED                                                                 [ 11%]
src/flask_api_tutorial/config.py::FLAKE8 PASSED                                                                  [ 13%]
src/flask_api_tutorial/config.py::BLACK PASSED                                                                   [ 15%]
src/flask_api_tutorial/api/__init__.py::FLAKE8 PASSED                                                            [ 17%]
src/flask_api_tutorial/api/__init__.py::BLACK PASSED                                                             [ 19%]
src/flask_api_tutorial/api/auth/__init__.py::FLAKE8 PASSED                                                       [ 21%]
src/flask_api_tutorial/api/auth/__init__.py::BLACK PASSED                                                        [ 23%]
src/flask_api_tutorial/api/auth/business.py::FLAKE8 PASSED                                                       [ 25%]
src/flask_api_tutorial/api/auth/business.py::BLACK PASSED                                                        [ 26%]
src/flask_api_tutorial/api/auth/dto.py::FLAKE8 PASSED                                                            [ 28%]
src/flask_api_tutorial/api/auth/dto.py::BLACK PASSED                                                             [ 30%]
src/flask_api_tutorial/api/auth/endpoints.py::FLAKE8 PASSED                                                      [ 32%]
src/flask_api_tutorial/api/auth/endpoints.py::BLACK PASSED                                                       [ 34%]
src/flask_api_tutorial/api/widgets/__init__.py::FLAKE8 PASSED                                                    [ 36%]
src/flask_api_tutorial/api/widgets/__init__.py::BLACK PASSED                                                     [ 38%]
src/flask_api_tutorial/models/__init__.py::FLAKE8 PASSED                                                         [ 40%]
src/flask_api_tutorial/models/__init__.py::BLACK PASSED                                                          [ 42%]
src/flask_api_tutorial/models/user.py::FLAKE8 PASSED                                                             [ 44%]
src/flask_api_tutorial/models/user.py::BLACK PASSED                                                              [ 46%]
src/flask_api_tutorial/util/__init__.py::FLAKE8 PASSED                                                           [ 48%]
src/flask_api_tutorial/util/__init__.py::BLACK PASSED                                                            [ 50%]
src/flask_api_tutorial/util/datetime_util.py::FLAKE8 PASSED                                                      [ 51%]
src/flask_api_tutorial/util/datetime_util.py::BLACK PASSED                                                       [ 53%]
src/flask_api_tutorial/util/result.py::FLAKE8 PASSED                                                             [ 55%]
src/flask_api_tutorial/util/result.py::BLACK PASSED                                                              [ 57%]
tests/__init__.py::FLAKE8 PASSED                                                                                 [ 59%]
tests/__init__.py::BLACK PASSED                                                                                  [ 61%]
tests/conftest.py::FLAKE8 PASSED                                                                                 [ 63%]
tests/conftest.py::BLACK PASSED                                                                                  [ 65%]
tests/test_auth_register.py::FLAKE8 PASSED                                                                       [ 67%]
tests/test_auth_register.py::BLACK PASSED                                                                        [ 69%]
tests/test_auth_register.py::test_auth_register PASSED                                                           [ 71%]
tests/test_auth_register.py::test_auth_register_email_already_registered PASSED                                  [ 73%]
tests/test_auth_register.py::test_auth_register_invalid_email PASSED                                             [ 75%]
tests/test_config.py::FLAKE8 PASSED                                                                              [ 76%]
tests/test_config.py::BLACK PASSED                                                                               [ 78%]
tests/test_config.py::test_config_development PASSED                                                             [ 80%]
tests/test_config.py::test_config_testing PASSED                                                                 [ 82%]
tests/test_config.py::test_config_production PASSED                                                              [ 84%]
tests/test_user.py::FLAKE8 PASSED                                                                                [ 86%]
tests/test_user.py::BLACK PASSED                                                                                 [ 88%]
tests/test_user.py::test_encode_access_token PASSED                                                              [ 90%]
tests/test_user.py::test_decode_access_token_success PASSED                                                      [ 92%]
tests/test_user.py::test_decode_access_token_expired PASSED                                                      [ 94%]
tests/test_user.py::test_decode_access_token_invalid PASSED                                                      [ 96%]
tests/util.py::FLAKE8 PASSED                                                                                     [ 98%]
tests/util.py::BLACK PASSED                                                                                      [100%]

=================================================== warnings summary ===================================================
src/flask_api_tutorial/api/auth/business.py::FLAKE8
  /Users/aaronluna/Projects/flask-api-tutorial/.tox/py37/lib/python3.7/site-packages/flask_restx/model.py:12: DeprecationWarning: Using or importing the ABCs from 'collections' instead of from 'collections.abc' is deprecated since Python 3.3,and in 3.9 it will stop working
    from collections import OrderedDict, MutableMapping

src/flask_api_tutorial/api/auth/business.py::FLAKE8
  /Users/aaronluna/Projects/flask-api-tutorial/.tox/py37/lib/python3.7/site-packages/flask_restx/api.py:28: DeprecationWarning: The import 'werkzeug.cached_property' is deprecated and will be removed in Werkzeug 1.0. Use 'from werkzeug.utils import cached_property' instead.
    from werkzeug import cached_property

src/flask_api_tutorial/api/auth/business.py::FLAKE8
  /Users/aaronluna/Projects/flask-api-tutorial/.tox/py37/lib/python3.7/site-packages/flask_restx/swagger.py:12: DeprecationWarning: Using or importing the ABCs from 'collections' instead of from 'collections.abc' is deprecated since Python 3.3,and in 3.9 it will stop working
    from collections import OrderedDict, Hashable

-- Docs: https://docs.pytest.org/en/latest/warnings.html
=========================================== 52 passed, 3 warnings in 14.47s ============================================
_______________________________________________________ summary ________________________________________________________
  py37: commands succeeded
  congratulations :)
The warning that is generated from Flask-RESTx is a very minor issue with the manner in which one of their modules is importing a type from the standard library. This has no effect on the operation of the API and will be fixed very soon in an upcoming release. I will update this test result when it has been fixed.
Checkpoint
Once again, we only implemented a small number of features from the requirements list. It’s not too surprising if you realize we only created one of the four auth_ns endpoints in this section. I think we have fully satisfied one requirement: New users can register by providing an email address and password, and partially satisfied one more since the JWT is sent in the registration and login response: JWT is sent in access_token field of HTTP response after successful authentication with email/password.
User Management/JWT Authentication
New users can register by providing an email address and password
Existing users can obtain a JWT by providing their email address and password
JWT contains the following claims: time the token was issued, time the token expires, a value that identifies the user, and a flag that indicates if the user has administrator access
JWT is sent in access_token field of HTTP response after successful authentication with email/password
JWTs must expire after 1 hour (in production)
JWT is sent by client in Authorization field of request header
Requests must be rejected if JWT has been modified
Requests must be rejected if JWT is expired
If user logs out, their JWT is immediately invalid/expired
If JWT is expired, user must re-authenticate with email/password to obtain a new JWT
API Resource: Widget List
All users can retrieve a list of all widgets
All users can retrieve individual widgets by name
Users with administrator access can add new widgets to the database
Users with administrator access can edit existing widgets
Users with administrator access can delete widgets from the database
The widget model contains a "name" attribute which must be a string value containing only lowercase-letters, numbers and the "-" (hyphen character) or "_" (underscore character).
The widget model contains a "deadline" attribute which must be a datetime value where the date component is equal to or greater than the current date. The comparison does not consider the value of the time component when this comparison is performed.
URL and datetime values must be validated before a new widget is added to the database (and when an existing widget is updated).
The widget model contains a "name" field which must be a string value containing only lowercase-letters, numbers and the "-" (hyphen character) or "_" (underscore character).
Widget name must be validated before a new widget is added to the database (and when an existing widget is updated).
If input validation fails either when adding a new widget or editing an existing widget, the API response must include error messages indicating the name(s) of the fields that failed validation.
In the next section we will create the remaining three auth_ns endpoints, so the entire set of JWT authentication requirements should be complete at the next checkpoint. Questions/comments are appreciated!