Packer Template: Amazon EC2 Ubuntu AMI with Latest NGINX

Photo by Franck V. on Unsplash
Build automation is a foundational concept within the culture of Continuous Delivey and DevOps. Implementing a successful build automation strategy can dramatically improve product quality and produce time savings in several areas. Packer is a powerful build automation tool that is relatively simple to integrate with your team’s workflow. The official website describes packer as follows:
Packer is an open source tool for creating identical machine images for multiple platforms from a single source configuration. Packer is lightweight, runs on every major operating system, and is highly performant, creating machine images for multiple platforms in parallel. Packer does not replace configuration management like Chef or Puppet. In fact, when building images, Packer is able to use tools like Chef or Puppet to install software onto the image.
Installing packer is simple, visit this page for instructions as well as download links for all platforms. The packer template shown in this post builds an Amazon EC2 image, so create an account if you do not already have one. The image will use a t2.micro instance, which qualifies for the free-tier.
I am warning you with peace and love, I am not responsible for any charges that are generated. If you are not comfortable with setting up an AWS account (credit card is required, even for the free-tier), I will be doing a follow-up post that uses Vagrant and Ansible to build VirtualBox images.
Packer Template Format
Before we begin, let’s define the components that make up a packer template in order to understand the role each component performs in the process of creating a machine image (The definitions below are copied from https://www.packer.io/docs/templates/index.html):
A template is a JSON object that has a set of keys configuring various components of Packer. The available keys within a template are listed below. Along with each key, it is noted whether it is required or not.
- builders (required) is an array of one or more objects that defines the builders that will be used to create machine images for, and configures each of those builders.
- variables (optional) is an object of one or more key/value strings that defines user variables contained in the template. If it is not specified, then no variables are defined.
- provisioners (optional) is an array of one or more objects that defines the provisioners that will be used to install and configure software for the machines created by each of the builders. If it is not specified, then no provisioners will be run.
- post-processors (optional) is an array of one or more objects that defines the various post-processing steps to take with the built images. If not specified, then no post-processing will be done.
Github Repository
If you would like to download the source code for the packer examples shown in this post, you can do so from the github repository linked below:
In this post I will go through each section of the packer template file nginx_ubuntu_from_source.json, showing the expected console output from each component individually. I will not cover the shell scripts which build NGINX from source code and configure the installation, since this has already been documented in this post.
Here is the complete template file, the line numbers will stay consistent throughout this post:
| |
The github repository also contains a second template file, nginx_ubuntu_from_deb.json. I will briefly cover the differences between the two templates at the end of this post.
User Variables
The first section of the template contains user variables which are passed to shell scripts in the provisioners section.
| |
Please keep the version numbers for NGINX, PCRE, zlip, OpenSSL and GeoIp libraries up-to-date. You can find the latest release for each product at the links below:
The other variables are directory and file names used within the shell scripts, the purpose for each is explained below:
- working_dir root directory for nginx install files
- src_folder sub-directory for downloaded source files
- deb_pkg_folder sub-directory for .deb package file and .zip containing source files
- log_folder sub-directory for installation log files
- log_file name of the installation log file
In order to use the value of a user variable within the templete, call the {{user}} function in the form of {{user `variable`}}. This function can be used in any value except type within the template: in builders, provisioners, anywhere outside the variables section. User variables are available globally within the rest of the template.
Packer CLI
Packer is controlled through a simple command-line interface, you can find documentation for the CLI here. For this example, we will only be using two commands: validate and build.
It’s a good idea to validate the template after making any changes to the JSON file by running packer validate with the template file. This command validates the syntax and configuration values. If the template is not valid, any errors will be output to the console. For our template file, the output should look similar to below since the template is valid:
$ packer validate nginx_ubuntu_from_deb.json
Template validated successfully.
After validating your template file, you are ready to build your machine image. This is done by calling packer build with the template file. Before doing so, there are a few values within the builders section which you need to modify according to your AWS EC2/VPC configuration.
Specifying Amazon Credentials
In order to build the machine image, you must provide your AWS authentication credentials to the packer template. Packer will check for your credentials in a defined order, for more info read the official documentation. The order is:
- Static credentials
AWS access key and secret key are defined in the variables section of the packer template (lines 3-13 where our version numbers, etc are defined) or provided with the
packer buildcommand as shown below:$ packer build \ > -var 'aws_access_key=YOUR ACCESS KEY' \ > -var 'aws_secret_key=YOUR SECRET KEY' \ > nginx_ubuntu_from_source.json - Environment variables
User provides credentials through the command line, as in the example below:
$ export AWS_ACCESS_KEY_ID="YOUR ACCESS KEY" $ export AWS_SECRET_ACCESS_KEY="YOUR SECRET KEY" $ export AWS_DEFAULT_REGION="us-west-2" $ packer build nginx_ubuntu_from_source.json - Shared credentials file
You can use an AWS credentials file to specify your credentials. The default location is $HOME/.aws/credentials on Linux and MacOS, or %USERPROFILE%.aws\credentials for Windows users. You can optionally specify a different location for packer to look for the configuration file by setting the value of the AWS_SHARED_CREDENTIALS_FILE environment variable.
- EC2 Role
This is the preferred method since you avoid hardcoding any credentials. For more info, read the documentation.
I use a credentials file to avoid the potential insecurity of methods #1 and #2. You can create the credentials file manually or generate it using the AWS CLI, here is the expected format:

Figure 1 - AWS Credentials File
The Amazon-EBS Builder
The builders section contains an array of objects that define the platform, operating system, etc. of each machine image that will be built from the template. Builders are responsible for creating virtual machines and generating images from them for various platforms. For example, there are separate builders for EC2, VMware, VirtualBox, etc. Packer comes with many builders by default, and can also be extended to add new builders.
The builder for our template is shown below:
| |
The amazon-ebs builder builds an AMI by launching an EC2 instance from a source AMI, provisioning that running machine, and then creating an AMI from that machine. The simplest way to choose the source AMI is through the source_ami configuration setting. For example, if you want to base your AMI off of the most recent, official Ubuntu 16.04 HVM EBS AMI, you could find the AMI ID inside the AWS console as shown below:
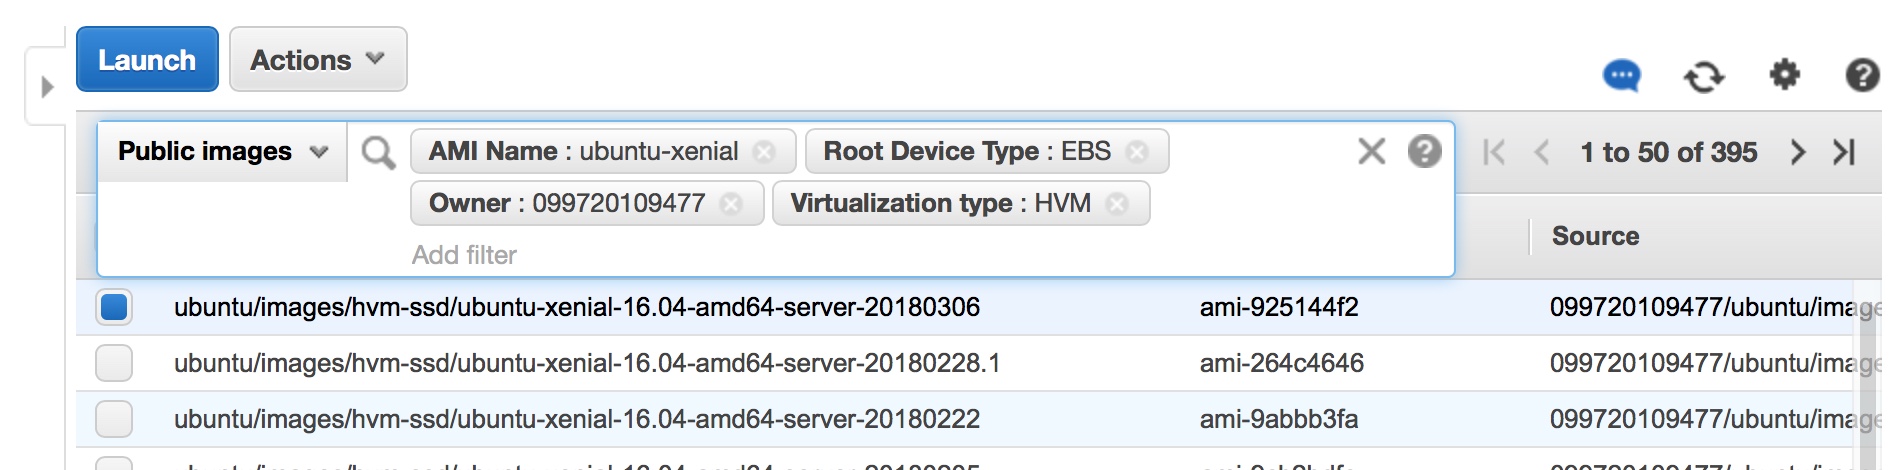
Figure 2 - AMI Filter Settings
To use this as your source AMI, you would add "source-ami": "ami-925144f2" to the JSON above and remove the entire source_ami_filter object.
However, if you plan on re-using this template and would like to always use the most recent Ubuntu 16.04 HVM EBS AMI from Canonical, you can do so and avoid hardcoding the AMI ID into the template with the source_ami_filter object. This is done in our example by setting the values below:
- virtualization-type The virtualization type.
- name The name of the AMI.
- root-device-type The type of the root device volume.
- owners An array of strings that filters the list of AMIs by Amazon account IDs. Used in our example to select only AMIs owned by Canonical.
- most_recent Boolean value that selects the newest created image when true.
The remaining configuration settings in the amazon-ebs builder deal with authenticating your AWS credentials and various aspects of the machine image:
- region (required) The name of the region, such as us-east-1, where the source AMI EC2 instance will be launched, and where the provisioned AMI will be stored.
- instance_type (required) The EC2 instance type to use while building the AMI, such as t2.micro.
- ssh_username (optional) Username to use for SSH, modify accordingly if you wish to use a different Linux distribution (e.g., use ec2-user for Amazon Linux AMI)
- ami_name (required) The name of the provisioned AMI that will appear in the EC2 console with other AMIs you own. Use a function like
timestampto ensure the AMI name is unique. - vpc_id, subnet_id (optional) If you have not defined a default VPC or you would like to use a VPC other than your default, you must provide these values. You can remove these if you wish to use your account’s default VPC.
- associate_public_ip_address (optional) If using a non-default VPC, public IP addresses are not provided by default. If this is toggled, your new instance will get a Public IP.
When you call packer build with our template file, the portion of the output which is generated solely by the builder is shown below:
$ packer build nginx_ubuntu_from_source.json
amazon-ebs output will be in this color.

==> amazon-ebs: Prevalidating AMI Name: custom_nginx_ubuntu_1524988180
    amazon-ebs: Found Image ID: ami-925144f2
==> amazon-ebs: Creating temporary keypair: packer_xxxxxxxx-xxxx-xxxx-xxxx-xxxxxxxxxxxx
==> amazon-ebs: Creating temporary security group for this instance: packer_xxxxxxxx-xxxx-xxxx-xxxx-xxxxxxxxxxxx
==> amazon-ebs: Authorizing access to port 22 from 0.0.0.0/0 in the temporary security group...
==> amazon-ebs: Launching a source AWS instance...
==> amazon-ebs: Adding tags to source instance
    amazon-ebs: Adding tag: "Name": "Packer Builder"
    amazon-ebs: Instance ID: i-xxxxxxxxxxxxxxxxx
==> amazon-ebs: Waiting for instance (i-xxxxxxxxxxxxxxxxx) to become ready...
==> amazon-ebs: Waiting for SSH to become available...
The output above shows that the source AMI used to launch our EC2 instance (ami-925144f2) is the most recent official Ubuntu 16.04 HVM EBS AMI, as we desired. The rest of the output is a result of packer creating a temporary keypair and security group in order to access the EC2 instance. After these are in place, the instance is launched and packer waits for the SSH service to become available in order to perform the actions in the provisioners object.
Provisioners
Provisioners perform configuration or installation procedures, and can be extremely useful since each provisioner is run for every builder defined. So if we had two builders defined in our template (e.g. Amazon EC2 and VMWare), then the complete set of provisioners would run as part of both builds. It is possible to only run specific provisioners for one builder, but it will not be covered in this basic example (you can find more information in the official documentation)
In order to install the latest version of NGINX and perform customizations such as enabling modules disabled by default, the packer template utilizes the shell and file provisioners. Please read the official documentation for more information about these and the other provisioners that are included with packer.
Shell Provisioner (Inline Script)
The first provisioner in our template is a shell provisioner. This provisioner requires that one of the following configuration options be present: inline, script or scripts. In this instance, we are using the inline option to define a sequence of shell commands to execute on the EC2 instance. The commands are run with the user defined by the ssh_username setting.
| |
These commands create two directories and change their owner to the SSH user, this is needed to use the file provisioner which is the next action performed on our EC2 instance. The output from the packer build command which is generated solely from this shell provisioner is shown below:
==> amazon-ebs: Connected to SSH!
==> amazon-ebs: Provisioning with shell script:
/var/folders/7t/g16tw4qd2x532lsb_1lm0vyh0000gn/T/packer-shell348591307
As you can see, packer creates a temporary script file from our shell commands and executes this script on our EC2 instance.
File Provisioner (Upload to EC2)
The file provisioner transfers files and folders between the local machine and the EC2 instance. The default transfer direction is upload (from the local machine to the EC2 instance). This is the default behavior, so you do not need to provide the direction setting in the file provisioner if this is the desired behavior. We will encounter the download transfer direction in a later step:
| |
This provisioner transfers the contents of the upload directory to the location on the EC2 instance defined by the values of the user variables working_dir and deb_pkg_folder (I chose to use /opt/deb_pkg). The uploaded files are used to configure the firewall settings and provide the systemd unit file for the NGINX service. The output from the packer build command which is generated solely from this file provisioner is shown below:
==> amazon-ebs: Uploading ./upload/ => /opt/deb_pkgShell Provisioner (Local File)
The next provisioner is where the bulk of the configuration process is performed. This is another shell provisioner but this time we are using the scripts configuration option to execute multiple bash script files. All of the user variables are used by this provisioner in the environment_vars object which injects the user variables into the shell scripts.
Also, please note the use of the configuration setting "expect_disconnect": true. This is necessary since the last shell script reboots the server to verify the NGINX service was configured successfully. If this option was not set, the build process would produce an error when the server disconnects and terminate the EC2 instance:
| |
These scripts perform the following sequence of actions:
- Prepare the EC2 instance for the NGINX installation
- Download all source files needed to build the latest NGINX release
- Build NGINX and create a .deb package which can install/uninstall our custom build
- Install NGINX from the .deb package
- Verify NGINX install was successful
- Configure NGINX for multiple virtual hosts
- Configure NGINX firewall settings and systemd unit file
- Remove downloaded source files
- Start NGINX service
- Reboot EC2 instance and verify NGINX service starts automatically
The output from the packer build command which is generated solely from this shell provisioner is shown below:
==> amazon-ebs: Provisioning with shell script: ./bash-scripts/00--nginx-prep_install.sh
    amazon-ebs: 29-Apr-2018-07-50-22 | Updating system...
    amazon-ebs: 29-Apr-2018-07-51-07 | Downloading prerequisites...
==> amazon-ebs: Provisioning with shell script: ./bash-scripts/01a-nginx-install_from_source.sh
    amazon-ebs: 29-Apr-2018-07-51-23 | Downloading source files...
    amazon-ebs: 29-Apr-2018-07-51-28 | Building NGINX from source...
    amazon-ebs:
    amazon-ebs: 29-Apr-2018-07-54-26 | Installing NGINX from .deb package...
    amazon-ebs:
    amazon-ebs: Selecting previously unselected package nginx.
    amazon-ebs: (Reading database ... 81442 files and directories currently installed.)
    amazon-ebs: Preparing to unpack nginx_1.15.6-1_amd64.deb ...
    amazon-ebs: Unpacking nginx (1.15.6-1) ...
    amazon-ebs: Setting up nginx (1.15.6-1) ...
    amazon-ebs: 29-Apr-2018-07-54-26 | Install completed successfully, creating archive of source files...
==> amazon-ebs: Provisioning with shell script: ./bash-scripts/02--nginx-configure_post_install.sh
    amazon-ebs:
    amazon-ebs: 29-Apr-2018-07-54-41 | Verify configuration file syntax is correct and test is successful:
    amazon-ebs:
    amazon-ebs: nginx: the configuration file /etc/nginx/nginx.conf syntax is ok
    amazon-ebs: nginx: configuration file /etc/nginx/nginx.conf test is successful
    amazon-ebs:
    amazon-ebs: 29-Apr-2018-07-54-41 | Verify NGINX version and configure arguments match your selections:
    amazon-ebs:
    amazon-ebs: nginx version: nginx/1.15.6 (Ubuntu)
    amazon-ebs: built by gcc 5.4.0 20160609 (Ubuntu 5.4.0-6ubuntu1~16.04.9)
    amazon-ebs: built with OpenSSL 1.1.0h  27 Mar 2018
    amazon-ebs: TLS SNI support enabled
    amazon-ebs: configure arguments: --prefix=/usr/share/nginx --sbin-path=/usr/sbin/nginx --modules-path=/usr/lib/nginx/modules --conf-path=/etc/nginx/nginx.conf --error-log-path=/var/log/nginx/error.log --http-log-path=/var/log/nginx/access.log --pid-path=/var/run/nginx.pid --lock-path=/var/lock/nginx.lock --user=www-data --group=www-data --build=Ubuntu --http-client-body-temp-path=/var/lib/nginx/body --http-fastcgi-temp-path=/var/lib/nginx/fastcgi --http-proxy-temp-path=/var/lib/nginx/proxy --http-scgi-temp-path=/var/lib/nginx/scgi --http-uwsgi-temp-path=/var/lib/nginx/uwsgi --with-openssl=/opt/src_files/openssl-1.1.0h --with-openssl-opt=enable-ec_nistp_64_gcc_128 --with-openssl-opt=no-nextprotoneg --with-openssl-opt=no-weak-ssl-ciphers --with-openssl-opt=no-ssl3 --with-pcre=/opt/src_files/pcre-8.42 --with-pcre-jit --with-zlib=/opt/src_files/zlib-1.2.11 --with-compat --with-file-aio --with-threads --with-http_addition_module --with-http_auth_request_module --with-http_dav_module --with-http_flv_module --with-http_gunzip_module --with-http_gzip_static_module --with-http_mp4_module --with-http_random_index_module --with-http_realip_module --with-http_slice_module --with-http_ssl_module --with-http_sub_module --with-http_stub_status_module --with-http_v2_module --with-http_secure_link_module --with-mail --with-mail_ssl_module --with-stream --with-stream_realip_module --with-stream_ssl_module --with-stream_ssl_preread_module --with-debug --add-module=../ngx_http_geoip2_module --add-module=../ngx_cache_purge --with-cc-opt='-g -O2 -fstack-protector --param=ssp-buffer-size=4 -Wformat -Werror=format-security -Wp,-D_FORTIFY_SOURCE=2' --with-ld-opt='-Wl,-z,relro -Wl,--as-needed'
    amazon-ebs:
    amazon-ebs: 29-Apr-2018-07-54-41 | Creating folders for nginx virtual hosts...
    amazon-ebs:
    amazon-ebs: 29-Apr-2018-07-54-41 | Downloading GeoIP2 database files...
    amazon-ebs: 29-Apr-2018-07-54-43 | Configuring firewall app profile...
    amazon-ebs: 29-Apr-2018-07-54-43 | Configuring systemd unit file...
    amazon-ebs: 29-Apr-2018-07-54-43 | Setting permissions for NGINX user account...
    amazon-ebs: 29-Apr-2018-07-54-43 | Installation and configuration is complete, removing source files...
    amazon-ebs:
    amazon-ebs: 29-Apr-2018-07-54-43 | Starting NGINX, verify service is active:
    amazon-ebs:
    amazon-ebs: ● nginx.service - A high performance web server and a reverse proxy server
    amazon-ebs:    Loaded: loaded (/etc/systemd/system/nginx.service; enabled; vendor preset: enabled)
    amazon-ebs:    Active: active (running) since Sun 2018-04-29 07:54:43 UTC; 149ms ago
    amazon-ebs:  Main PID: 8595 (nginx)
    amazon-ebs:    CGroup: /system.slice/nginx.service
    amazon-ebs:            ├─8595 nginx: master process /usr/sbin/nginx -g daemon on; master_process on
    amazon-ebs:            └─8597 nginx: worker process
    amazon-ebs:
    amazon-ebs: Apr 29 07:54:43 ip-172-31-12-194 systemd[1]: Starting A high performance web server and a reverse proxy server...
    amazon-ebs: Apr 29 07:54:43 ip-172-31-12-194 systemd[1]: Started A high performance web server and a reverse proxy server.
    amazon-ebs:
    amazon-ebs: 29-Apr-2018-07-54-43 | NGINX is successfully installed and configured
    amazon-ebs: 29-Apr-2018-07-54-43 | Rebooting server to verify NGINX starts automatically...
The next provisioner executes a single shell script after the EC2 instance has rebooted. Following a reboot, it is recommended to use the pause_before option when executing a shell script because Packer is able to detect and SSH into the instance as soon as SSH is available. However, Ubuntu actually doesn’t get proper amounts of time to initialize. The pause makes sure that the OS properly initializes:
| |
The output from the packer build command which is generated solely from this shell provisioner is shown below:
==> amazon-ebs: Pausing 10s before the next provisioner...
==> amazon-ebs: Provisioning with shell script: ./bash-scripts/03--nginx-verify_install.sh
    amazon-ebs:
    amazon-ebs: 29-Apr-2018-07-55-37 | Reboot completed, NGINX service should be running:
    amazon-ebs:
    amazon-ebs: ● nginx.service - A high performance web server and a reverse proxy server
    amazon-ebs:    Loaded: loaded (/etc/systemd/system/nginx.service; enabled; vendor preset: enabled)
    amazon-ebs:    Active: active (running) since Sun 2018-04-29 07:55:18 UTC; 18s ago
    amazon-ebs:   Process: 1164 ExecStart=/usr/sbin/nginx -g daemon on; master_process on; (code=exited, status=0/SUCCESS)
    amazon-ebs:   Process: 1124 ExecStartPre=/usr/sbin/nginx -t -q -g daemon on; master_process on; (code=exited, status=0/SUCCESS)
    amazon-ebs:  Main PID: 1171 (nginx)
    amazon-ebs:     Tasks: 2
    amazon-ebs:    Memory: 4.7M
    amazon-ebs:       CPU: 9ms
    amazon-ebs:    CGroup: /system.slice/nginx.service
    amazon-ebs:            ├─1171 nginx: master process /usr/sbin/nginx -g daemon on; master_process on
    amazon-ebs:            └─1174 nginx: worker process
    amazon-ebs:
    amazon-ebs: Apr 29 07:55:18 ip-172-31-12-194 systemd[1]: Starting A high performance web server and a reverse proxy server...
    amazon-ebs: Apr 29 07:55:18 ip-172-31-12-194 systemd[1]: Started A high performance web server and a reverse proxy server.
    amazon-ebs:
    amazon-ebs: 29-Apr-2018-07-55-37 | Verify 3 NGINX UFW app profiles are listed below (Full, HTTP and HTTPS):
    amazon-ebs: WARN: uid is 0 but '/etc/ufw/applications.d/nginx' is owned by 1000
    amazon-ebs: Available applications:
    amazon-ebs:   Nginx Full
    amazon-ebs:   Nginx HTTP
    amazon-ebs:   Nginx HTTPS
    amazon-ebs:   OpenSSH
File Provisioner (Download from EC2)
The final two provisioners in our template are file provisioners that download files from the EC2 instance to our local machine. In order to do so, we must use the configuration setting "direction": "download" as shown below:
| |
These provisioners download the contents of the directories defined by the values of the user variables working_dir/deb_pkg_folder and working_dir/log_folder to the download folder which must exist within the directory where the packer template is located. The first provisioner downloads the .deb package which can install/uninstall the custom NGINX build and the .tar.gz file containing the source files needed to perform the installation. The second provisioner downloads the log of the NGINX installation process.
The output from the packer build command which is generated solely from these file provisioners is shown below:
==> amazon-ebs: Downloading /opt/deb_pkg/ => ./download
==> amazon-ebs: Downloading /opt/log/ => ./download
Finishing the Build
After the provisioners have completed, packer stops the EC2 instance and creates an AMI that is associated with your account. You can use this AMI to launch any number of t2.micro instances that are running the latest version of NGINX, configured with your desired set of builtin and third-party modules.
The output from the packer build command which is generated after the provisioners have completed is shown below:
==> amazon-ebs: Stopping the source instance...
    amazon-ebs: Stopping instance, attempt 1
==> amazon-ebs: Waiting for the instance to stop...
==> amazon-ebs: Creating the AMI: custom_nginx_ubuntu_1524988180
    amazon-ebs: AMI: ami-xxxxxxxx
==> amazon-ebs: Waiting for AMI to become ready...
==> amazon-ebs: Terminating the source AWS instance...
==> amazon-ebs: Cleaning up any extra volumes...
==> amazon-ebs: No volumes to clean up, skipping
==> amazon-ebs: Deleting temporary security group...
==> amazon-ebs: Deleting temporary keypair...
Build 'amazon-ebs' finished.


==> Builds finished. The artifacts of successful builds are:
--> amazon-ebs: AMIs were created:
us-west-1: ami-xxxxxxxxFirst, login to the AWS Console and navigate to EC2 -> AMIs. The AMI created by the packer template will have the name specified in line 31 of the JSON file:
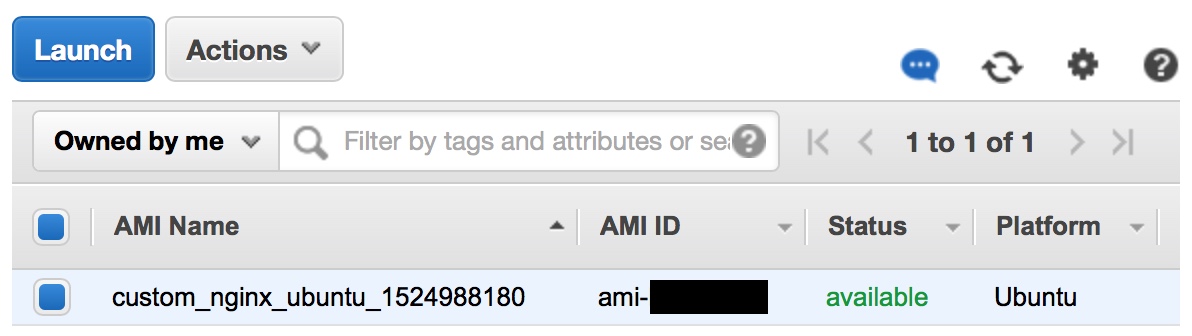
Figure 3 - AMI Built from Packer Template
Select the AMI and click Deregister from the Actions menu:
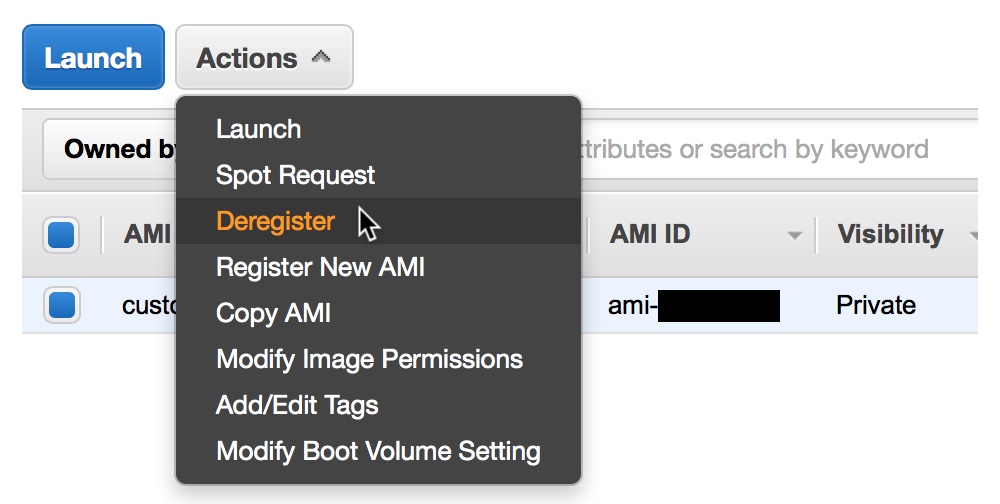
Figure 4 - Deregister the AMI to Avoid Incurring Costs
Next, navigate to EC2 -> Snapshots:

Figure 5 - Snapshot Associated with Packer AMI
Select the snapshot and click Delete from the Actions menu
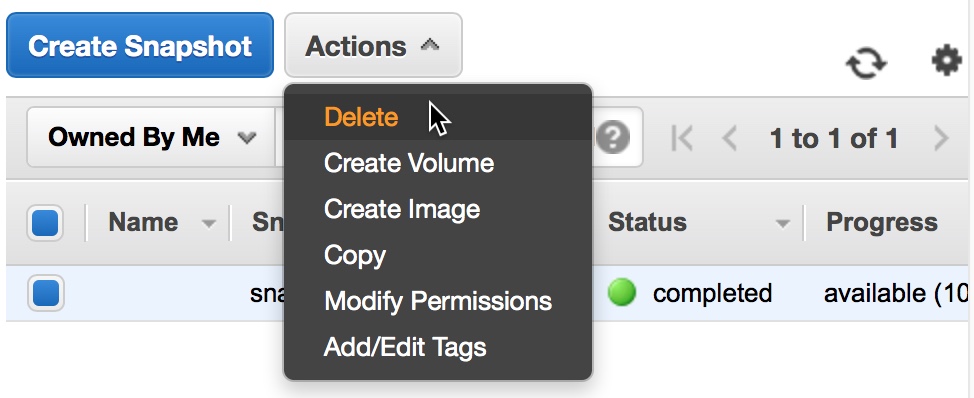
Figure 6 - Delete the AMI Snapshot to Avoid Incurring Costs
Installing NGINX from .deb File
The final provisioner downloaded two files from the deb_pkg folder on the EC2 instance to the local machine:
$ ls -l
total 194512
-rwxr-xr-x  1 aaronluna  staff  97927787 Apr 29 03:09 nginx-1.15.6-src_files.tar.gz
-rwxr-xr-x  1 aaronluna  staff   1655608 Apr 29 00:58 nginx_1.15.6-1_amd64.deb
The .deb package can be used to uninstall NGINX from an EC2 instance launched from an AMI produced by the nginx_ubuntu_from_source.json template file, and it can also be used (along with the .tar.gz file containing the necessary source files) to install NGINX on an EC2 instance. To do so, you only need to call packer build with the other template file in the github repository: nginx_ubuntu_from_deb.json.
The two templates are very similar. In fact, the shell scripts have been modularized so they can be used in both versions. Here is the full JSON for nginx_ubuntu_from_deb.json:
| |
The two files are identical through lines 1-46. The template which installs NGINX from the .deb package contains an additional file provisioner (lines 47-50) which uploads the two files in the deb_pkg folder to the EC2 instance:
| |
The next provisioner which executes the array of shell scripts to install NGINX is also nearly identical in both files. The only difference is in line 53 which executes a different installation script that installs NGINX from the .deb package rather than downloading and building NGINX from source:
| |
The entire output from the packer build command for this template file is shown below:
$ packer build nginx_ubuntu_from_deb.json
==> amazon-ebs: Prevalidating AMI Name: custom_nginx_ubuntu_1525002641
    amazon-ebs: Found Image ID: ami-925144f2
==> amazon-ebs: Creating temporary keypair: packer_xxxxxxxx-xxxx-xxxx-xxxx-xxxxxxxxxxxx
==> amazon-ebs: Creating temporary security group for this instance: packer_xxxxxxxx-xxxx-xxxx-xxxx-xxxxxxxxxxxx
==> amazon-ebs: Authorizing access to port 22 from 0.0.0.0/0 in the temporary security group...
==> amazon-ebs: Launching a source AWS instance...
==> amazon-ebs: Adding tags to source instance
    amazon-ebs: Adding tag: "Name": "Packer Builder"
    amazon-ebs: Instance ID: i-xxxxxxxxxxxxxxxxx
==> amazon-ebs: Waiting for instance (i-xxxxxxxxxxxxxxxxx) to become ready...
==> amazon-ebs: Waiting for SSH to become available...
==> amazon-ebs: Connected to SSH!
==> amazon-ebs: Provisioning with shell script: /var/folders/7t/g16tw4qd2x532lsb_1lm0vyh0000gn/T/packer-shell264972135
==> amazon-ebs: Uploading ./upload/ => /opt/deb_pkg
==> amazon-ebs: Uploading ./download/deb_pkg/ => /opt/src_files
==> amazon-ebs: Provisioning with shell script: ./bash-scripts/00--nginx-prep_install.sh
    amazon-ebs: 29-Apr-2018-14-00-32 | Updating system...
    amazon-ebs: 29-Apr-2018-14-01-22 | Downloading prerequisites...
==> amazon-ebs: Provisioning with shell script: ./bash-scripts/01b-nginx-install_from_deb.sh
    amazon-ebs: 29-Apr-2018-14-01-48 | Extracting source files from archive...
    amazon-ebs:
    amazon-ebs: 29-Apr-2018-14-01-51 | Installing NGINX from .deb package...
    amazon-ebs:
    amazon-ebs: Selecting previously unselected package nginx.
    amazon-ebs: (Reading database ... 81442 files and directories currently installed.)
    amazon-ebs: Preparing to unpack nginx_1.15.6-1_amd64.deb ...
    amazon-ebs: Unpacking nginx (1.15.6-1) ...
    amazon-ebs: Setting up nginx (1.15.6-1) ...
==> amazon-ebs: Provisioning with shell script: ./bash-scripts/02--nginx-configure_post_install.sh
    amazon-ebs:
    amazon-ebs: 29-Apr-2018-14-01-59 | Verify configuration file syntax is correct and test is successful:
    amazon-ebs:
    amazon-ebs: nginx: the configuration file /etc/nginx/nginx.conf syntax is ok
    amazon-ebs: nginx: configuration file /etc/nginx/nginx.conf test is successful
    amazon-ebs:
    amazon-ebs: 29-Apr-2018-14-01-59 | Verify NGINX version and configure arguments match your selections:
    amazon-ebs:
    amazon-ebs: nginx version: nginx/1.15.6 (Ubuntu)
    amazon-ebs: built by gcc 5.4.0 20160609 (Ubuntu 5.4.0-6ubuntu1~16.04.9)
    amazon-ebs: built with OpenSSL 1.1.0h  27 Mar 2018
    amazon-ebs: TLS SNI support enabled
    amazon-ebs: configure arguments: --prefix=/usr/share/nginx --sbin-path=/usr/sbin/nginx --modules-path=/usr/lib/nginx/modules --conf-path=/etc/nginx/nginx.conf --error-log-path=/var/log/nginx/error.log --http-log-path=/var/log/nginx/access.log --pid-path=/var/run/nginx.pid --lock-path=/var/lock/nginx.lock --user=www-data --group=www-data --build=Ubuntu --http-client-body-temp-path=/var/lib/nginx/body --http-fastcgi-temp-path=/var/lib/nginx/fastcgi --http-proxy-temp-path=/var/lib/nginx/proxy --http-scgi-temp-path=/var/lib/nginx/scgi --http-uwsgi-temp-path=/var/lib/nginx/uwsgi --with-openssl=/opt/src_files/openssl-1.1.0h --with-openssl-opt=enable-ec_nistp_64_gcc_128 --with-openssl-opt=no-nextprotoneg --with-openssl-opt=no-weak-ssl-ciphers --with-openssl-opt=no-ssl3 --with-pcre=/opt/src_files/pcre-8.42 --with-pcre-jit --with-zlib=/opt/src_files/zlib-1.2.11 --with-compat --with-file-aio --with-threads --with-http_addition_module --with-http_auth_request_module --with-http_dav_module --with-http_flv_module --with-http_gunzip_module --with-http_gzip_static_module --with-http_mp4_module --with-http_random_index_module --with-http_realip_module --with-http_slice_module --with-http_ssl_module --with-http_sub_module --with-http_stub_status_module --with-http_v2_module --with-http_secure_link_module --with-mail --with-mail_ssl_module --with-stream --with-stream_realip_module --with-stream_ssl_module --with-stream_ssl_preread_module --with-debug --add-module=../ngx_http_geoip2_module --add-module=../ngx_cache_purge --with-cc-opt='-g -O2 -fstack-protector --param=ssp-buffer-size=4 -Wformat -Werror=format-security -Wp,-D_FORTIFY_SOURCE=2' --with-ld-opt='-Wl,-z,relro -Wl,--as-needed'
    amazon-ebs:
    amazon-ebs: 29-Apr-2018-14-01-59 | Creating folders for nginx virtual hosts...
    amazon-ebs:
    amazon-ebs: 29-Apr-2018-14-01-59 | Downloading GeoIP2 database files...
    amazon-ebs: 29-Apr-2018-14-02-01 | Configuring firewall app profile...
    amazon-ebs: 29-Apr-2018-14-02-01 | Configuring systemd unit file...
    amazon-ebs: 29-Apr-2018-14-02-01 | Setting permissions for NGINX user account...
    amazon-ebs: 29-Apr-2018-14-02-01 | Installation and configuration is complete, removing source files...
    amazon-ebs:
    amazon-ebs: 29-Apr-2018-14-02-01 | Starting NGINX, verify service is active:
    amazon-ebs:
    amazon-ebs: ● nginx.service - A high performance web server and a reverse proxy server
    amazon-ebs:    Loaded: loaded (/etc/systemd/system/nginx.service; enabled; vendor preset: enabled)
    amazon-ebs:    Active: active (running) since Sun 2018-04-29 14:02:01 UTC; 127ms ago
    amazon-ebs:  Main PID: 31508 (nginx)
    amazon-ebs:    CGroup: /system.slice/nginx.service
    amazon-ebs:            ├─31508 nginx: master process /usr/sbin/nginx -g daemon on; master_process on
    amazon-ebs:            └─31509 nginx: worker process
    amazon-ebs:
    amazon-ebs: Apr 29 14:02:01 ip-172-31-14-86 systemd[1]: Starting A high performance web server and a reverse proxy server...
    amazon-ebs: Apr 29 14:02:01 ip-172-31-14-86 systemd[1]: Started A high performance web server and a reverse proxy server.
    amazon-ebs:
    amazon-ebs: 29-Apr-2018-14-02-01 | NGINX is successfully installed and configured
    amazon-ebs: 29-Apr-2018-14-02-01 | Rebooting server to verify NGINX starts automatically...
==> amazon-ebs: Pausing 10s before the next provisioner...
==> amazon-ebs: Provisioning with shell script: ./bash-scripts/03--nginx-verify_install.sh
    amazon-ebs:
    amazon-ebs: 29-Apr-2018-14-02-56 | Reboot completed, NGINX service should be running:
    amazon-ebs:
    amazon-ebs: ● nginx.service - A high performance web server and a reverse proxy server
    amazon-ebs:    Loaded: loaded (/etc/systemd/system/nginx.service; enabled; vendor preset: enabled)
    amazon-ebs:    Active: active (running) since Sun 2018-04-29 14:02:34 UTC; 22s ago
    amazon-ebs:   Process: 1173 ExecStart=/usr/sbin/nginx -g daemon on; master_process on; (code=exited, status=0/SUCCESS)
    amazon-ebs:   Process: 1119 ExecStartPre=/usr/sbin/nginx -t -q -g daemon on; master_process on; (code=exited, status=0/SUCCESS)
    amazon-ebs:  Main PID: 1175 (nginx)
    amazon-ebs:     Tasks: 2
    amazon-ebs:    Memory: 4.5M
    amazon-ebs:       CPU: 9ms
    amazon-ebs:    CGroup: /system.slice/nginx.service
    amazon-ebs:            ├─1175 nginx: master process /usr/sbin/nginx -g daemon on; master_process on
    amazon-ebs:            └─1177 nginx: worker process
    amazon-ebs:
    amazon-ebs: Apr 29 14:02:33 ip-172-31-14-86 systemd[1]: Starting A high performance web server and a reverse proxy server...
    amazon-ebs: Apr 29 14:02:34 ip-172-31-14-86 systemd[1]: nginx.service: Failed to read PID from file /run/nginx.pid: Invalid argument
    amazon-ebs: Apr 29 14:02:34 ip-172-31-14-86 systemd[1]: Started A high performance web server and a reverse proxy server.
    amazon-ebs:
    amazon-ebs: 29-Apr-2018-14-02-56 | Verify 3 NGINX UFW app profiles are listed below (Full, HTTP and HTTPS):
    amazon-ebs: WARN: uid is 0 but '/etc/ufw/applications.d/nginx' is owned by 1000
    amazon-ebs: Available applications:
    amazon-ebs:   Nginx Full
    amazon-ebs:   Nginx HTTP
    amazon-ebs:   Nginx HTTPS
    amazon-ebs:   OpenSSH
==> amazon-ebs: Downloading /opt/log/ => ./download
==> amazon-ebs: Stopping the source instance...
    amazon-ebs: Stopping instance, attempt 1
==> amazon-ebs: Waiting for the instance to stop...
==> amazon-ebs: Creating the AMI: custom_nginx_ubuntu_1525002641
    amazon-ebs: AMI: ami-xxxxxxxx
==> amazon-ebs: Waiting for AMI to become ready...
==> amazon-ebs: Terminating the source AWS instance...
==> amazon-ebs: Cleaning up any extra volumes...
==> amazon-ebs: No volumes to clean up, skipping
==> amazon-ebs: Deleting temporary security group...
==> amazon-ebs: Deleting temporary keypair...
Build 'amazon-ebs' finished.


==> Builds finished. The artifacts of successful builds are:
--> amazon-ebs: AMIs were created:
us-west-1: ami-xxxxxxxx
Installation Log Files
Each packer template downloads a log file of the installation process containing the console output from the EC2 instance to the local machine:
$ ls -l
total 2520
-rw-r--r--  1 aaronluna  staff    92355 Apr 29 07:03 install_deb.log
-rw-r--r--@ 1 aaronluna  staff  1195654 Apr 29 03:11 install_source.log
The install_source.log file is much larger than install_deb.log, since the output of the make command which builds NGINX is extremely verbose. If you are interested in the fine details of each process, you can find it in these logs.
Conclusion
I hope this post helps you understand the basics of packer and how this tool can be used in many situations to create machine images of various types with identical configurations. The example presented here of a custom NGINX install is just the beginning of what you can do with a packer template and simple shell scripts. You could install many more applications and services and do so with other configuration management tools such as Ansible and Vagrant. I will present a more advanced packer template using these tools in a future post.