Vigorish: Hybrid Python/Node.Js Web Scraper

Photo by Patti Black on Unsplash
Table of Contents
Requirements
- Python 3.6+
- Node.js 10+ (Tested with Node.js 11-13)
- Xvfb
- AWS account (optional but recommended, used to store scraped data in S3)
Since vigorish uses the dataclass decorator, Python 3.6+ is required (dataclass was introduced in Python 3.7, however a backport exists for 3.6).
All web scraping is performed by Nightmare, which is a browser automation tool similar to Selenium/PhantomJS. Nightmare is a nodejs module based on Electron/Chromium, requiring Node.js 4+. However, my scraping functions use async iterators (a ES2018 feature), which is only supported in Node.js 10+, so that is the minimum supported version. (I have only tested with versions 11-14).
vigorish runs Nightmare in “headless” mode, i.e., without any graphical UI. Regardless, Electron/Chromium will not function if a display driver cannot be located. Therefore, on Linux systems, you must install a virtual display driver (Windows and Mac systems obviously have a display driver installed). By far, the most popular virtual display driver for Linux systems is Xvfb. This document explains all steps necessary to install Xvfb and all required dependencies.
Installation
Prerequisites
First, install a recent, stable version of Node.js (i.e., v10-13), along with npm. I’ll provide instructions for Ubuntu, but they should be easily adaptable to any Linux-distro.
Node.js
While you can install Node.js using the default package repository on your system, the versions that are available tend to be outdated. On Ubuntu, you can add a PPA (personal package archive) maintained by NodeSource which always contains the latest versions of Node.js.
The command below will download the installation script for the NodeSource PPA containing the latest v12.x version and run the script after it has been downloaded (if you would like to download a different version, simply replace 12.x with 8.x, 10.x, etc.). You must have sudo privileges to execute the installation script:
$ curl -sL https://deb.nodesource.com/setup_12.x | sudo -E bash -
The script will add the NodesSource PPA and update your local package cache. After the package listing is refreshed, install the nodejs package using the command below:
$ sudo apt install nodejs
The version of node you specified and npm should both be installed. Verify that the versions installed are correct:
$ node --version
v12.16.2
$ npm --version
6.14.2
Finally, install the build-essential package since some of the packages needed for vigorish require compiling from source:
$ sudo apt install build-essential
Xvfb
An X server must be installed in order to use Electron in headless mode. The most popular X server for UNIX-like systems is Xvfb. Xvfb enables a system without display hardware to run graphical applications.
Install Xvfb and its dependencies using the command below:
sudo apt install -y xvfb x11-xkb-utils xfonts-100dpi xfonts-75dpi xfonts-scalable xfonts-cyrillic x11-apps clang libdbus-1-dev libgtk2.0-dev libnotify-dev libgnome-keyring-dev libgconf2-dev libasound2-dev libcap-dev libcups2-dev libxtst-dev libxss1 libnss3-dev gcc-multilib g++-multilib
pipx
The recommended way to install vigorish is with pipx. On Ubuntu with Python 3.7 aliased to python3.7, you can install pipx with the commands below:
$ python3.7 -m pip install --user pipx
$ python3.7 -m pipx ensurepath
After executing the two commands above, logout and log back in. To setup tab completions, run this command and follow the instructions for your shell:
$ pipx completions
Logout and login again in order for the changes to take effect.
Why should you use pipx to install vigorish? If you are brand new to Python, you may not be aware of all the little annoyances that come along with installing packages from pip. If you use your system Python installation, very quickly you will encounter unresolvable dependency issues. Eventually, you will fall into the habit of creating a new virtual environment whenever you install an application to isolate all of the required packages and their specific versions from your system install.
While creating unique virtual environments works, it can be annoying and confusing to manage applications that are intended to be installed globally in this manner. pipx is the solution to this problem. From the README:
You can globally install an application by running
pipx install PACKAGEThis automatically creates a virtual environment, installs the package, and adds the package’s associated applications (entry points) to a location on your
PATH. For example,pipx install pycowsaymakes thepycowsaycommand available globally, but sandboxes the pycowsay package in its own virtual environment.
It is similarly easy to update and remove Python applications with pipx. Check out the README for install instructions for Mac and usage examples.
Install vigorish
If you followed the instructions to install pipx, you can install vigorish with the command below:
$ pipx install vigorish
If you did not install pipx, follow the steps below to install vigorish:
Create a new directory for
vigorishand navigate to it:$ mkdir vigorish && cd vigorishCreate a new Python 3.6+ virtual environment:
$ python3.7 -m venv venv --prompt vigActivate the virtual environment:
$ source venv/bin/activateUpdate
pip,setuptoolsandwheelpackages to the latest versions:(vig) $ pip install --upgrade pip setuptools wheelFinally, install
vigorishusingpip:(vig) $ pip install vigorish
Verify Install
If you installed vigorish within a virtual environment, activate the environment and run the vig command. If you installed vigorish with pipx, simply run vig. If the install succeeded, the help documentation for the CLI should be displayed:
(vig) $ vig
Usage: vig [OPTIONS] COMMAND [ARGS]...

  Entry point for the CLI application.

Options:
  --help  Show this message and exit.

Commands:
  scrape  Scrape MLB data from websites.
  setup   Populate database with initial player, team and season data.
  status  Report progress of scraped data, by date or MLB season.
  ui      Menu-driven TUI powered by Bullet.
Next, run vig ui and verify that the UI displays:
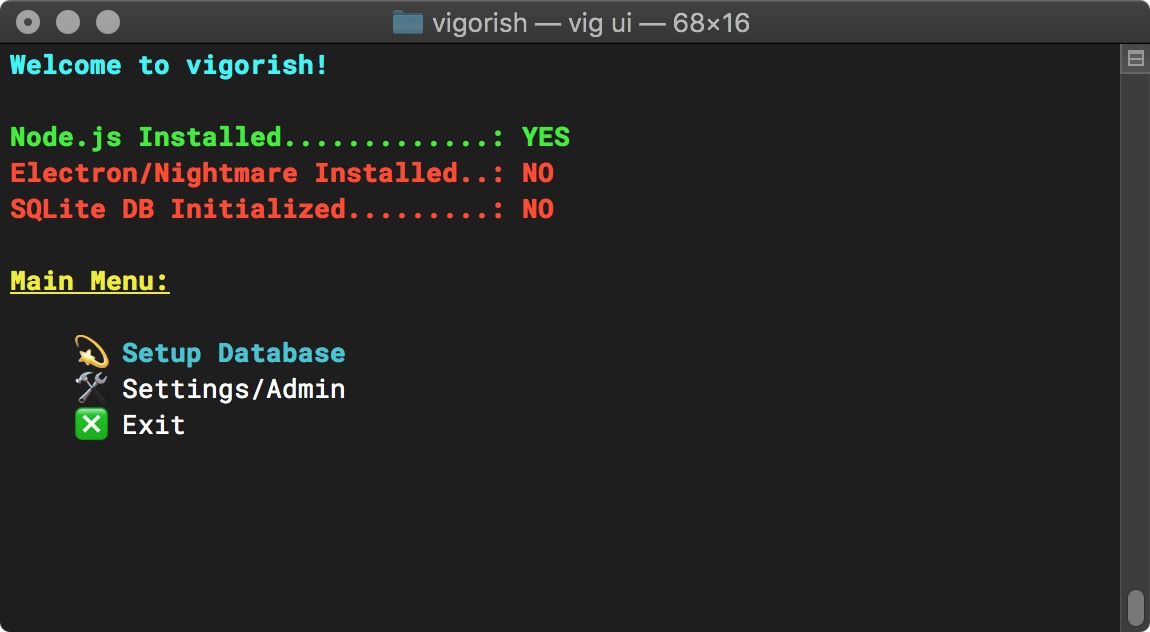
Main Menu (Prerequisites Installed)
If both the CLI help screen and the UI are displayed, the installation was successful! However, you can not begin scraping data just yet. You need to perform a few additional configuration steps first.
Config/Setup
There are quite a few settings that determine how vigorish scrapes data, where scraped HTML/JSON is stored, etc. The majority of these settings are stored in a JSON file, and the rest are stored in a file named .env
When you launch the UI or run any CLI command, vigorish looks for a folder named ~/.vig and creates the directory if it does not exist. Next, it looks for .env in the ~/.vig folder. If this file does not exist, a default .env is created with the following values:
AWS_ACCESS_KEY_ID=
AWS_SECRET_ACCESS_KEY=
AWS_DEFAULT_REGION=
CONFIG_FILE={YOUR_HOME_FOLDER}/.vig/vig.config.json
DATABASE_URL=sqlite:///{YOUR_HOME_FOLDER}/.vig/vig.db
These values are Environment Variables. They are loaded into the environment using the python-dotenv package, and their values can be accessed from code with the os.getenv function.
Next, vigorish uses the value of CONFIG_FILE to read the contents of vig.config.json. Just like .env, if this file does not exist a default config file is created. Let’s go back and discuss how to manage the values in .env before we discuss the settings available in vig.config.json.
Environment Variables
Run vig ui and use the arrow keys to select Settings/Admin from the main menu and press Enter. Then, select Environment Variables from the menu options:

Main Menu (Env. Variables Selected)
Press Enter and you should see the menu below:
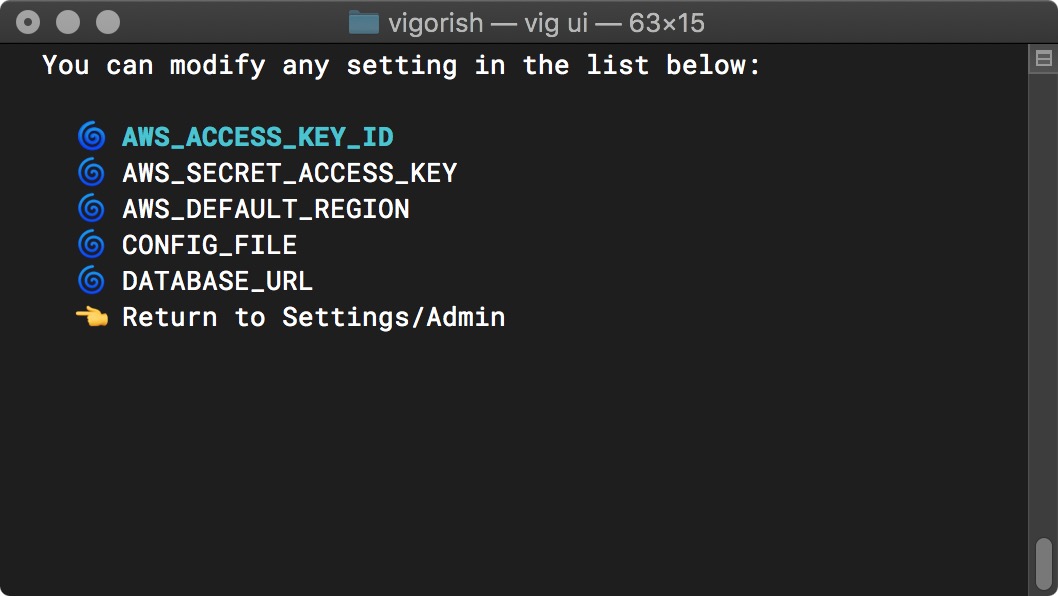
Environment Variables Menu
The first three settings in this list must be set if you wish to store scraped HTML/JSON documents in an S3 bucket. If you do not want to use this feature, you have the option to store scraped HTML in a local folder or to not store HTML files at all. JSON files must be stored in a local folder if you do not wish to store them in a S3 bucket.
The remaining environment variables are rather self-explanatory. If you wish to change the location/filename of vig.config.json, select CONFIG_FILE. If you wish to change the location/filename of the SQLite database, select DATABASE_URL .
Selecting any item in this list will show the current value of the environment variable. For example, if you select CONFIG_FILE you will see the menu below:
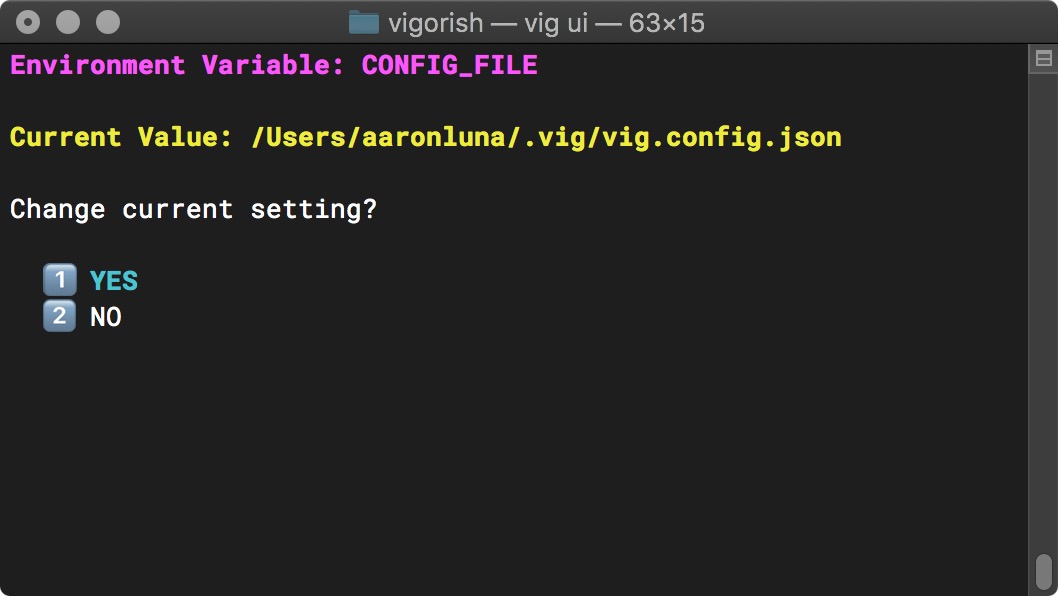
Environment Variable - Current Setting
You can return to the list of environment variables by selecting NO. If you select YES, you will be prompted to enter a new value.
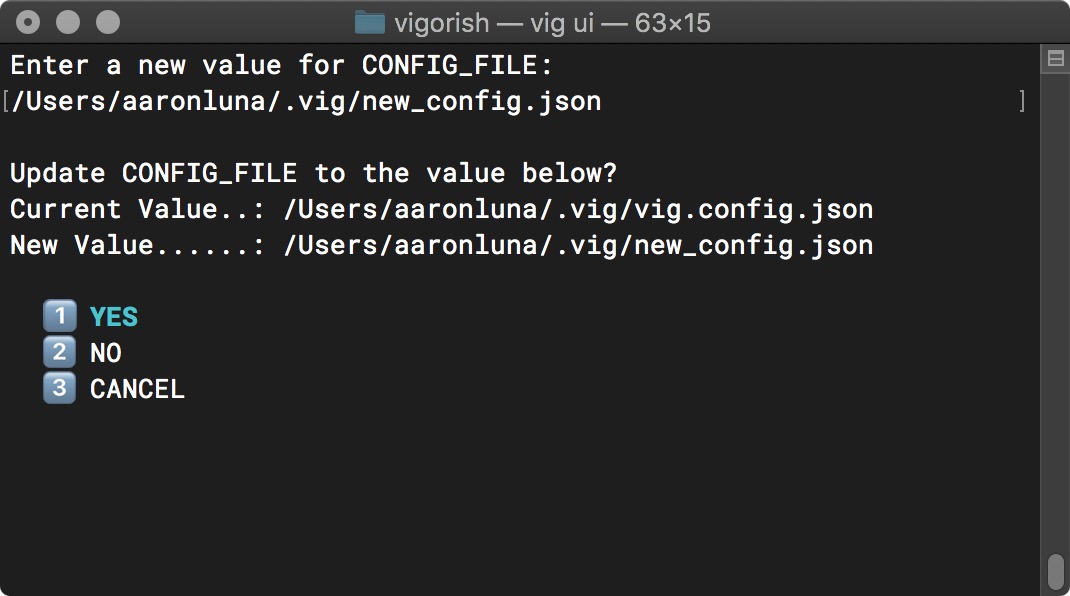
Next, you will be asked to confirm the new value is correct before it is applied. If it is not correct, selecting NO will prompt you to re-enter the new value. Selecting CANCEL will keep the current value and return to the previous menu:
Environment Variable - Change Setting
Please enter your AWS credentials if you plan on using the S3 storage feature. If you would like to change the location/name of the vig.config.json file and/or SQLite database file, please do so now. When complete, return to the Main Menu.
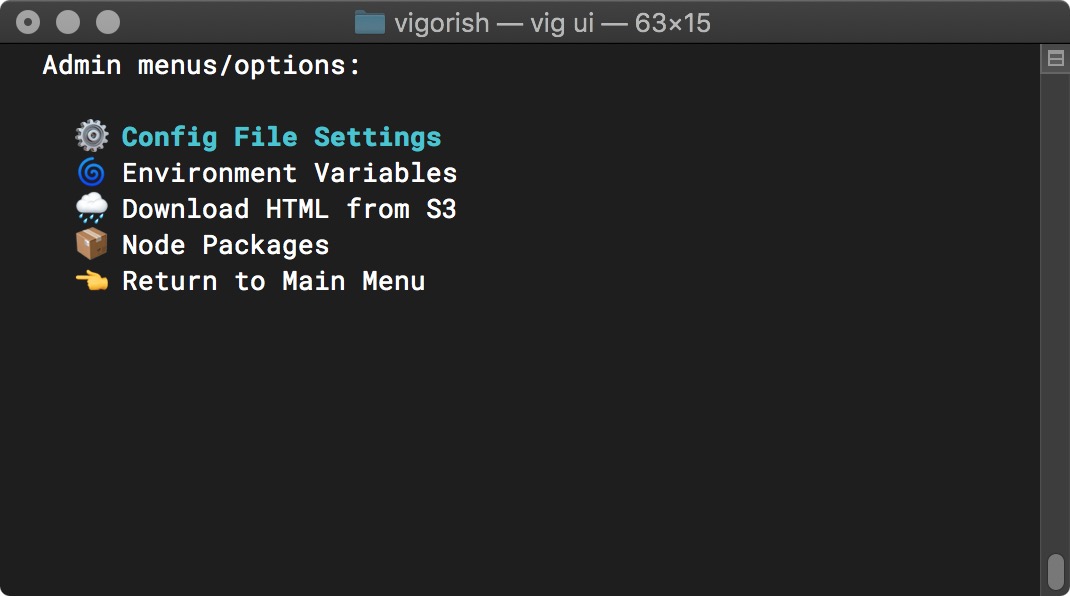
Config File Settings
Next, select Config File Settings from the Admin/Settings Menu:
Main Menu (Config File Settings Selected)
Press Enter and you should see the menu below:
The Config File Settings menu allows the user to view or modify the current value of any setting defined in vig.config.json. Please note the small up/down arrows that appear at various times in the video above. Whenever a menu contains more than eight items, it will be rendered as a scrolling menu. The arrows indicate that there are additional menu items that can be accessed by navigating through the list.
To make navigating the UI easier, options to return to the previous menu are added to the beginning AND end of the scroll menu (as opposed to normal menus which only have the return option at the end of the list).
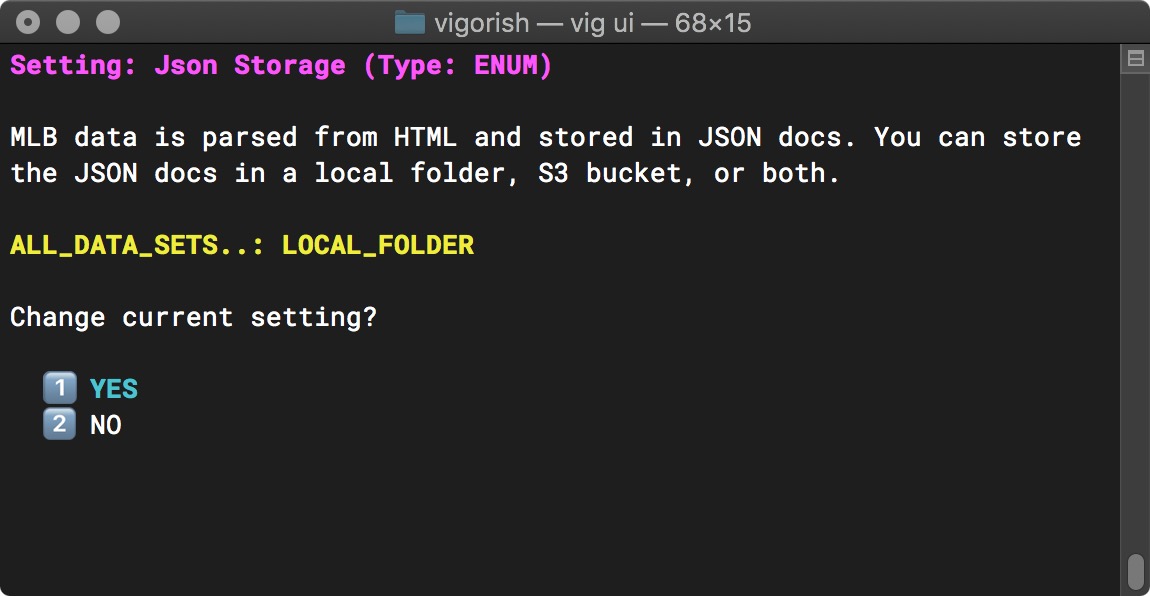
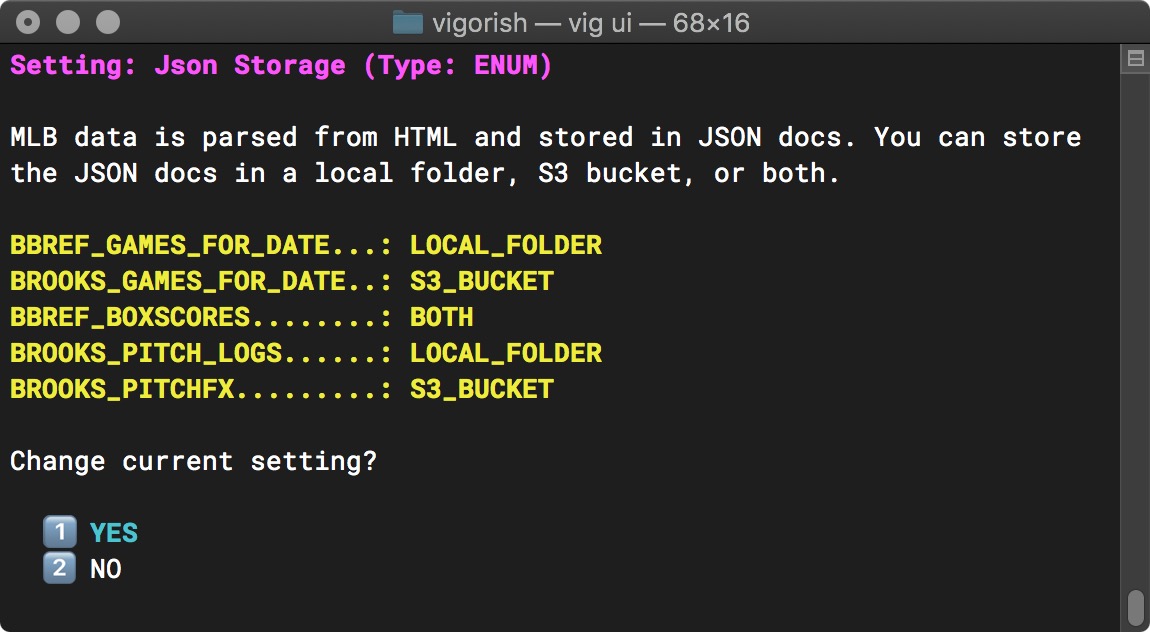
We will cover the purpose/effect of each config setting shortly. Selecting a config setting (press Enter) displays the setting name, data type, description and current setting as shown below:
Config File Settings - Change Setting
Within this menu, you are asked if you would like to change the current setting. In the screenshot above, the Json Storage setting has a current value of ALL_DATA_SETS..: BOTH. Most settings can be configured per data set OR or the same value can be used for all data sets.
If you choose to change the current setting, you are asked if you would like to use the same setting for all data sets:
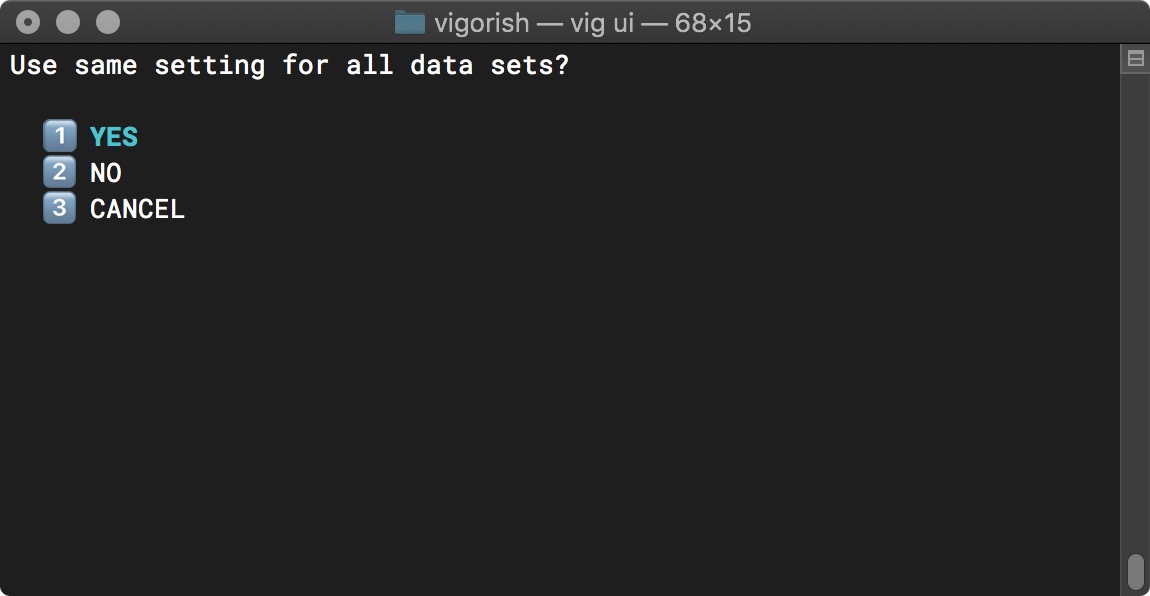
Use Same Setting For all Data Sets Prompt
Selecting YES will prompt you to select a new value:
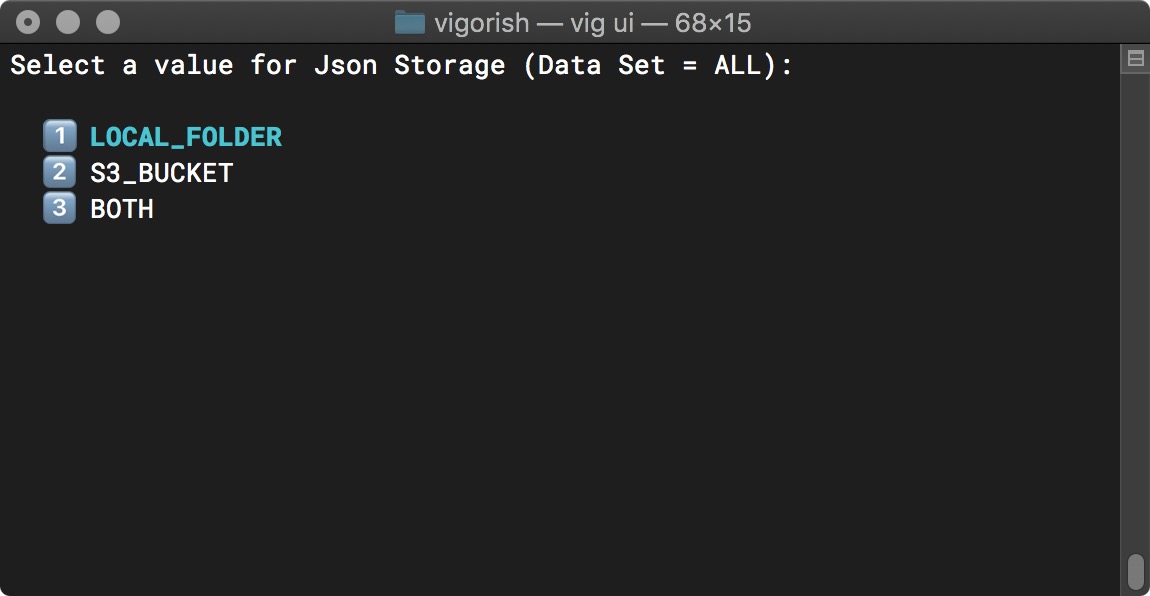
Change Config Setting (All Data Sets)
In this case, the data type of the setting is an Enum. For this data type, you can select a new value from a list of all possible values (all other data types (str, numeric, Path) will be typed in directly).
Going back one step, if you selected NO when asked if you would like to use the same setting for all data sets, you will be asked to enter a new value for the setting five times, once for each data set that can be scraped using vigorish.
The prompt for a single data type is shown below:

Change Config Setting (Single Data Set)
After entering values for all data types, you can verify that the new value was applied by selecting the setting you modified from the Config File Settings menu. If you chose to set separate values for each data set, you will see something similar to the screenshot below:
Updated Config Setting
With a fresh install, the following default settings are used:
Same setting for all data sets
STATUS_REPORT:SEASON_SUMMARYS3_BUCKET:your-bucket- This is a placeholder value, you must set this to the name of a S3 bucket that your AWS account has permission to create/read/delete objects.
SCRAPE_CONDITION:ONLY_MISSING_DATAURL_SCRAPE_DELAY:Delay is random (3-6 seconds)BATCH_JOB_SETTINGS:Batch size is random (50-80 URLs)HTML_STORAGE:NONE- By default, scraped HTML is NOT STORED since this will consume storage space very quickly. However, I frequently make changes to the parser functions and it is extremely useful and 100x quicker to store the HTML and run the updated parsers against local copies of scraped HTML. The owners of the scraped sites surely appreciate it as well.
HTML_LOCAL_FOLDER_PATH:html_storage/{year}/{data_set}/- All settings that are
data_type=Pathrecognize the two placeholder strings{year}and{data_set}. The path that is generated substitutes values in place of the placeholders using the date that the game occurred on and the data set being scraped.
- All settings that are
HTML_S3_FOLDER_PATH:{year}/{data_set}/html/JSON_STORAGE:LOCAL_FOLDER- Be default, JSON files containing parsed data are only stored in the local file system. If you would like to store JSON files in S3 or both S3 and the local file system, you must enter your AWS credentials in the Environment Variables menu and then update this setting.
JSON_LOCAL_FOLDER_PATH:json_storage/{year}/{data_set}/JSON_S3_FOLDER_PATH:{year}/{data_set}SCRAPED_DATA_COMBINE_CONDITION:ONLY_MISSING_DATACOMBINED_DATA_STORAGE:LOCAL_FOLDERCOMBINED_DATA_LOCAL_FOLDER_PATH:json_storage/{year}/combined_dataJSON_S3_FOLDER_PATH:{year}/combined_data
Different setting for each data set
BATCH_SCRAPE_DELAYBBREF_GAMES_FOR_DATE:Delay is random (5-10 minutes)BROOKS_GAMES_FOR_DATE:Delay is random (30-45 minutes)BBREF_BOXSCORES:Delay is random (5-10 minutes)BROOKS_PITCH_LOGS:Delay is random (30-45 minutes)BROOKS_PITCHFX:Delay is random (30-45 minutes)
I arrived at these settings through trial and error. I know that it takes much longer to scrape data from brooksbaseball.net with a 30-45 minute delay every 50-80 URLs, but I have never been banned with this configuration. Without the batch delay, I was always blocked within an hour or two.
Please make any changes you wish at this point. When you have everything setup to your liking, return to the Main Menu.
Install Node Packages
Next, select Node Packages from the Admin/Settings Menu:
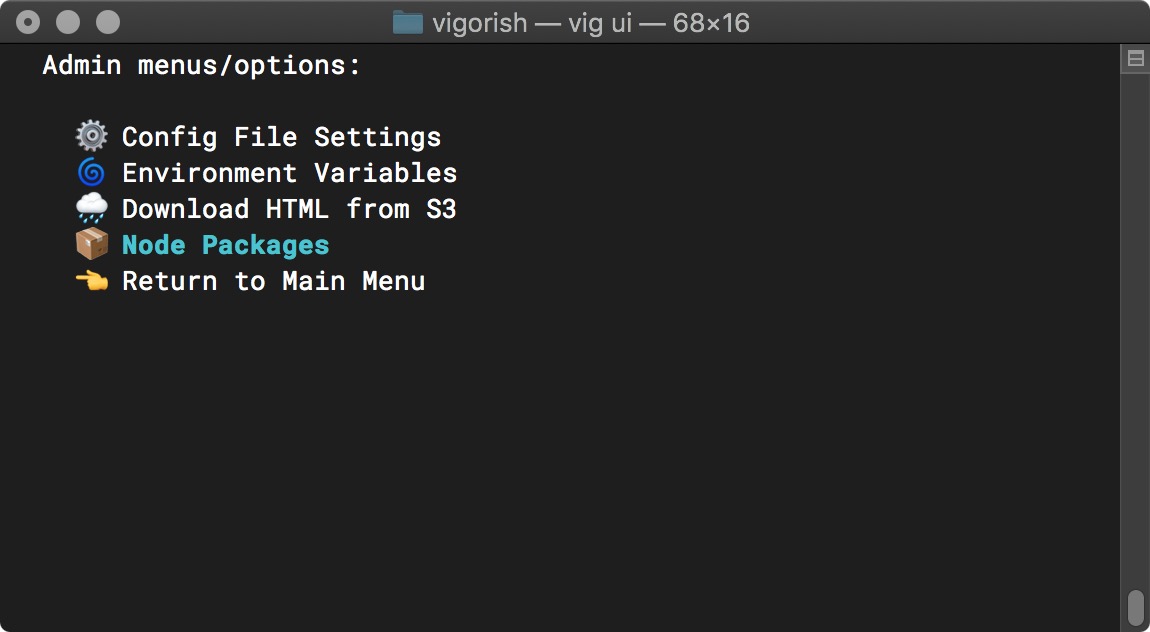
Main Menu (Node Packages Selected)
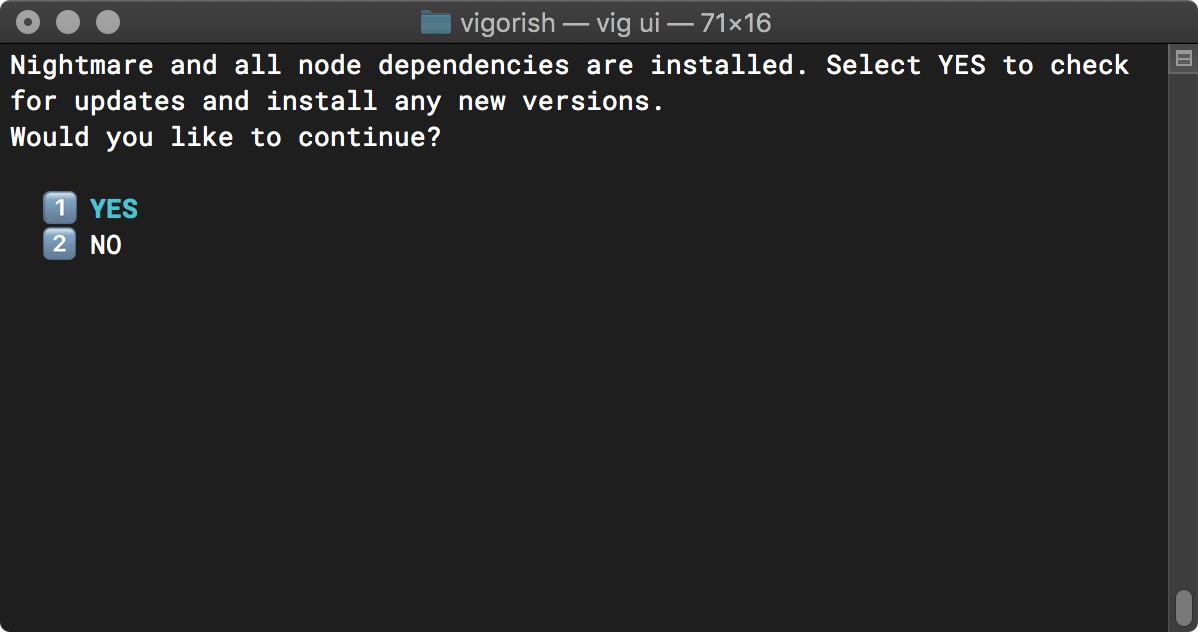
Press Enter and you will be prompted to install all node dependencies:
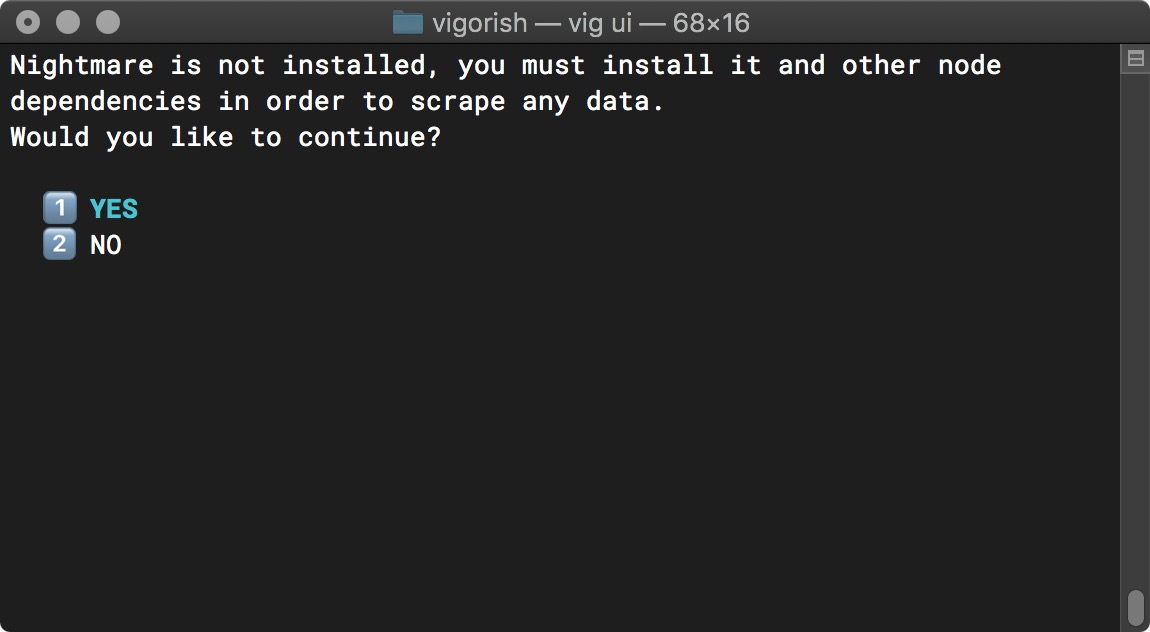
Install Node Packages - Prompt
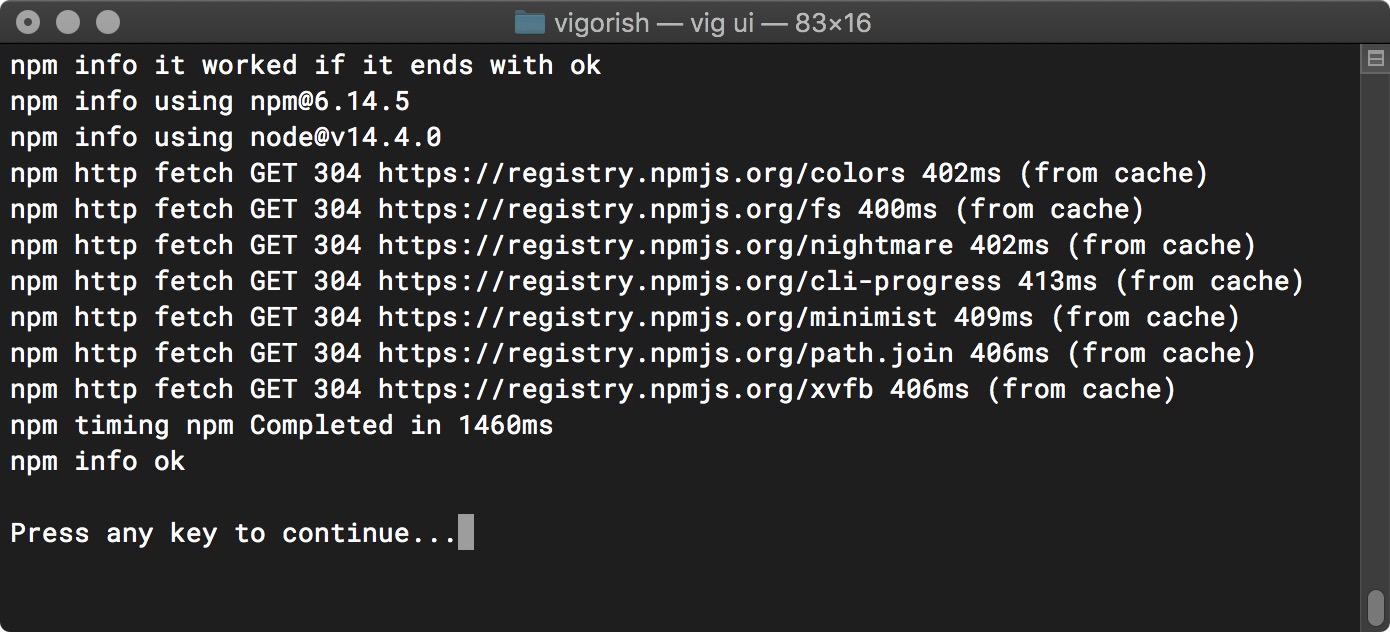
Select YES to begin the installation. You will see the output from npm, and when complete simply press any key to continue:
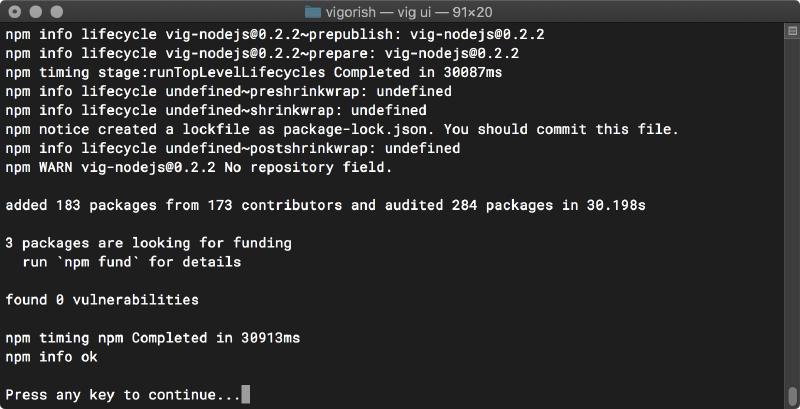
Install Node Packages - Complete
After successful installation, the Node Packages menu will instead ask if you would like to update the installed node packages:
Update Node Packages - Update
Select YES to check for updates. If any are available, they will be updated automatically and the output from npm will be displayed as shown below:
Update Node Packages - Complete
Initialize SQLite Database
Finally, select Setup Database from the Main Menu:
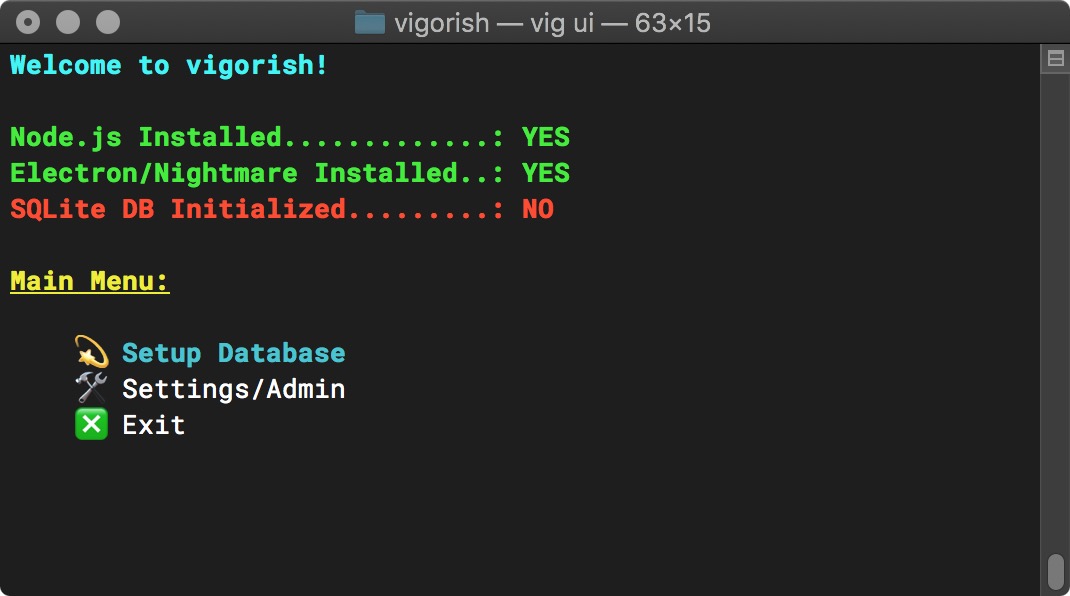
Main Menu (DB has not been setup)
Press Enter and you will be prompted to initialize the SQLite database:
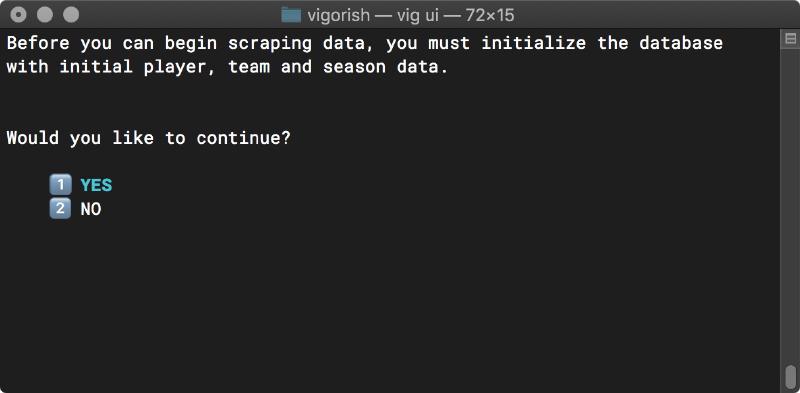
Initialize Database - Prompt
Select YES to begin the initialization process. After all tables have been populated with initial data, press any key.

Initialize Database - Complete
If you are re-installing vigorish or moving an existing installation to a different system, you may have scraped data that you would like to import. You will be prompted to do this after the database has been installed:
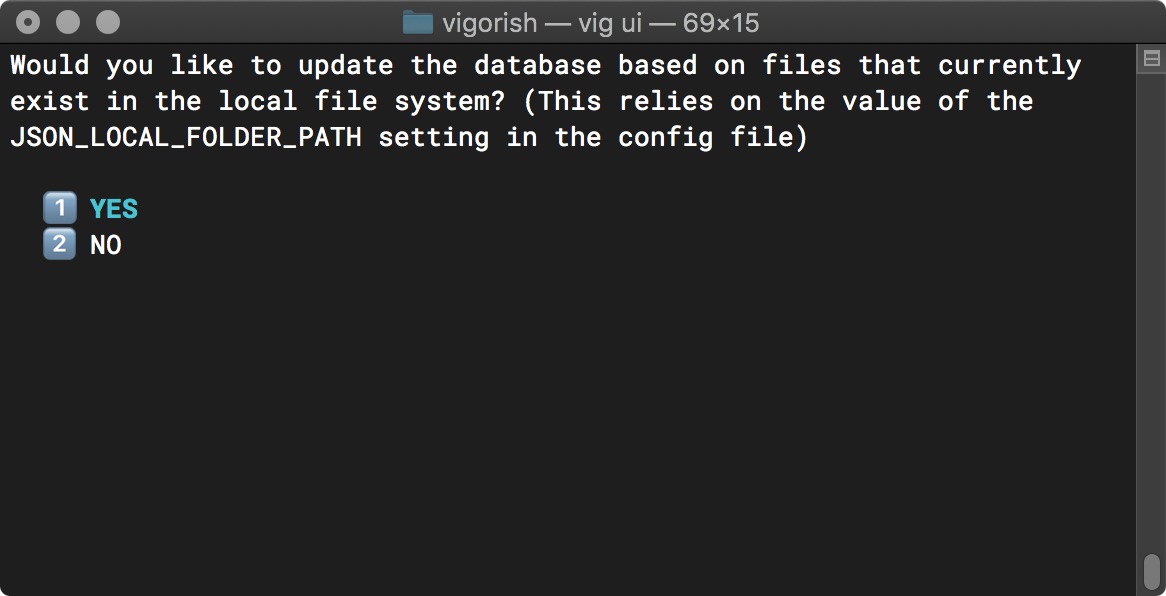
Import Scraped Data - Prompt
If you select YES, any data within the path specified by the JSON_LOCAL_FOLDER_PATH config setting will be imported. The import process will look for yearly data as shown below:
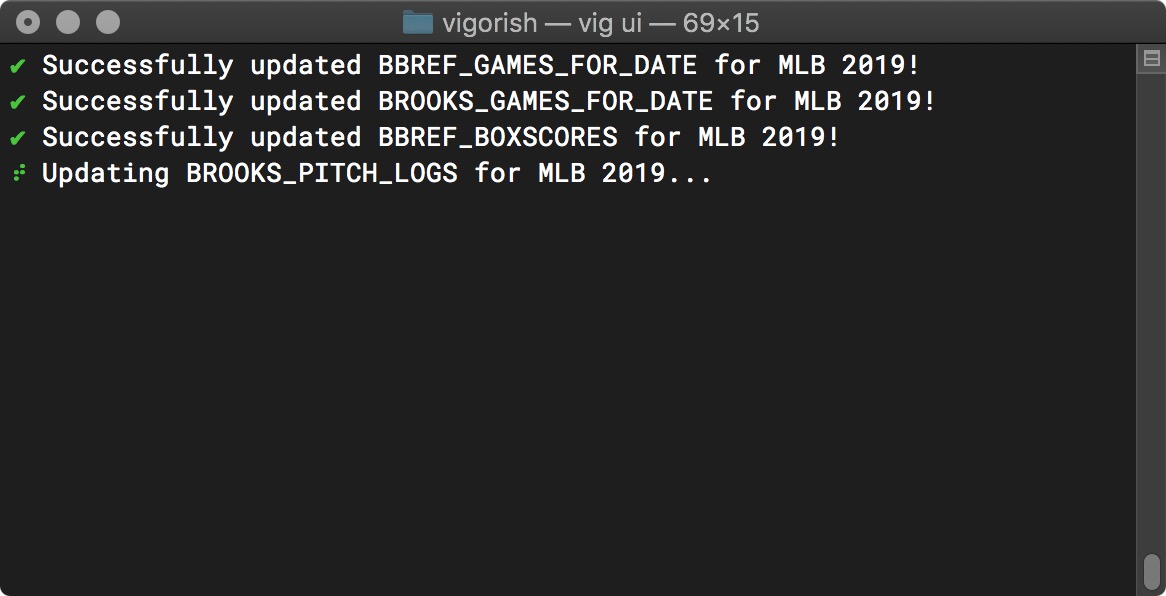
Import Scraped Data - In Progress
After all of the data within your local cache folder has been added to the database, you will automatically be returned to the Main Menu.
Usage
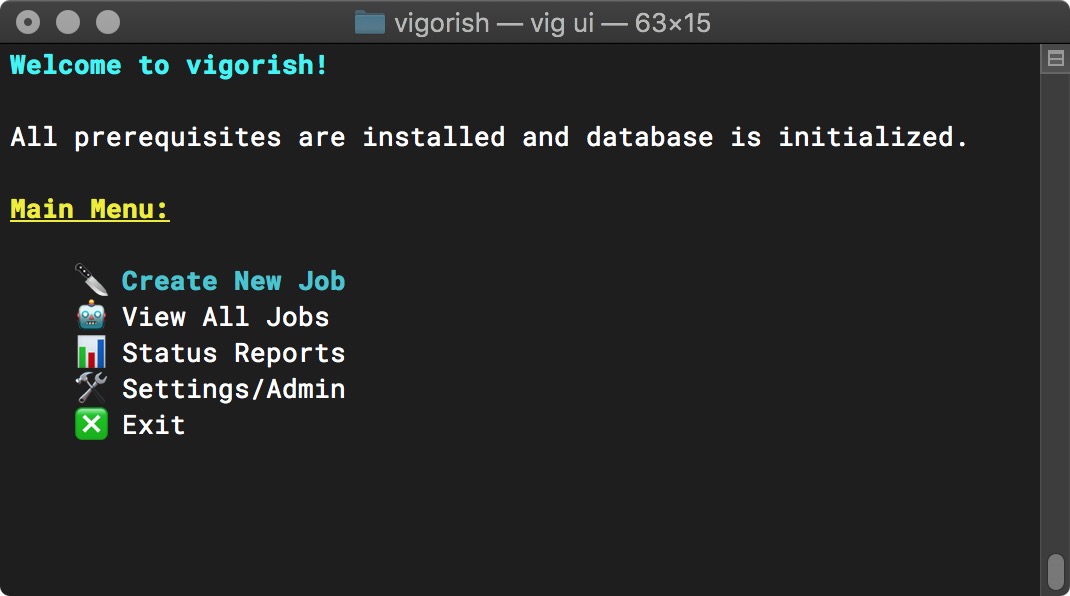
Congratulations! If you made it this far, you have successfully installed and configured vigorish! After installing Nightmare/Electron and initializing the database, the Main Menu will display three new options (Create New Job, View All Jobs and Status Reports):
Main Menu (Setup Complete)
For explanations of these menu items, continue reading the User Guide. Otherwise, return to the Project Documentation home page: