How to Optimize Performance of Windows 10 and Visual Studio in VMWare Fusion

Photo by Daniel Olah on Unsplash
The majority of my work consists of C#/.NET development, and Visual Studio+ReSharper is my preferred IDE. Since I’m a Mac user, I run VS on a Windows 10 instance with VMWare Fusion. For the first month or so everything ran smoothly. However, the performance of the VM degraded significantly over time, especially with multiple Visual Studio projects open in the VM and resource-hungry programs running on the Mac simultaneously.
Thankfully, after changing a few settings and clearing unnecessary files I was able to improve the speed and responsiveness of both my Mac and the Windows 10 instance. I’ve documented these steps below to help others who find themselves in a similar situation.
Settings in VMWare Fusion
I found that a combination of 2 processor cores with 4096 MB of memory works best for my needs (Note: My MacBook Pro has a 2.8GHz Intel quad core i7 with 8 GB RAM and Intel Iris GPU with 1536 MB). Also, select “Enable hypervisor applications in this virtual machine” as shown in Figure 1.
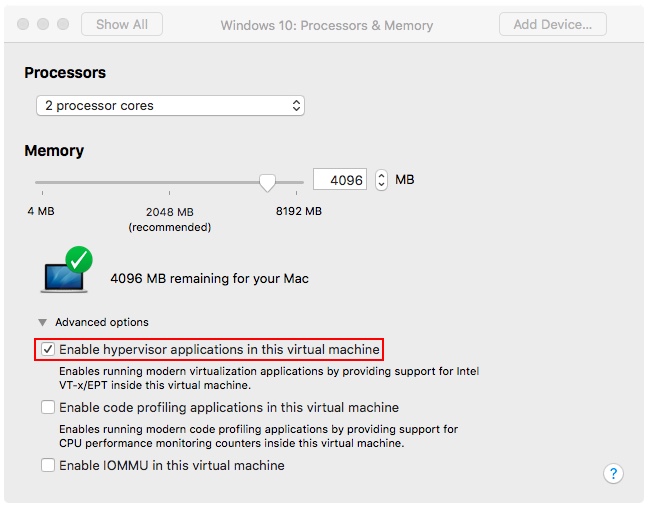
Figure 1 - Processors & Memory Settings
I also saw a performance boost by changing the driver for the hard drive bus type to SCSI. On the Hard Disk Settings page, expand the “Advanced options” menu and change the Bus type to SCSI. Also, select “Pre-allocate disk space” as shown in Figure 2:
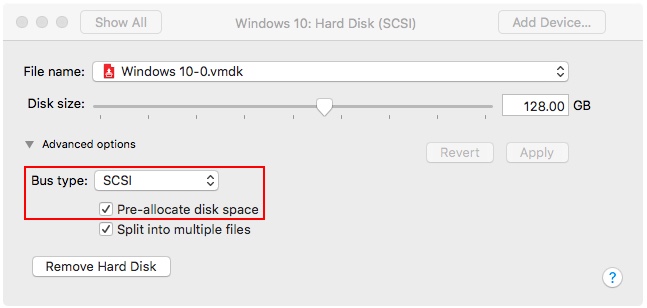
Figure 2 - Hard Disk Settings
Settings in the .VMX File
VMWare only exposes a small number of settings through the UI. There are hundreds of additional configuration options which can only be modified by editing the .vmx file.
Before changing the .vmx file itself, launch TextEdit and open the Preferences menu. Make sure Smart quotes is unchecked (See Figure 3 below). If this option is checked and you save the .vmx file, you will not be able to boot your VM.
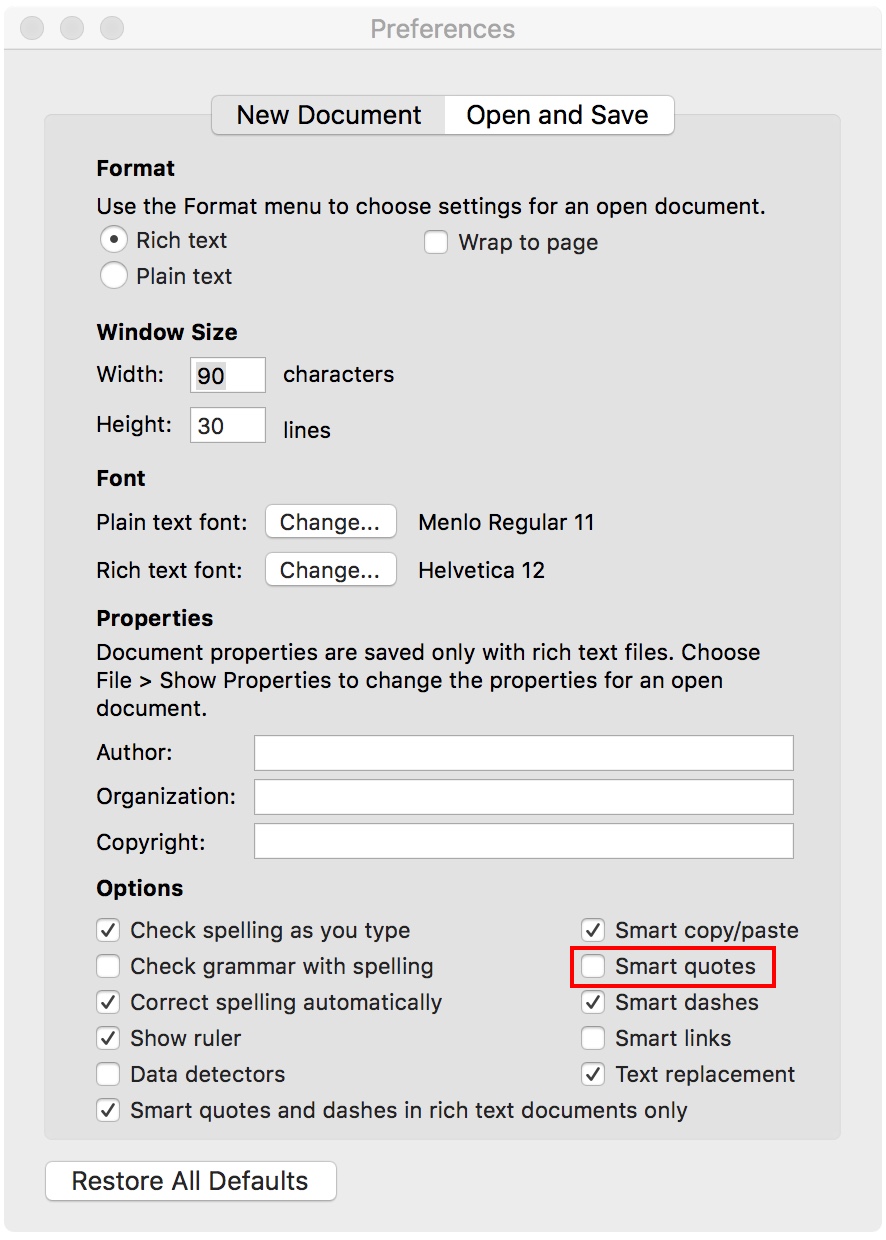
Figure 3 - TextEdit Preferences menu showing location of Smart quotes setting
The easiest way to access the .vmx file is from the list of virtual machines in the main VMWare Fusion window. If the list of virtual machines is not visible, go to Window -> Virtual Machine Library.
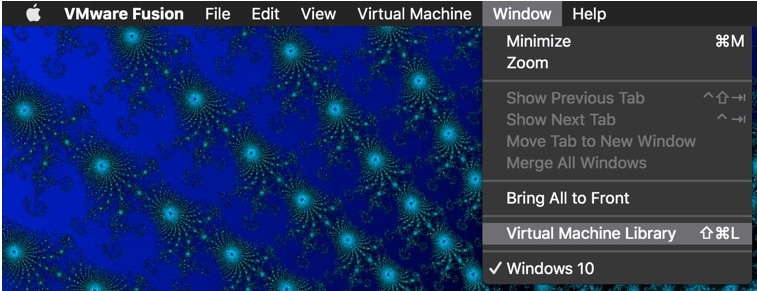
Figure 4 - The virtual machine library can be accessed from the Window menu
Next, shutdown the VM. Ensure that it is completely shutdown and not in a suspended state.
Right click on the VM as shown in Figure 5. If you press and hold the ⌥ (ALT) key, Show in Finder will change to Open Config File in Editor.
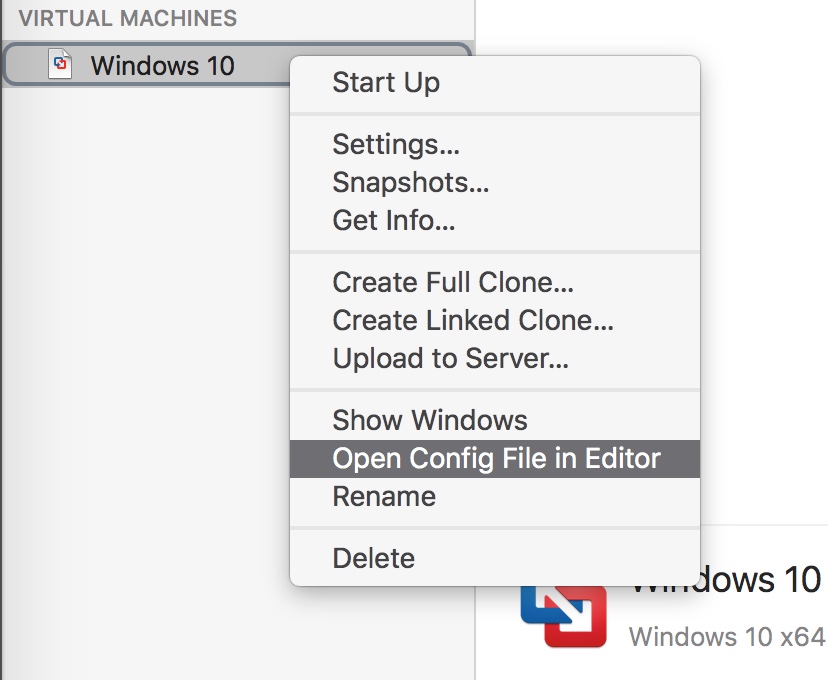
Figure 5 - Menu options available with the ALT key pressed
There are other hidden options within this menu, try holding the ^ (CTRL) key or ⌘ (CMD) key and the menu item will change to Show Config File in Finder and Open Latest Log File, respectively.
Right-click on your VM while holding the ⌥ (ALT) key and select Open Config File in Editor. This will launch TextEdit. Make the following changes to the .vmx file:
Find ethernet0.virtualDev = “e1000e” and change it to ethernet0.virtualDev = “vmxnet3”.
E1000E is the default value and is recognized by Windows as an Intel 82574L Gigabit NIC. VMXNET3 is a virtual NIC which is optimized for use in a VM and is not based on a physical part (Figure 6 shows how the two NICs are displayed in Windows) Changing this value should drastically improve network performance. If you would like to read a detailed comparison of these two NICs and others which can be used with VMWare, check out this page.
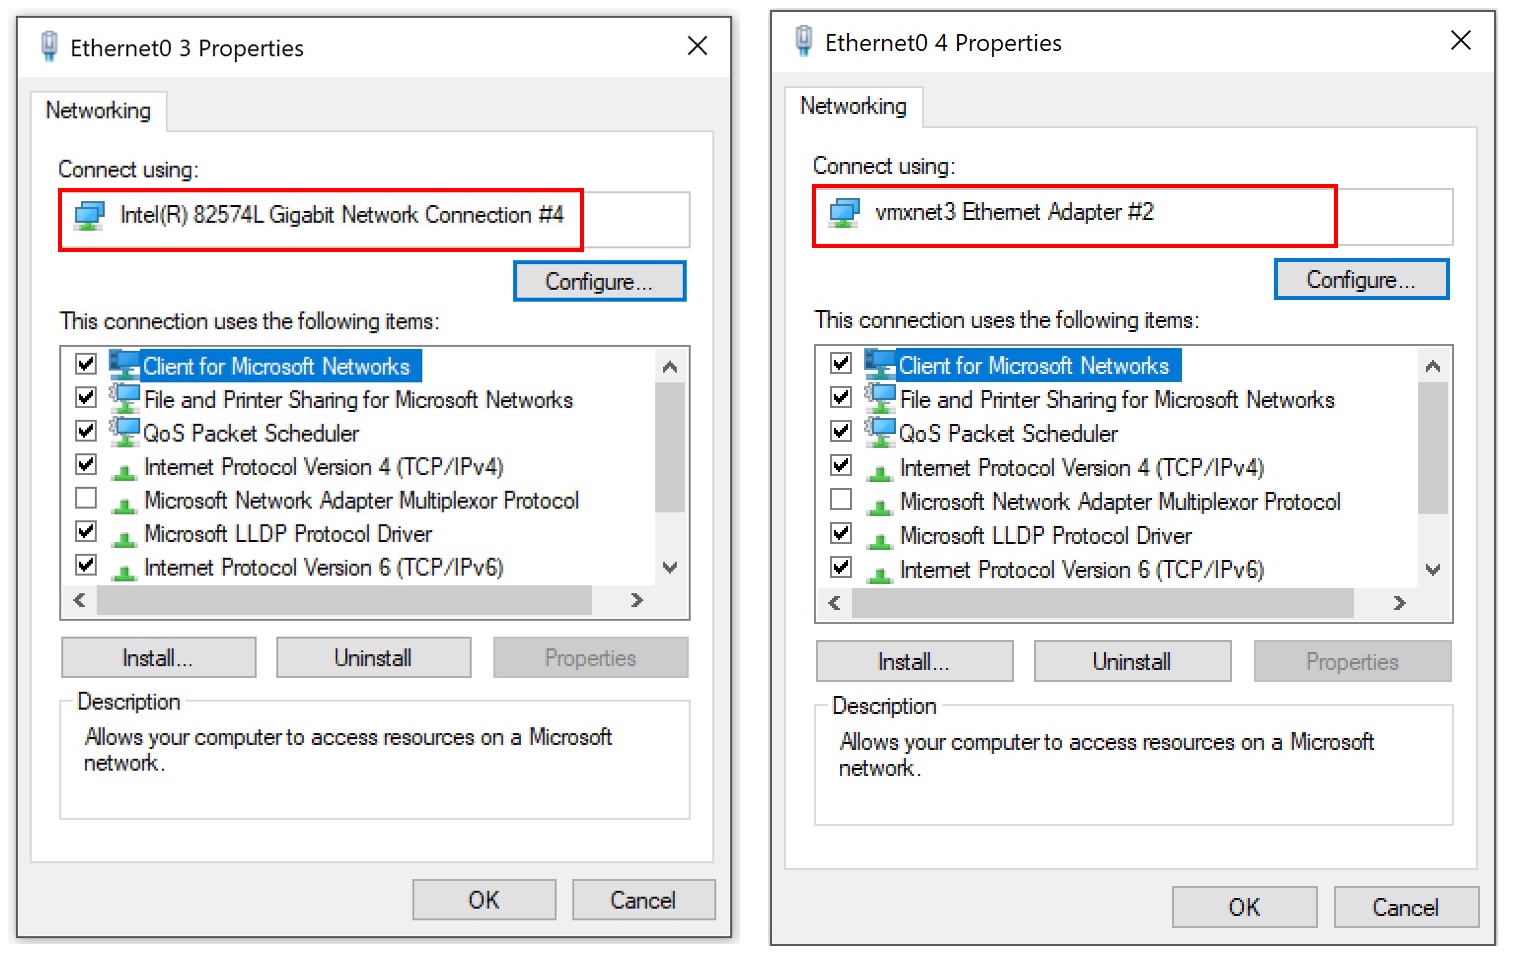
Figure 6 - Network adapter properties for E1000E and VMXNET3 within Windows
Add the following lines to the .vmx file:
Table 1 Configuration settings to add to .vmx file1 Add to .VMX File Notes scsi0:0.virtualSSD = 1 Optimizes disk I/O for SSD. Only use this if your Mac has an SSD! prefvmx.useRecommendedLockedMemSize = “TRUE” Speed up I/O at the cost of increased memory usage in the host OS sched.mem.pshare.enable = “FALSE” Disables page sharing MemAllowAutoScaleDown = “FALSE” Disables scale down of memory allocation 1Source: http://artykul8.com/2012/06/vmware-performance-enhancing/ 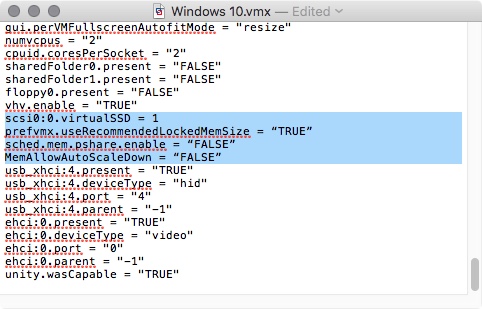
Figure 7 - .VMX file with additional settings added
Windows Update Cleanup
One of the main causes of slower performance in my Windows VM turned out to be caused by Windows Update. I noticed that I was constantly running out of hard drive space, and would allocate more space from the host OS to improve performance. It turns out that Windows keeps copies of all updates, and performing a normal Disk Cleanup does not remove these files even when they are completely redundant.
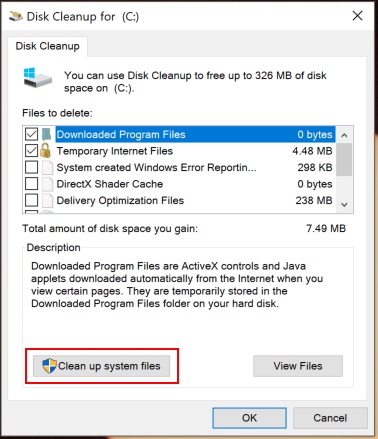
Figure 8 - Disk Cleanup Tool
The Disk Cleanup tool is located at Control Panel -> System and Security -> Administrative Tools. Note that in Figure 8, performing the cleanup will free up less than 10 MB. You need to click the “Clean up system files” button and select the checkbox for “Windows Update Cleanup” as shown in Figure 9:
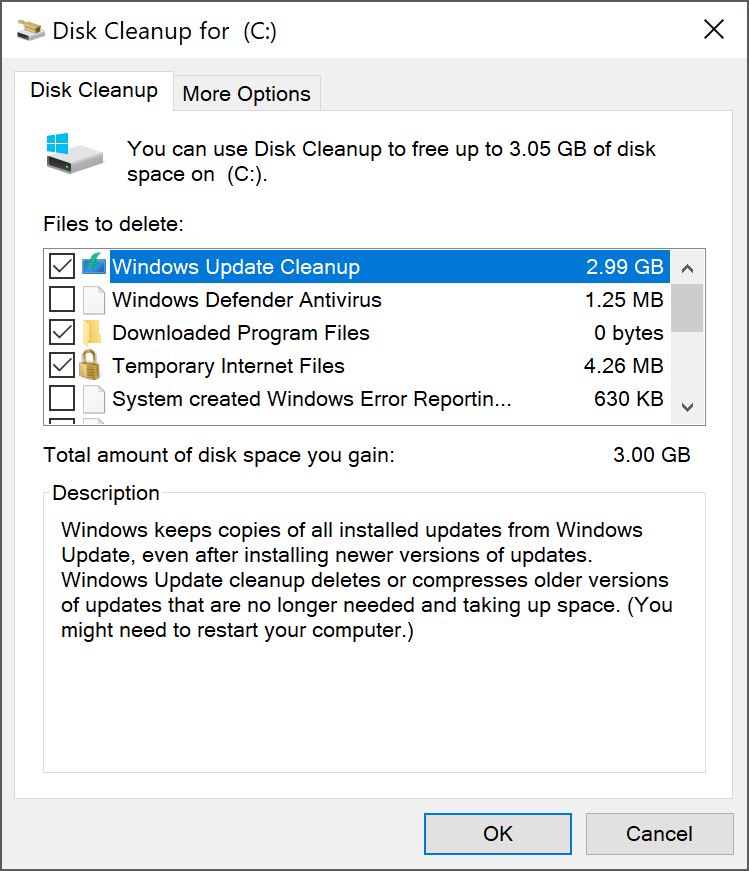
Figure 9 - Disk Cleanup Tool with Windows Update Cleanup option selected
Now, the Disk Cleanup tool shows that 3 GB of space will be reclaimed. Running this tool once a month should improve the performance of your Windows 10 VM dramatically. The cleanup process took approximately 45 minutes to complete when I ran it for the first time.

Figure 10 - Disk Cleanup in progress
Virtual Memory Settings in Windows 10
Another way to realize performance gains is by adjusting the size of the paging file. Right-click the Start button and select “Settings”. Enter “performance” in the search box and select “Adjust the appearance and performance of Windows” as shown in Figure 11:
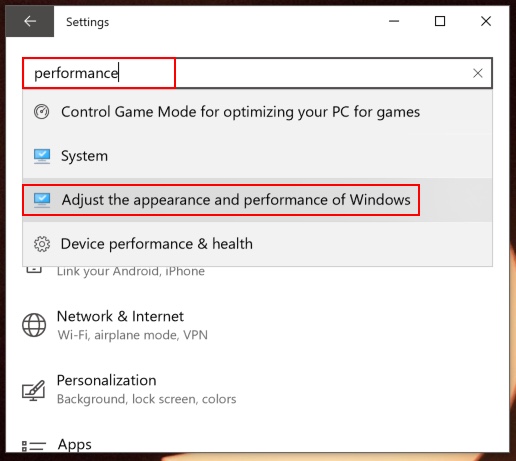
Figure 11 - Windows Settings Search Results
This will open Performance Options. Navigate to the Advanced tab and click the Change… button. Uncheck the “Automatically manage paging file size for all drives” checkbox and select the radio button for “Custom Size”. For both Initial and Maximum Size enter twice the amount of RAM that the VM has allocated. For my setup, this equals 2 * 4096 MB = 8192 MB. See Figure 12:
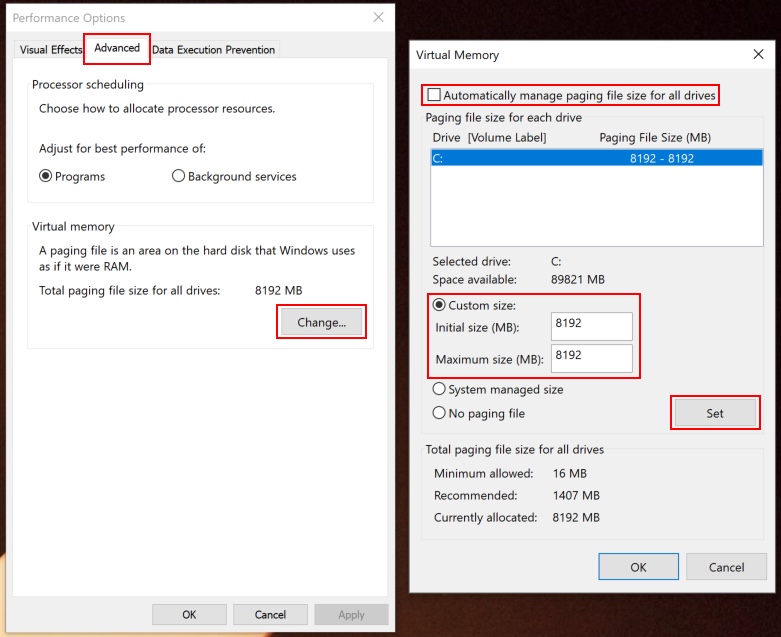
Figure 12 - Changes to paging file size within Performance Options
Click the Set button and reboot the VM in order to apply the changes.
Remove AppData Folders
If Visual Studio is still sluggish, you may be experiencing the issue described in this blog post. Using the extremely useful Process Monitor (the link in the blog post is broken and outdated), the author found that Visual Studio was accessing the location C:\Users...\AppData\Local\Microsoft\WebSiteCache on nearly every IDE operation. The author zipped the folder contents and moved them elsewhere, but it appears from the comments that the files are not needed. Moving/deleting the contents of this directory completely fixed the sluggishness in Visual Studio.
Here is a link to Sysinternals Suite which is a collection of free troubleshooting utilties from Microsoft (Process Monitor is part of the suite). Again, I am linking this because the link in the original blog post is broken and outdated.